
2din aftermarket radio in a D2!
#1
 05-12-2018, 09:09 AM

Hi!
As per juke179r suggestion, I'm starting this new thread to go into the details on how to accomplish this upgrade. I'm putting together a pdf with most of the details, but in the meantime to start, lets talk budget:
I started from:
1. 2DIN (chinese) stereo with navigation and bluetooh. I picked one with the best average customer reviews in amazon. Comes with backup camera, so it was a plus. $160
2. Spare dashboard central console. I would highly recomend that you work on a spare and not in your original one, just in case something goes wrong with the craftmanship. If you are lucky and can get one from your preferred yard or u pull and pay, great. I wasn't, so got one in a very good shape on ebay for $45. You will need to do a lot of work on this frame, so if it is structurally sound (no cracks, broken trims, etc) it should be fine. Bondo will help anyway to make it nice!
3. This is important. If you want to keep the harness of the truck stock (it was one of my goals) you need a Metra 70-1786 hardness wiring harness. $8.77 in amazon. The so claimed compatible harness adapter has missing pins (all of them does, seems that metra thinks that steering wheel controls are not necessary), but will deal with that later. Also, if you have the alpine radio without navigation (high line according to the rave) you need to go through the stock amplifier, be sure then that whatever stereo you get, it has the pre-amp outputs (normally RCAs) and your metra or similar wiring adapter has the RCAs counterpart connectors. Again working towards keeping things stock.
4. If you want to have the USB port in the dash, like I did, you probably would want to use a panel mount USB (I used this ). The shorter the better, there wiill be limitted space to accomodate the excess cabling)~$10.
5. I also got another that fits exactly the hole for the cigarette lighter, that has also an aux in. Here, . $9.49
6. Misc hardware (butt crimp connectors, 2 wire plugs, etc), sand paper, black paint (semi-gloss and compatible with plastic, don't go with automotive), bondo, black foamy cardboard from dollar tree (I used a couple few small pieces, so taking some from your kids stock should be fine) and time, patience and consistent work. Total here, not including labor: ~$50 or less.
So, overall this was a ~$280 project. If you also want to go with measuring the temperature, pressure, humidity, etc, this is an additional $60 and a bit more work. Some electronic skills recommended but not mandatory.
More to come!
Just an additional comment. If you end up buying a chinese radio, be patient and don't get into rrrrr... mode. Expect the instructions to be almost non existent or not for quite the model that you got, the customer service to be not very helpful (even useless) and some language barrier, and be prepared to read a lot and do research by yourself. Fortunately, despite some look and feel and packaging differences, the wiring and functionality in all the brands are almost the same, I went down the path and maybe I can help.
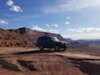
This whole project started becuse i wanted to have the Moab trail map on the gps without a bunch of devices protuding or hanging everywhere in the truck, and in particular falling into the pit of doom while going down the secret spire trail.
As per juke179r suggestion, I'm starting this new thread to go into the details on how to accomplish this upgrade. I'm putting together a pdf with most of the details, but in the meantime to start, lets talk budget:
I started from:
1. 2DIN (chinese) stereo with navigation and bluetooh. I picked one with the best average customer reviews in amazon. Comes with backup camera, so it was a plus. $160
2. Spare dashboard central console. I would highly recomend that you work on a spare and not in your original one, just in case something goes wrong with the craftmanship. If you are lucky and can get one from your preferred yard or u pull and pay, great. I wasn't, so got one in a very good shape on ebay for $45. You will need to do a lot of work on this frame, so if it is structurally sound (no cracks, broken trims, etc) it should be fine. Bondo will help anyway to make it nice!
3. This is important. If you want to keep the harness of the truck stock (it was one of my goals) you need a Metra 70-1786 hardness wiring harness. $8.77 in amazon. The so claimed compatible harness adapter has missing pins (all of them does, seems that metra thinks that steering wheel controls are not necessary), but will deal with that later. Also, if you have the alpine radio without navigation (high line according to the rave) you need to go through the stock amplifier, be sure then that whatever stereo you get, it has the pre-amp outputs (normally RCAs) and your metra or similar wiring adapter has the RCAs counterpart connectors. Again working towards keeping things stock.
4. If you want to have the USB port in the dash, like I did, you probably would want to use a panel mount USB (I used this ). The shorter the better, there wiill be limitted space to accomodate the excess cabling)~$10.
5. I also got another that fits exactly the hole for the cigarette lighter, that has also an aux in. Here, . $9.49
6. Misc hardware (butt crimp connectors, 2 wire plugs, etc), sand paper, black paint (semi-gloss and compatible with plastic, don't go with automotive), bondo, black foamy cardboard from dollar tree (I used a couple few small pieces, so taking some from your kids stock should be fine) and time, patience and consistent work. Total here, not including labor: ~$50 or less.
So, overall this was a ~$280 project. If you also want to go with measuring the temperature, pressure, humidity, etc, this is an additional $60 and a bit more work. Some electronic skills recommended but not mandatory.
More to come!
Just an additional comment. If you end up buying a chinese radio, be patient and don't get into rrrrr... mode. Expect the instructions to be almost non existent or not for quite the model that you got, the customer service to be not very helpful (even useless) and some language barrier, and be prepared to read a lot and do research by yourself. Fortunately, despite some look and feel and packaging differences, the wiring and functionality in all the brands are almost the same, I went down the path and maybe I can help.
This whole project started becuse i wanted to have the Moab trail map on the gps without a bunch of devices protuding or hanging everywhere in the truck, and in particular falling into the pit of doom while going down the secret spire trail.
Last edited by lrdb01; 05-12-2018 at 09:28 AM. Reason: Missing sentence

#7
05-12-2018, 08:21 PM

#10
05-13-2018, 12:57 AM

Recovery Vehicle
But if I will do it again will go with this:
https://www.amazon.com/Included-Navi...29MMHK93RXF0CY
Seems more compact, and a bit more of space will make things a bit easier.