
DIY: Custom iPod Interface Fabrication (PICS!)
#1
 02-25-2012, 08:54 PM


Join Date: Dec 2011
Location: Bucks County, PA
Posts: 16
Likes: 0
Received 0 Likes
on
0 Posts
I've seen a few threads regarding iPod/iPhone integration before, but I've always been left wondering "why do I HAVE to store the iPod/iPhone in the glovebox, center console, etc?" So, always favoring the "factory" look, I set out to fabricate an integration system that looked, well, factory!
Much of my inspiration came from this thread by JMT (thanks!):
https://landroverforums.com/forum/di...ictures-12252/
I, too used the Grom Audio iPod interface to replace my 6 disc changer:
Rover LandRover 99-05 USB Bluetooth iPod car interface adapter
My idea was was to integrate the iPod/iPhone into the ash tray, for 3 reasons:
1. Stock look. If iPods/iPhones existed in 2000, Land Rover could/should have offered this an interior option.
2. Security. Upon exiting the truck, I'm able to simply grab my iPhone and push the tray shut. This eliminates any kind of temptations for thieves, as there is no evidence of an iPod/iPhone set-up.
3. Stability. There is no clanking, flopping or otherwise moving around while driving. That's good.
Items Used:
*Grom iPod Interface w/included 3.5mm input cable AND optional iPod connection cable (+$24.99)
*1 Apple iPhone 4 dock:
Apple iPhone 4 Dock - Apple Store (U.S.)
*Rover Radio Removal Tools:
Radio Removal Tool (LRA-76-001ABP Same Fit As Genuine Part # C10036-REV A) - Land Rover radios from Atlantic British
*Plastic Weld:
http://www.permatex.com/products/aut...astic_Weld.htm
*Legos. Yes, I said Legos. More on that in a minute...
*Dremmel. Hours of Dremmeling... Ugh.
Prep:
Our victims:
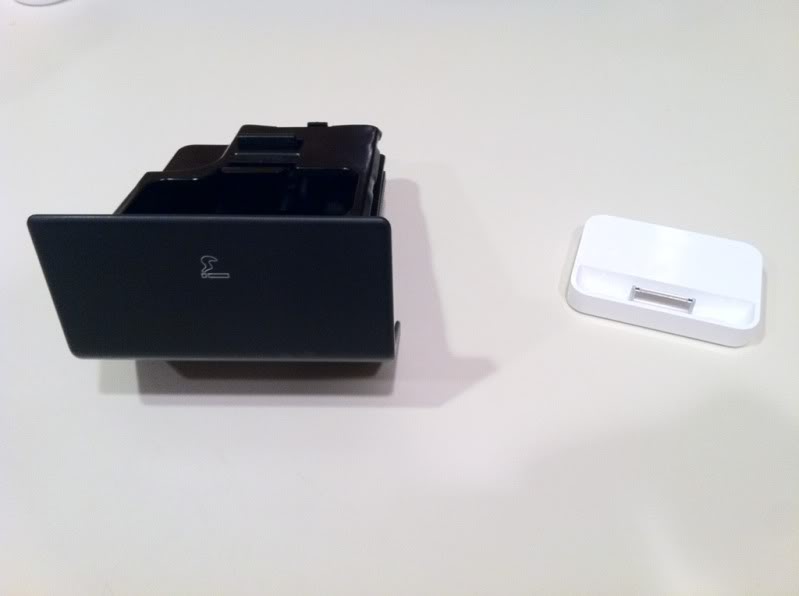
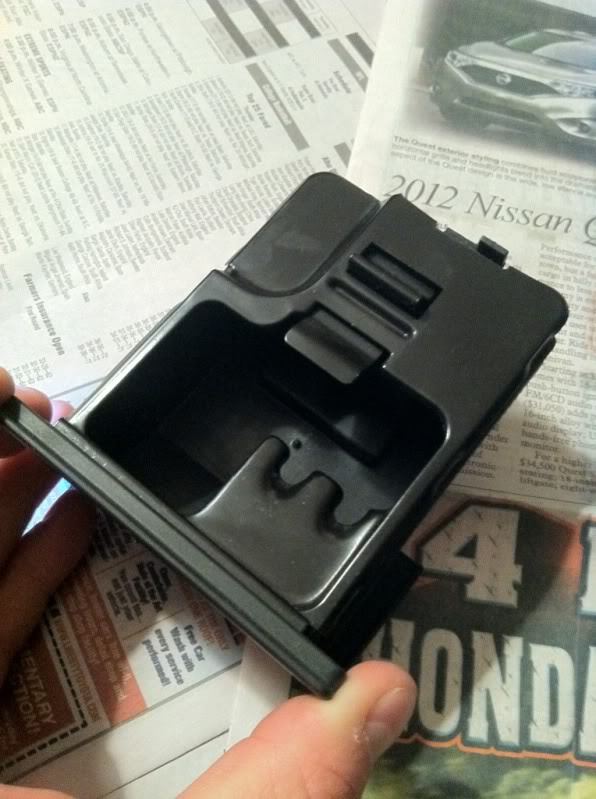
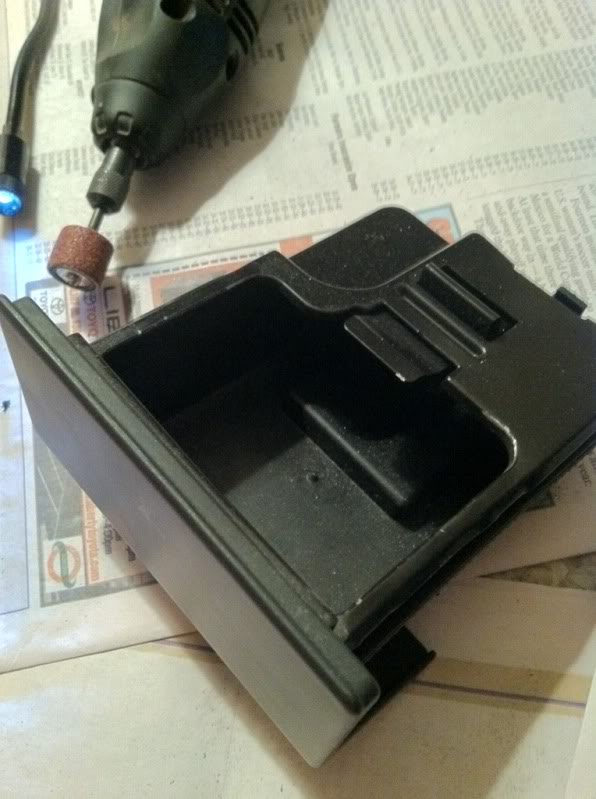
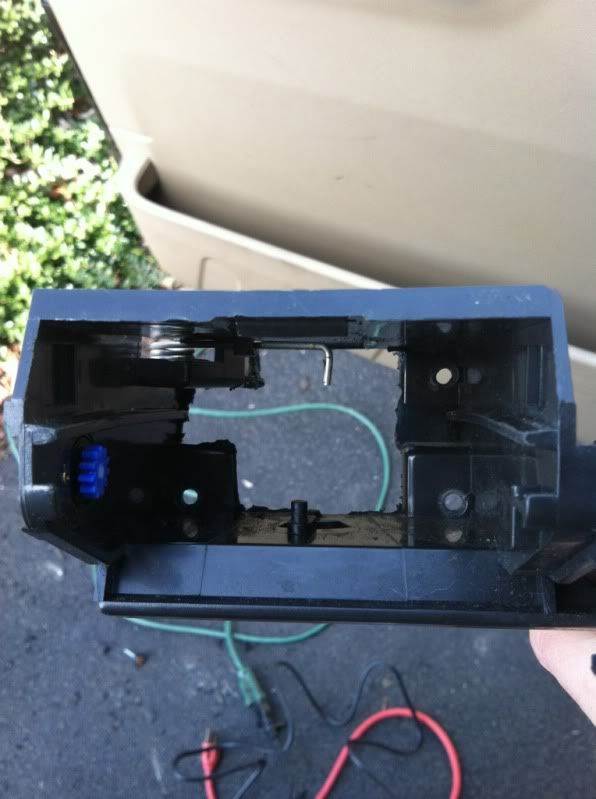
First, I took out my ash tray (I actually switched the change drawer and the ash tray; keeping the ash tray on the driver's side) and Dremmel'd a large hole to run the iPod cable out of the tray up to the head unit.
Before:
After:
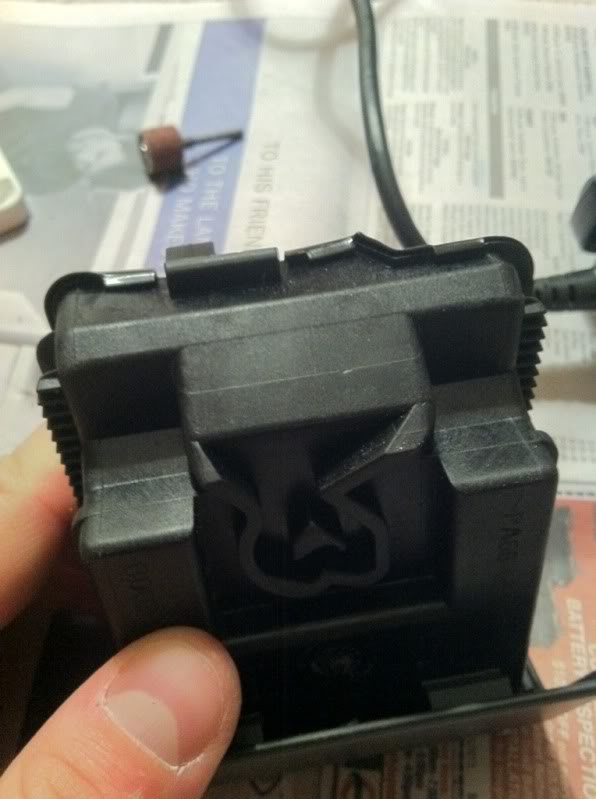
Next, I Dremmel'd the metal cigarette "rest" out:
Before:
After:
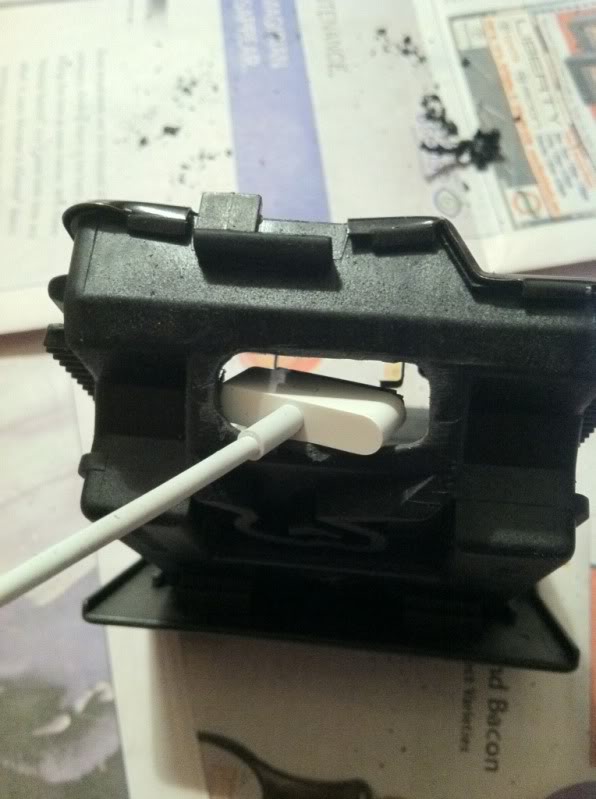
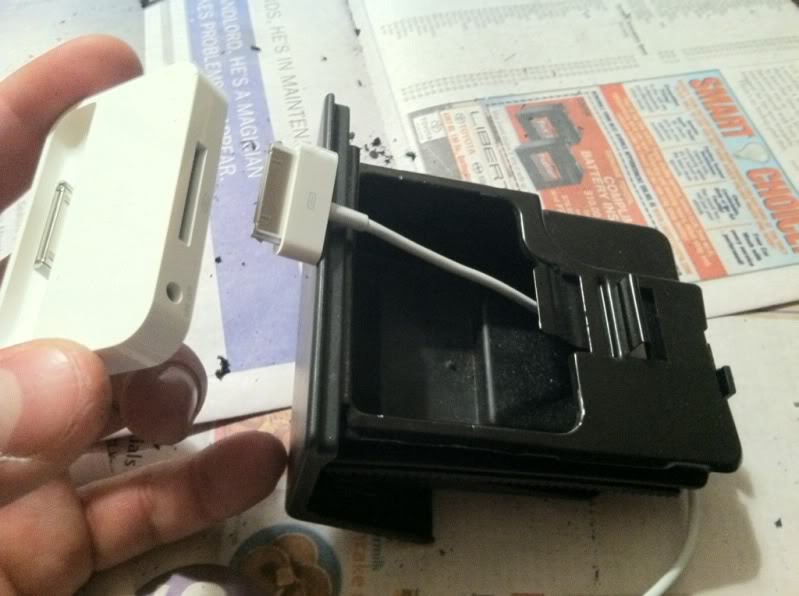
Next, I test-fit the cable and the dock:
Then, I Plastic Welded some Legos to shim up the sloped bottom of the tray:
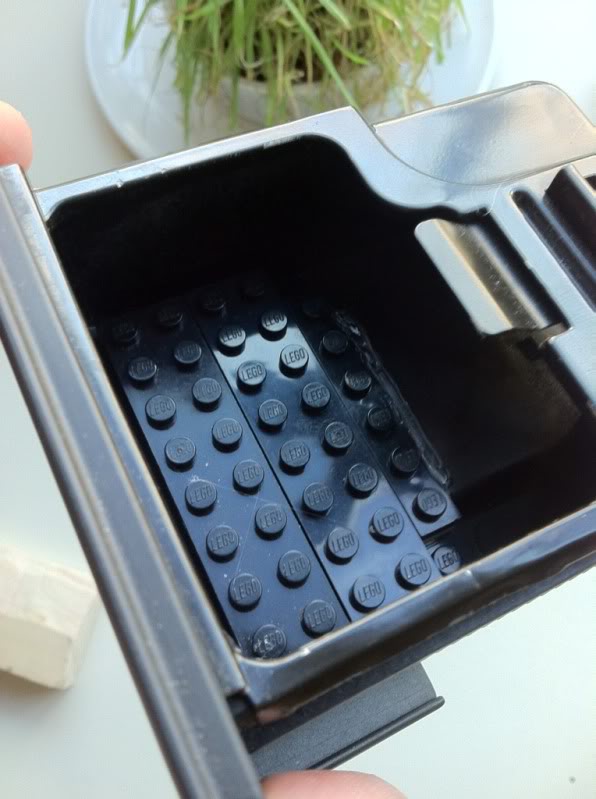
Finished tray mock-up:
Installation:
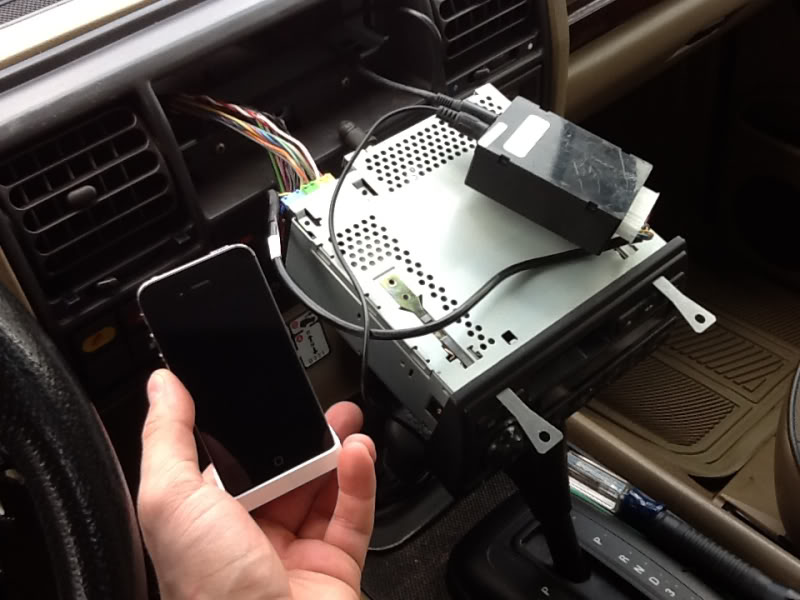
Radio comes out:
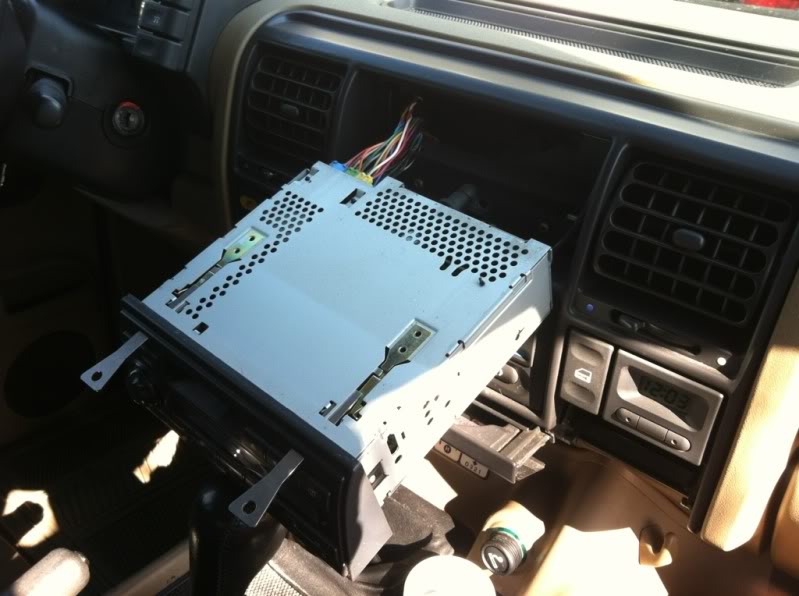
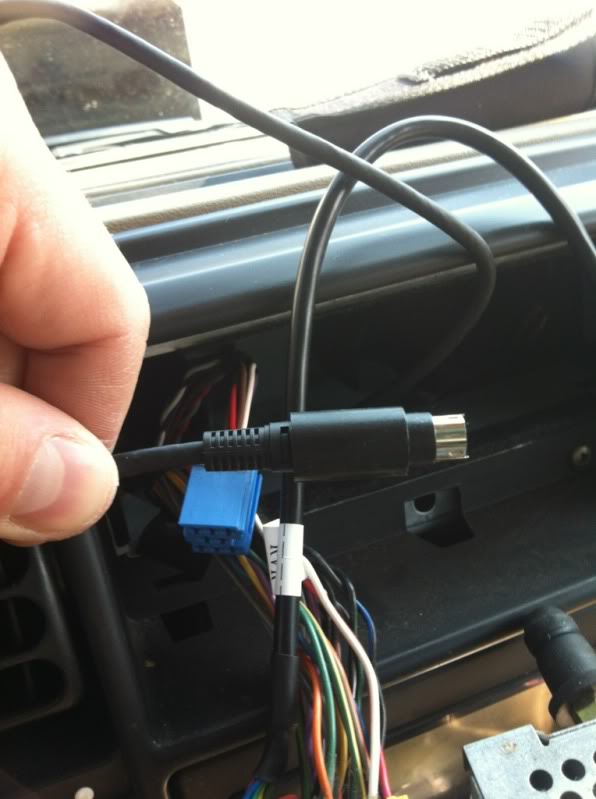
The blue plug is what we're looking to replace:
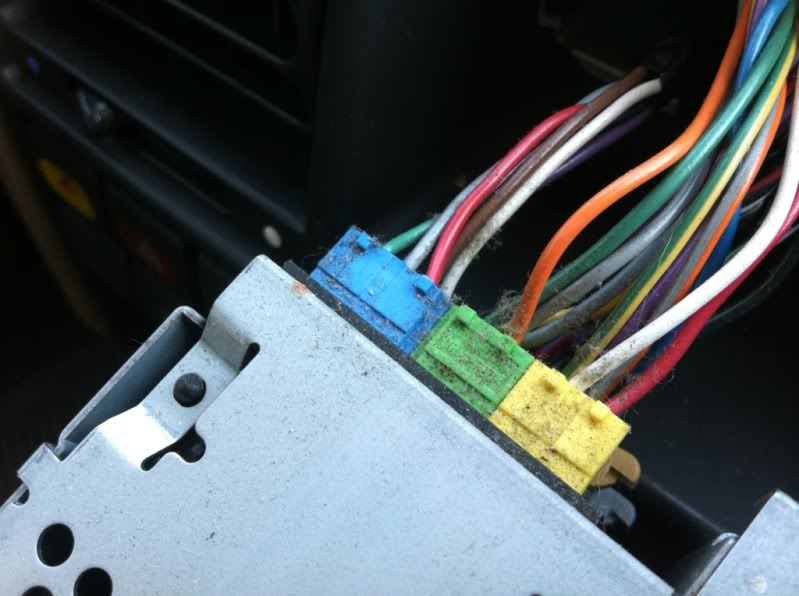
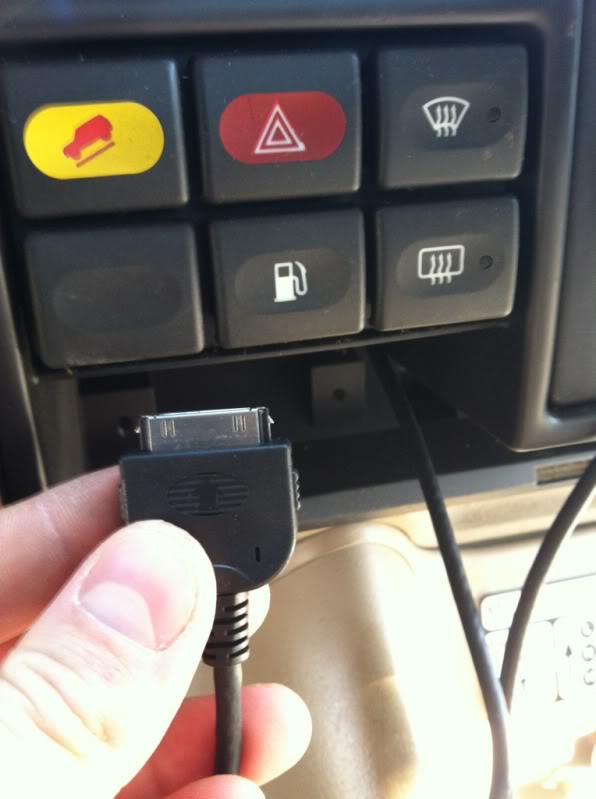
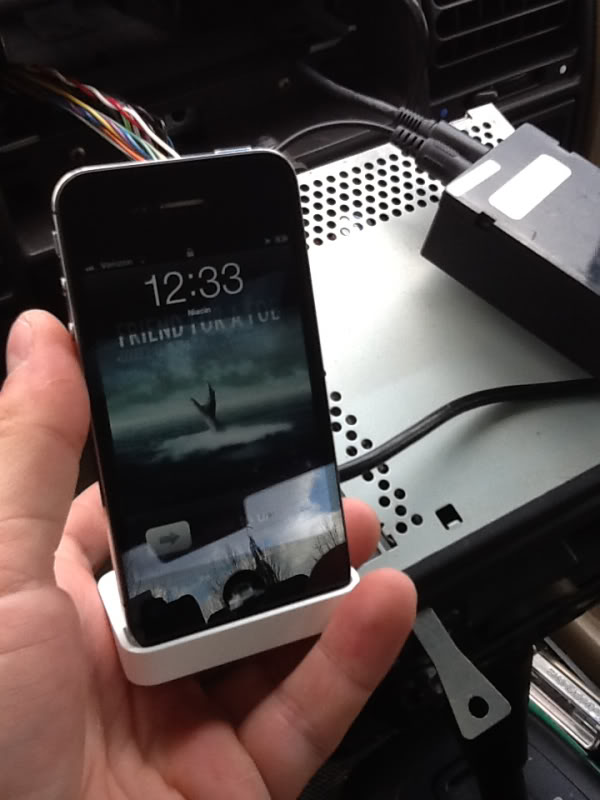
With the Grom Adapter cable installed in-place of the 6 disc changer:
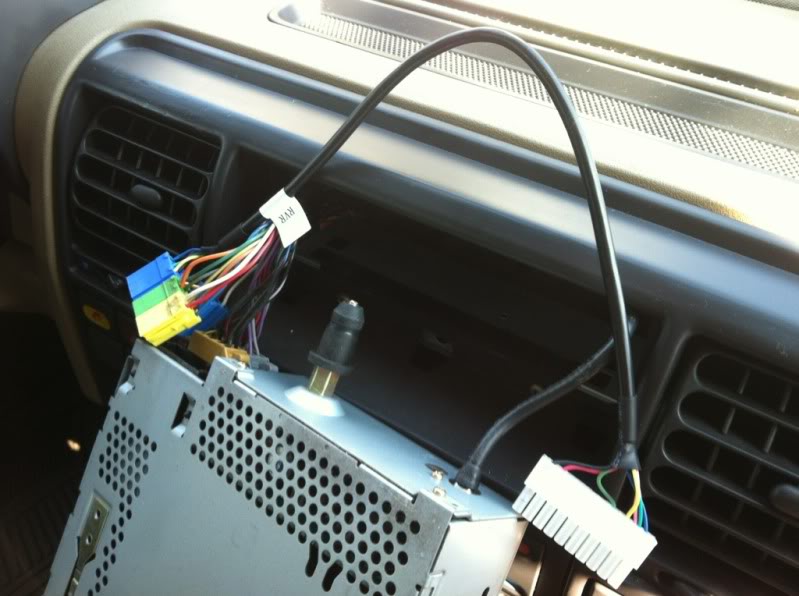
Next, I removed the cupholder assembly to better access the back of the stereo bay:
I ran the cables (3.5mm and the iPod adapter plug) up towards the back of the stereo. Use a bright flashlight to look for pathways -- there's plenty of space:
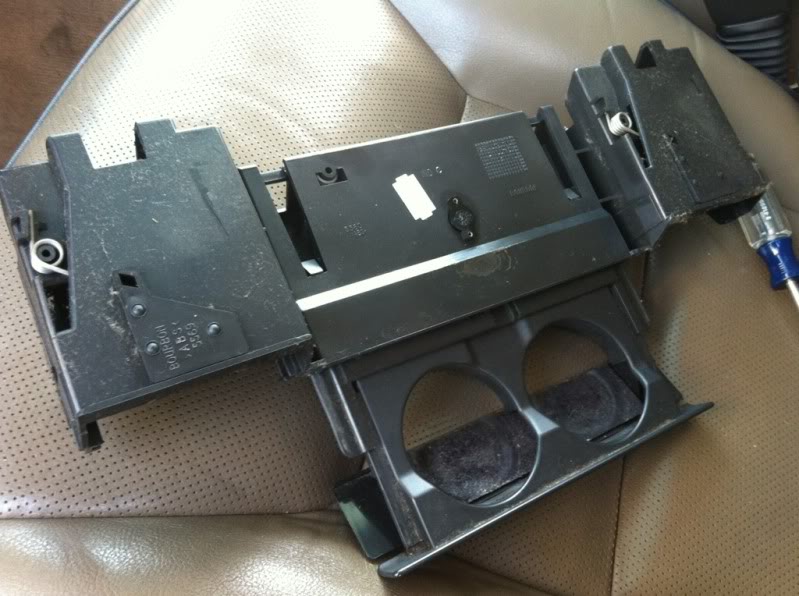
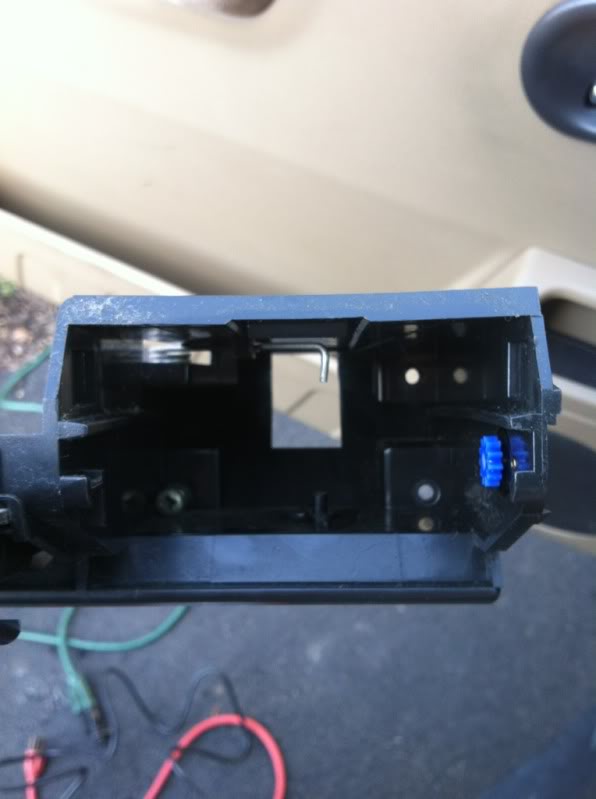
Next, I Dremmel'ed out some plastic on the cupholder assembly to allow clearance for the wires, as they tend to bend and bunch when the ash tray slides in and out of the dashboard:
Before:
After:
I tested EVERYTHING at least 5 times before I reinstalled anything!
Then, I reinstalled the cupholder assembly and CAREFULLY adjusted the slack for both cables. This is important because if too much slack exists behind the ash tray, it will bind. Before reinstalling the head-unit, tuck as much of the 3.5mm and iPod cables down as you can. There is plenty of space, again.
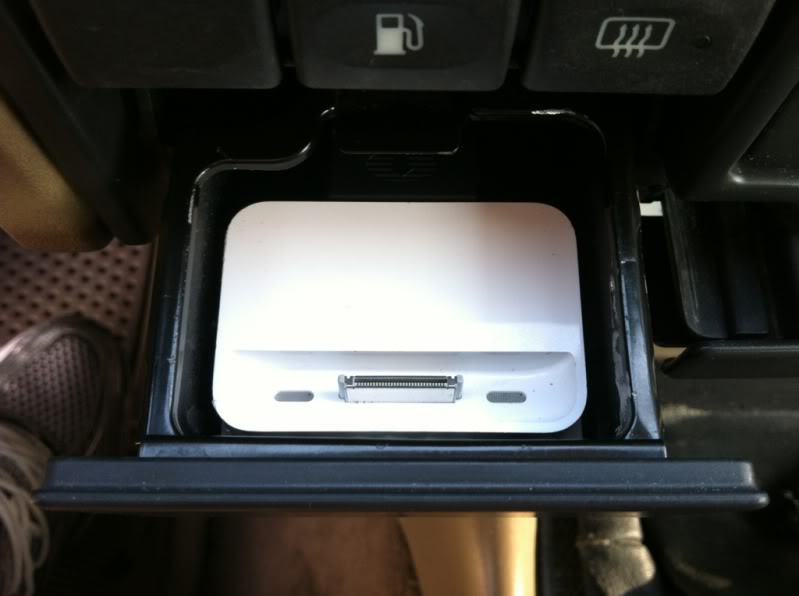
After everything was plugged in, lined up and properly "slacked," I epoxied the Apple dock to the Legos in the ash tray, being VERY careful not to disturb any of the connections or alignments. DO NOT RUSH THIS PART.
Once the epoxy cured, I reinstalled the head-unit and tightened the screws on the opposite side of the cupholder assembly. That's it!
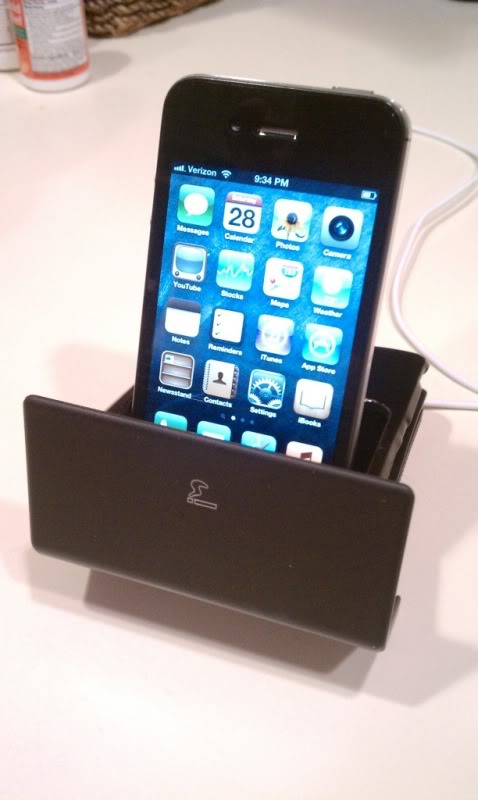
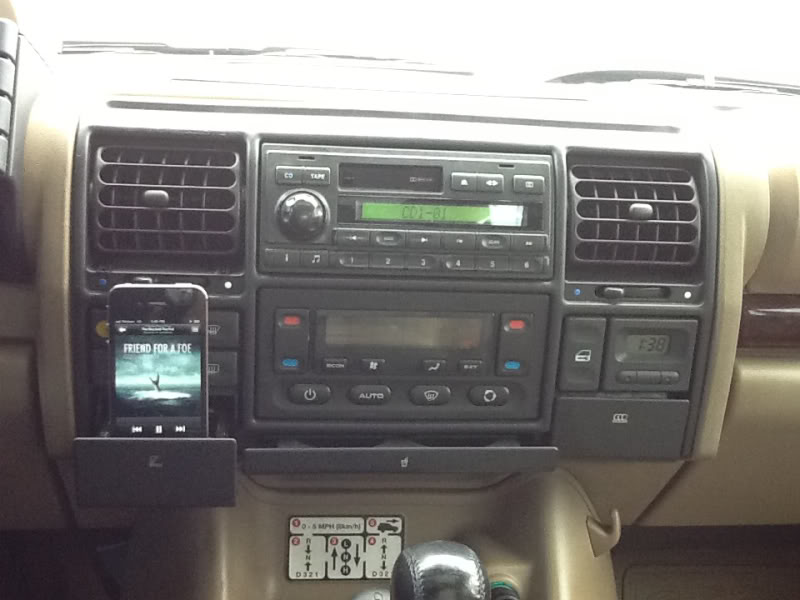
The Final Product:
Observations, afterthoughts, etc:
* You cannot use the stereo controls with the Apple dock and 3.5mm combo. The Apple dock is not "transparent," as it were -- the dock was designed to charge and sync with iTunes on a Mac or PC, not flow audio out of the 30-pin connection (that I know of). You must use the 3.5mm cable to achieve audio. These were all acceptable casualties to me, but YMMV. The iPhone/iPod charges, plays and the steering wheel volume controls work. That was all I wanted with this build.
Hope this helps anyone considering doing a custom-ish iPod installation!
Much of my inspiration came from this thread by JMT (thanks!):
https://landroverforums.com/forum/di...ictures-12252/
I, too used the Grom Audio iPod interface to replace my 6 disc changer:
Rover LandRover 99-05 USB Bluetooth iPod car interface adapter
My idea was was to integrate the iPod/iPhone into the ash tray, for 3 reasons:
1. Stock look. If iPods/iPhones existed in 2000, Land Rover could/should have offered this an interior option.
2. Security. Upon exiting the truck, I'm able to simply grab my iPhone and push the tray shut. This eliminates any kind of temptations for thieves, as there is no evidence of an iPod/iPhone set-up.
3. Stability. There is no clanking, flopping or otherwise moving around while driving. That's good.
Items Used:
*Grom iPod Interface w/included 3.5mm input cable AND optional iPod connection cable (+$24.99)
*1 Apple iPhone 4 dock:
Apple iPhone 4 Dock - Apple Store (U.S.)
*Rover Radio Removal Tools:
Radio Removal Tool (LRA-76-001ABP Same Fit As Genuine Part # C10036-REV A) - Land Rover radios from Atlantic British
*Plastic Weld:
http://www.permatex.com/products/aut...astic_Weld.htm
*Legos. Yes, I said Legos. More on that in a minute...
*Dremmel. Hours of Dremmeling... Ugh.
Prep:
Our victims:
First, I took out my ash tray (I actually switched the change drawer and the ash tray; keeping the ash tray on the driver's side) and Dremmel'd a large hole to run the iPod cable out of the tray up to the head unit.
Before:
After:
Next, I Dremmel'd the metal cigarette "rest" out:
Before:
After:
Next, I test-fit the cable and the dock:
Then, I Plastic Welded some Legos to shim up the sloped bottom of the tray:
Finished tray mock-up:
Installation:
Radio comes out:
The blue plug is what we're looking to replace:
With the Grom Adapter cable installed in-place of the 6 disc changer:
Next, I removed the cupholder assembly to better access the back of the stereo bay:
I ran the cables (3.5mm and the iPod adapter plug) up towards the back of the stereo. Use a bright flashlight to look for pathways -- there's plenty of space:
Next, I Dremmel'ed out some plastic on the cupholder assembly to allow clearance for the wires, as they tend to bend and bunch when the ash tray slides in and out of the dashboard:
Before:
After:
I tested EVERYTHING at least 5 times before I reinstalled anything!
Then, I reinstalled the cupholder assembly and CAREFULLY adjusted the slack for both cables. This is important because if too much slack exists behind the ash tray, it will bind. Before reinstalling the head-unit, tuck as much of the 3.5mm and iPod cables down as you can. There is plenty of space, again.
After everything was plugged in, lined up and properly "slacked," I epoxied the Apple dock to the Legos in the ash tray, being VERY careful not to disturb any of the connections or alignments. DO NOT RUSH THIS PART.
Once the epoxy cured, I reinstalled the head-unit and tightened the screws on the opposite side of the cupholder assembly. That's it!
The Final Product:
Observations, afterthoughts, etc:
* You cannot use the stereo controls with the Apple dock and 3.5mm combo. The Apple dock is not "transparent," as it were -- the dock was designed to charge and sync with iTunes on a Mac or PC, not flow audio out of the 30-pin connection (that I know of). You must use the 3.5mm cable to achieve audio. These were all acceptable casualties to me, but YMMV. The iPhone/iPod charges, plays and the steering wheel volume controls work. That was all I wanted with this build.
Hope this helps anyone considering doing a custom-ish iPod installation!

#3
02-25-2012, 10:17 PM

Mudding
Join Date: Feb 2012
Location: Central North Dakota
Posts: 218
Likes: 0
Received 0 Likes
on
0 Posts
Very cool! Congrats on a fine job.
I just received my Grom unit this weekend. I also bought a factory stereo with CD player so I can still use CDs if I want, since I am eliminating the disc changer. I am also adding Bluetooth to it. Your write up sure helps to know what to look forward to.
I just received my Grom unit this weekend. I also bought a factory stereo with CD player so I can still use CDs if I want, since I am eliminating the disc changer. I am also adding Bluetooth to it. Your write up sure helps to know what to look forward to.
#4
02-26-2012, 11:19 PM

Recovery Vehicle
#5
02-27-2012, 12:27 AM

Overlanding

#6
02-27-2012, 12:11 PM

Mudding
Join Date: Dec 2009
Location: Novato, CA
Posts: 153
Likes: 0
Received 0 Likes
on
0 Posts
#7
02-27-2012, 03:44 PM

#8
02-27-2012, 06:15 PM

I am seriously considering replicating your mod. I am having a hard time understanding your last notes, though... You can control volume via steering column, but must select songs with iPhone? Can still use stereo (not CD changer) with iPhone out of dock?
Considering installing a couple of LEDs in the Lego area, to help visibility at night (hey, I'm old and blind). Anyone have any suggestions where I might wire these to, to correspond with dash illumination?
Again, sweet job!
Considering installing a couple of LEDs in the Lego area, to help visibility at night (hey, I'm old and blind). Anyone have any suggestions where I might wire these to, to correspond with dash illumination?
Again, sweet job!
#9
02-27-2012, 08:53 PM
Join Date: Dec 2011
Location: Bucks County, PA
Posts: 16
Likes: 0
Received 0 Likes
on
0 Posts
There is no USB portion on the Grom iPod cable. The (I believe) 8-pin connector plugs into the back of the Grom box.
Yes. Unfortunately, song selection must take place on the iPod/iPhone - as far as I know. I will typically just set a playlist up, or let it play on random.
And yes, you can still use your stereo. When you select the "CD" button to activate the Grom box, it's just as if you were changing from the radio to the CD changer. The only difference is that your CD changer was unplugged (the blue connector removed above).
A "Rover" green LED set-up would be sweet! I thought of that as well, but I'm not sure where I'd draw the power from. Hmm...
I am seriously considering replicating your mod. I am having a hard time understanding your last notes, though... You can control volume via steering column, but must select songs with iPhone? Can still use stereo (not CD changer) with iPhone out of dock?
Considering installing a couple of LEDs in the Lego area, to help visibility at night (hey, I'm old and blind). Anyone have any suggestions where I might wire these to, to correspond with dash illumination?
Again, sweet job!
Considering installing a couple of LEDs in the Lego area, to help visibility at night (hey, I'm old and blind). Anyone have any suggestions where I might wire these to, to correspond with dash illumination?
Again, sweet job!
And yes, you can still use your stereo. When you select the "CD" button to activate the Grom box, it's just as if you were changing from the radio to the CD changer. The only difference is that your CD changer was unplugged (the blue connector removed above).
A "Rover" green LED set-up would be sweet! I thought of that as well, but I'm not sure where I'd draw the power from. Hmm...
#10
02-27-2012, 11:29 PM
