
diy wind fairng


Thread Starter
|
Rock Crawling
Joined: Nov 2012
Posts: 315
Likes: 1
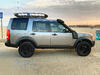
Hey all, for awhile now i've been wanting a wind fairing for my roof basket. I also didn't want to pay $80. for one. So with a little searching on the internet and the little bit of knowledge that i have... well maybe a pinch of knowledge, I constructed my own with parts i found from lowes for around $20.
this is what i used to make it: some of the items in the picture i already had and some of them i eliminated.
[2] 50" x 8 1/2" sheets of acrylic- found in scrap section $5.00
[2] small u bolts $1.36 each
[2] large u bolts $1.89 each
[1] can of black spray paint $3.96
[1] small bottle of gorilla glue $5.00
Here are the steps:
1. sand all sides of the acrylic sheets so that the glue and paint has something to grab onto.
2. glue the inside of acrylic sheets together and let set over night.
3. make a template and cut the acrylic sheet with a jigsaw (use a small metal blade, and expect the acrylic to melt a little, plus go slow or the acrylic sheet will crack and possibly break)
4. Paint the fairing, sand with fine grit sand paper and paint again...repeat this step until your are happy with the out come.
5. use the large and small u bolts to attach to your cage or basket.
I am still doing small tweaks to it, and it doesn't look exact to the $80 one but it does what its supposed to and im very happy with it.


Winching
Joined: Nov 2009
Posts: 595
Likes: 25
From: Philadelphia,Pa
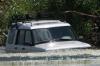
WOW.. you just made a brick out of your roof. Seriously, a fairing should have a nice gentle slope to it. it should sit lower on your roof line attempting to keep air flow from going UNDER the roof rack. It does not matter if it covers the entire front of the rack. You can have a inch or 2 of exposed rack on the top. You should try to re-configure so that the plexi if not touching the roof should be as close to it as possible. The last one I made I put a neoprene strip on the bottom so it would not scratch the roof paint. The idea is to deflect the air up and over not under, and from the pics it appears that the plexi is closer to straight up and down. Other than that it looks great.
WOW.. you just made a brick out of your roof. Seriously, a fairing should have a nice gentle slope to it. it should sit lower on your roof line attempting to keep air flow from going UNDER the roof rack. It does not matter if it covers the entire front of the rack. You can have a inch or 2 of exposed rack on the top. You should try to re-configure so that the plexi if not touching the roof should be as close to it as possible. The last one I made I put a neoprene strip on the bottom so it would not scratch the roof paint. The idea is to deflect the air up and over not under, and from the pics it appears that the plexi is closer to straight up and down. Other than that it looks great.
X2. A wall is going to be a lot harder to pull through the air then a couple of bars, and a wall is exactly what you made. Bring it down a bit and angle it the sam angle as the the windscreen. That will work much much better.
Thread Starter
|
Rock Crawling
Joined: Nov 2012
Posts: 315
Likes: 1
OK I adjusted the u bolts and now it has a very nice slop it still doesn't touch the roof of the truck but I think it is better.
Savannah, I found a discovery decade sticker pretty sweet looking. It will go nice on the lower right corner of the fairing, along with the camel trophy sticker.
Thanks guys for the feedback
Savannah, I found a discovery decade sticker pretty sweet looking. It will go nice on the lower right corner of the fairing, along with the camel trophy sticker.
Thanks guys for the feedback
Pics?
Mudding
Joined: May 2012
Posts: 193
Likes: 15
From: Oklahoma
The wind fairing on the roof rack I made is made out of Plexiglass as well. Instead of thebubolts though I used trim adhesive, its like a super double sided tape, along the bars. Just another option if you didn't want clamps visible. Where it comes arond the sides i used a heat gun to soften it, when it cools it will mostly take that shape. Has held up so far.
Your rack looks nice with it.
Your rack looks nice with it.