
How-to: Disco II Alternator Disassembly

Recovery Vehicle
Joined: Aug 2009
Posts: 1,033
Likes: 4
From: SF Bay Area
Nice....great write-up!
I rebuilt my PT Cruiser "generator" due to bad bearings (the rest was still perfectly fine). The new bearings only cost $20 from a local rebuilder.
These are the easiest things to rebuild. Simple tools and a puller....done. Money left over for a 12 pack of beer and a steak dinner.
I rebuilt my PT Cruiser "generator" due to bad bearings (the rest was still perfectly fine). The new bearings only cost $20 from a local rebuilder.
These are the easiest things to rebuild. Simple tools and a puller....done. Money left over for a 12 pack of beer and a steak dinner.
Three Wheeling
Joined: Mar 2012
Posts: 98
Likes: 3
From: South Texas
Hi to all.,.. a question on the alternator...
Does any one knows how to change the Slip Ring 1124303007 SLR39121 2.88... because I change the bearings of my alternator and the slip ring was in bad shape... and with this post I have the part number and I can ordered but... it is a part that I never change before....that why I ask for that....
Thanks a lot.. and Happy new year...2013
Replacing Slip Rings on Internal Fan IF Bosch Alternators : EuroPartsHouse Bargain Parts
Three Wheeling
Joined: Mar 2012
Posts: 98
Likes: 3
From: South Texas
Hi.. here is my alternator PN. 0 123 510 073 and the bearings that I bought...from an internet store...High Output Alternators | Fan Motor Assembly | Power Cable Kits ,, just search for the code 5-xxxx ..I don't know if it is the same aternator...
------------------------------------------------------------
62034 ALTERNATOR BEARING 5-4000
- 5-4000
BOSCH & FORD ALTERNATOR 5-5224
DOUBLE SEALED BEARING -
5-5224
hey take a look to this page.. thet is where I take the parts numbers to my bearings....
http://www.rangerovers.net/repairdet...haltrepair.htm
Last edited by marizcal; Mar 4, 2013 at 10:46 PM.

Drifting
Joined: Feb 2012
Posts: 49
Likes: 2
Hi.. here is my alternator PN. 0 123 510 073 and the bearings that I bought...from an internet store...High Output Alternators | Fan Motor Assembly | Power Cable Kits ,, just search for the code 5-xxxx ..I don't know if it is the same aternator...
------------------------------------------------------------
62034 ALTERNATOR BEARING 5-4000
- 5-4000
BOSCH & FORD ALTERNATOR 5-5224
DOUBLE SEALED BEARING -
5-5224
hey take a look to this page.. thet is where I take the parts numbers to my bearings....
Bosch_repair
------------------------------------------------------------
62034 ALTERNATOR BEARING 5-4000
- 5-4000
BOSCH & FORD ALTERNATOR 5-5224
DOUBLE SEALED BEARING -
5-5224
hey take a look to this page.. thet is where I take the parts numbers to my bearings....
Bosch_repair


Winching
Joined: Aug 2008
Posts: 677
Likes: 12
From: Austin, TX
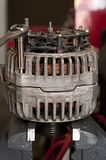
Disassembly
1. Remove the back cover. Remove 3 screws on the top of the cover and then pry 3 tabs out away from the alternator. Keep in mind that they are plastic so pry them out just enough to clear the housing.
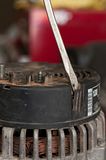
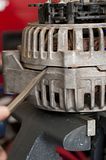
2. Remove the voltage regulator. To do this just remove the two screws securing it down. They are the two partially spun out in this picture.

3. Remove four bolts that surround your alternator body. You'll need an 8mm socket for this.
4. Pry the two halves apart using a screw driver. It should come apart fairly easy, but if not alternate sides back and forth. This will help you avoid putting too much pressure on one spot and cracking it. When they seperate the back will come off and everything will stay attached to the front.
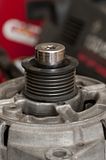
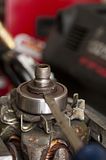
5. Clamp the internals in your clamp. This will keep them from spinning when you try to remove the pulley. Use a 22mm socket to remove the pulley holding the nut in. Once removed it may require prying off, but should come off fairly easily. Once removed I pounded the center section out by hitting the center shaft with a rubber mallet.
6. Remove 4 retaining screws. These go into a plate on the backside of the housing that holds your front bearing into the housing recess.
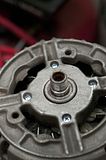
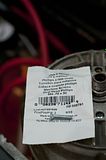
7. My 4 screws were siezed into place so rather than deal with the hassle I just drilled the heads off and removed them once the cover was out. If you end up going this route you need to replace them with M4-.70x20 screws. I got mine at Lowes. Here's the package, they come in packs of two.
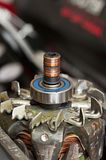
8. Once the rotor assembly is out we'll be working with just that. First remove the retaining washer for the front bearing. I'm sure you can use a bearing puller, but I don't have one and just used two screw drivers. I first got enough space between the bearing and washer and put the two screw drivers on each side and alternated pressure back and forth wiggling the retaining washer off.
9. I used the same method as above to remove the front bearing.

10. Flip over your rotor assembly and you'll note a white plastic cap. You can just grab ahold of this and carefully pull it off. Don't break it because it seals your voltage regulator brushes to the shaft and also takes up the extra space between your rear bearing and the housing.
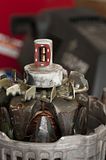
11. Once removed you'll see your bearing. Get your screw drivers under this and wiggle it off just like the parts above. Just as a note, these bushings have 90k miles on them and are pretty worn. I just don't know the part to replace them and was more concerned with just fixing the bearing noise. I would recommend if you can find the part number/have the money replace them while your at it.
1. Remove the back cover. Remove 3 screws on the top of the cover and then pry 3 tabs out away from the alternator. Keep in mind that they are plastic so pry them out just enough to clear the housing.

2. Remove the voltage regulator. To do this just remove the two screws securing it down. They are the two partially spun out in this picture.

3. Remove four bolts that surround your alternator body. You'll need an 8mm socket for this.

4. Pry the two halves apart using a screw driver. It should come apart fairly easy, but if not alternate sides back and forth. This will help you avoid putting too much pressure on one spot and cracking it. When they seperate the back will come off and everything will stay attached to the front.

5. Clamp the internals in your clamp. This will keep them from spinning when you try to remove the pulley. Use a 22mm socket to remove the pulley holding the nut in. Once removed it may require prying off, but should come off fairly easily. Once removed I pounded the center section out by hitting the center shaft with a rubber mallet.

6. Remove 4 retaining screws. These go into a plate on the backside of the housing that holds your front bearing into the housing recess.

7. My 4 screws were siezed into place so rather than deal with the hassle I just drilled the heads off and removed them once the cover was out. If you end up going this route you need to replace them with M4-.70x20 screws. I got mine at Lowes. Here's the package, they come in packs of two.

8. Once the rotor assembly is out we'll be working with just that. First remove the retaining washer for the front bearing. I'm sure you can use a bearing puller, but I don't have one and just used two screw drivers. I first got enough space between the bearing and washer and put the two screw drivers on each side and alternated pressure back and forth wiggling the retaining washer off.

9. I used the same method as above to remove the front bearing.

10. Flip over your rotor assembly and you'll note a white plastic cap. You can just grab ahold of this and carefully pull it off. Don't break it because it seals your voltage regulator brushes to the shaft and also takes up the extra space between your rear bearing and the housing.

11. Once removed you'll see your bearing. Get your screw drivers under this and wiggle it off just like the parts above. Just as a note, these bushings have 90k miles on them and are pretty worn. I just don't know the part to replace them and was more concerned with just fixing the bearing noise. I would recommend if you can find the part number/have the money replace them while your at it.


2nd Gear
Joined: Sep 2016
Posts: 2
Likes: 0
Will be starting this project today. Will keep posted. Thanks for the information.
Problem. Squeaking noise while idle (sometimes)
Squeaking increases while cruising at speeds anywhere between 25-60 mph
any suggestions other than replacing alternantor bearings?
2003 landrover D2 8 Cylinder 6 4.6L MFI
Problem. Squeaking noise while idle (sometimes)
Squeaking increases while cruising at speeds anywhere between 25-60 mph
any suggestions other than replacing alternantor bearings?
2003 landrover D2 8 Cylinder 6 4.6L MFI