
How-to: Disco II Alternator Disassembly


Thread Starter
|
Mudding
Joined: May 2012
Posts: 193
Likes: 15
From: Oklahoma
Hey guys, my alternator was making a horrible whine. It was pretty much akin to a power steering pump without fluid in it. I looked online and found them running anywhere from $125-$350+. I knew for it was just a bearing and couldn't see spending that much for a $10 part. I went online searching and couldn't find any information on disassembly/assembly of a DII alternator or more importantly the bearing part numbers so hopefully this will help someone else.
This took me around 3 hours I think to pull the alternator, tear it down, reassemble, and install. Follow the RAVE for removal/installation of the alternator.
DISCLOSURE: I am not a mechanic and only do this for my own personal projects and am sharing how I accomplished this task. If you decide to try this and ruin your alternator, you ruined your alternator, not me. Also, read through this all the way as some of the steps I took could be done differently.
Parts:
Voltage Regulator/Brushes (I did not replace, but probably should have): 1197311549
Copper Bushes that go on shaft: I have no idea, but these were worn on mine pretty good
Large Front Bearing: B17-99LLU on bearingsdirect.com; I couldn't find locally. If they try to source it from NTN who originally made it, you will find they stopped producing them in 2005
Smaller Rear Bearing: Koyo 6203
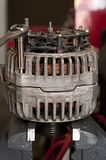
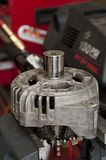
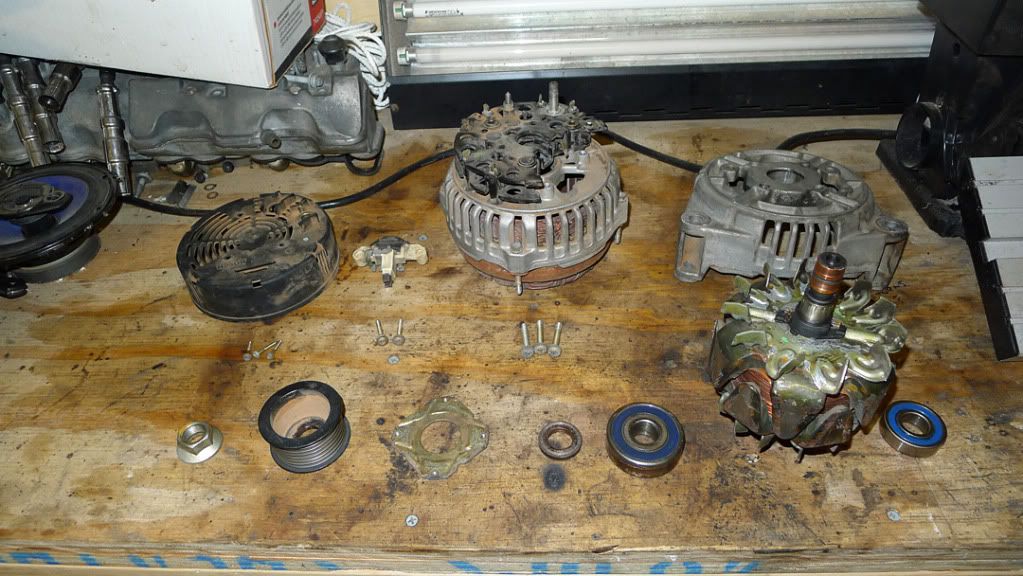
Here's a breakdown picture of what it looks like apart. Hopefully you can use this as a reference if you see a picture below and aren't sure what area you are looking at.

This took me around 3 hours I think to pull the alternator, tear it down, reassemble, and install. Follow the RAVE for removal/installation of the alternator.
DISCLOSURE: I am not a mechanic and only do this for my own personal projects and am sharing how I accomplished this task. If you decide to try this and ruin your alternator, you ruined your alternator, not me. Also, read through this all the way as some of the steps I took could be done differently.
Parts:
Voltage Regulator/Brushes (I did not replace, but probably should have): 1197311549
Copper Bushes that go on shaft: I have no idea, but these were worn on mine pretty good
Large Front Bearing: B17-99LLU on bearingsdirect.com; I couldn't find locally. If they try to source it from NTN who originally made it, you will find they stopped producing them in 2005
Smaller Rear Bearing: Koyo 6203
Here's a breakdown picture of what it looks like apart. Hopefully you can use this as a reference if you see a picture below and aren't sure what area you are looking at.
Last edited by BrandonS; Jul 9, 2012 at 11:25 PM.
Thread Starter
|
Mudding
Joined: May 2012
Posts: 193
Likes: 15
From: Oklahoma
Disassembly
1. Remove the back cover. Remove 3 screws on the top of the cover and then pry 3 tabs out away from the alternator. Keep in mind that they are plastic so pry them out just enough to clear the housing.
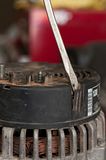
2. Remove the voltage regulator. To do this just remove the two screws securing it down. They are the two partially spun out in this picture.

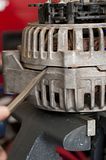
3. Remove four bolts that surround your alternator body. You'll need an 8mm socket for this.
4. Pry the two halves apart using a screw driver. It should come apart fairly easy, but if not alternate sides back and forth. This will help you avoid putting too much pressure on one spot and cracking it. When they seperate the back will come off and everything will stay attached to the front.
5. Clamp the internals in your clamp. This will keep them from spinning when you try to remove the pulley. Use a 22mm socket to remove the pulley holding the nut in. Once removed it may require prying off, but should come off fairly easily. Once removed I pounded the center section out by hitting the center shaft with a rubber mallet.
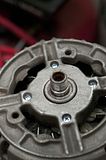
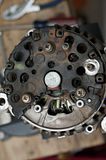
6. Remove 4 retaining screws. These go into a plate on the backside of the housing that holds your front bearing into the housing recess.
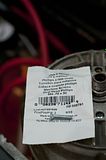
7. My 4 screws were siezed into place so rather than deal with the hassle I just drilled the heads off and removed them once the cover was out. If you end up going this route you need to replace them with M4-.70x20 screws. I got mine at Lowes. Here's the package, they come in packs of two.
8. Once the rotor assembly is out we'll be working with just that. First remove the retaining washer for the front bearing. I'm sure you can use a bearing puller, but I don't have one and just used two screw drivers. I first got enough space between the bearing and washer and put the two screw drivers on each side and alternated pressure back and forth wiggling the retaining washer off.
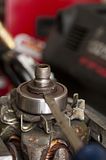
9. I used the same method as above to remove the front bearing.

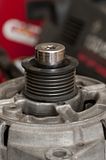
10. Flip over your rotor assembly and you'll note a white plastic cap. You can just grab ahold of this and carefully pull it off. Don't break it because it seals your voltage regulator brushes to the shaft and also takes up the extra space between your rear bearing and the housing.
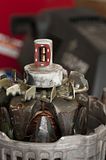
11. Once removed you'll see your bearing. Get your screw drivers under this and wiggle it off just like the parts above. Just as a note, these bushings have 90k miles on them and are pretty worn. I just don't know the part to replace them and was more concerned with just fixing the bearing noise. I would recommend if you can find the part number/have the money replace them while your at it.
1. Remove the back cover. Remove 3 screws on the top of the cover and then pry 3 tabs out away from the alternator. Keep in mind that they are plastic so pry them out just enough to clear the housing.

2. Remove the voltage regulator. To do this just remove the two screws securing it down. They are the two partially spun out in this picture.

3. Remove four bolts that surround your alternator body. You'll need an 8mm socket for this.

4. Pry the two halves apart using a screw driver. It should come apart fairly easy, but if not alternate sides back and forth. This will help you avoid putting too much pressure on one spot and cracking it. When they seperate the back will come off and everything will stay attached to the front.

5. Clamp the internals in your clamp. This will keep them from spinning when you try to remove the pulley. Use a 22mm socket to remove the pulley holding the nut in. Once removed it may require prying off, but should come off fairly easily. Once removed I pounded the center section out by hitting the center shaft with a rubber mallet.

6. Remove 4 retaining screws. These go into a plate on the backside of the housing that holds your front bearing into the housing recess.

7. My 4 screws were siezed into place so rather than deal with the hassle I just drilled the heads off and removed them once the cover was out. If you end up going this route you need to replace them with M4-.70x20 screws. I got mine at Lowes. Here's the package, they come in packs of two.

8. Once the rotor assembly is out we'll be working with just that. First remove the retaining washer for the front bearing. I'm sure you can use a bearing puller, but I don't have one and just used two screw drivers. I first got enough space between the bearing and washer and put the two screw drivers on each side and alternated pressure back and forth wiggling the retaining washer off.

9. I used the same method as above to remove the front bearing.

10. Flip over your rotor assembly and you'll note a white plastic cap. You can just grab ahold of this and carefully pull it off. Don't break it because it seals your voltage regulator brushes to the shaft and also takes up the extra space between your rear bearing and the housing.

11. Once removed you'll see your bearing. Get your screw drivers under this and wiggle it off just like the parts above. Just as a note, these bushings have 90k miles on them and are pretty worn. I just don't know the part to replace them and was more concerned with just fixing the bearing noise. I would recommend if you can find the part number/have the money replace them while your at it.

Last edited by BrandonS; Jul 9, 2012 at 11:26 PM.
Thread Starter
|
Mudding
Joined: May 2012
Posts: 193
Likes: 15
From: Oklahoma
Assembly
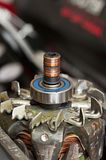
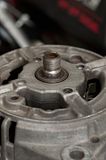
1. Push your new rear bearing onto the shaft. You could use a press or probably a vice, but my 10" vice was too small and I don't have a press. So I used an 18mm deep well socket and a rubber mallet. Just make sure you are pushing it straight down. If it gets off, hit more on the high side. Also, make sure whatever you use is pushing on the inner race. DO NOT PUSH IT DOWN ON THE RUBBER SEAL (blue part). Oh yea, make sure you put your new on one. I'm dumb and reinstalled my old bearing off the workbench, but I'm confident you are all smarter than I and will not do this.

2. READ THROUGH BOTH OPTIONS
Option A: Flip your rotor assembly over again. Make sure you first put down the retaining plate (you can see it here below the bearing). Next put your bearing down. I pushed it on with the 18mm socket used earlier. This method might cause you some swearing later. Just read on and you'll see.
Option B: I don't have pictures for this because I did Option A. What you can do instead of pushing your bearing on the shaft is to push it into the front housing. At this point you can install your plate over it and push the housing and bearing down over the shaft. Then pressing the retaining washer in from the front. The front shaft hole is large enough to do this.
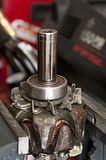
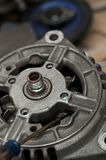
3. Alright for all you going with Option A in the last step it's time to push on the retaining washer. Please make note that you need to put the side with the raised inner section down. This is keeps it raised off the bearing so you can get it off next time you have it apart. In the picture it is not pushed all the way down, I left it up so you could see the ridge that needs to go down. Push it down against the bearing.
4. Now push your housing cover onto the bearing. I used a 22 mm socket for this. Any socket that is larger than the shaft hole will work.
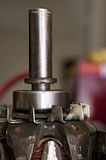
7. When it's pushed on all the way it should look like this. In this shot you can also see the clearance you would have if you went with option B and had to push the retaining washer down through the housing.
6.. Remember when I said you may swear if you take Option A? Well this would be where. In all honesty it took all of 1 minute to get this done, but I could see it easily becoming very frustrated. You need to spin the shaft and rotor so that holes in the bearing retaining plate match the hole locations in the housing. Then since the screws won't be long enough to reach down to the plate laying on the rotor you need to insert a small screw driver and lift it up to the screw and then tighten the screw. Don't tighten it all the way until you do this and get all 4 threaded into the plate; then tighten them down.
7. Put your pulley back on and tighten down the pulley nut with a 22mm socket. To keep the assembly from spinning clamp the rotor assembly in your vice, not the housing.
8. Flip over your rotor assembly one more time and put your plastic cover over the bearing. If you wait until now you have less risk of breaking it with all the pounding going on to put the front bearing on.
9. Slide your rear housing down over the rotor asembly. Align the opening/gasket side of your plastic housing with the open side of the rear.
10. Tighten down the 4 bolts attaching your housing halves.
11. Attach your voltage regulator/brushes and tighten the two screws down that hold it in place.
12. Snap the rear cover back down on and install the 3 screws that hold it on.
13. Congrats, enjoy your non-screaming alternator and relish in the fact you are no longer getting stared at for having the annoying car in traffic. Also treat yourself to your favorite beer, you saved yourself a boat load of money.
1. Push your new rear bearing onto the shaft. You could use a press or probably a vice, but my 10" vice was too small and I don't have a press. So I used an 18mm deep well socket and a rubber mallet. Just make sure you are pushing it straight down. If it gets off, hit more on the high side. Also, make sure whatever you use is pushing on the inner race. DO NOT PUSH IT DOWN ON THE RUBBER SEAL (blue part). Oh yea, make sure you put your new on one. I'm dumb and reinstalled my old bearing off the workbench, but I'm confident you are all smarter than I and will not do this.

2. READ THROUGH BOTH OPTIONS
Option A: Flip your rotor assembly over again. Make sure you first put down the retaining plate (you can see it here below the bearing). Next put your bearing down. I pushed it on with the 18mm socket used earlier. This method might cause you some swearing later. Just read on and you'll see.

Option B: I don't have pictures for this because I did Option A. What you can do instead of pushing your bearing on the shaft is to push it into the front housing. At this point you can install your plate over it and push the housing and bearing down over the shaft. Then pressing the retaining washer in from the front. The front shaft hole is large enough to do this.
3. Alright for all you going with Option A in the last step it's time to push on the retaining washer. Please make note that you need to put the side with the raised inner section down. This is keeps it raised off the bearing so you can get it off next time you have it apart. In the picture it is not pushed all the way down, I left it up so you could see the ridge that needs to go down. Push it down against the bearing.

4. Now push your housing cover onto the bearing. I used a 22 mm socket for this. Any socket that is larger than the shaft hole will work.

7. When it's pushed on all the way it should look like this. In this shot you can also see the clearance you would have if you went with option B and had to push the retaining washer down through the housing.

6.. Remember when I said you may swear if you take Option A? Well this would be where. In all honesty it took all of 1 minute to get this done, but I could see it easily becoming very frustrated. You need to spin the shaft and rotor so that holes in the bearing retaining plate match the hole locations in the housing. Then since the screws won't be long enough to reach down to the plate laying on the rotor you need to insert a small screw driver and lift it up to the screw and then tighten the screw. Don't tighten it all the way until you do this and get all 4 threaded into the plate; then tighten them down.

7. Put your pulley back on and tighten down the pulley nut with a 22mm socket. To keep the assembly from spinning clamp the rotor assembly in your vice, not the housing.
8. Flip over your rotor assembly one more time and put your plastic cover over the bearing. If you wait until now you have less risk of breaking it with all the pounding going on to put the front bearing on.
9. Slide your rear housing down over the rotor asembly. Align the opening/gasket side of your plastic housing with the open side of the rear.

10. Tighten down the 4 bolts attaching your housing halves.
11. Attach your voltage regulator/brushes and tighten the two screws down that hold it in place.
12. Snap the rear cover back down on and install the 3 screws that hold it on.
13. Congrats, enjoy your non-screaming alternator and relish in the fact you are no longer getting stared at for having the annoying car in traffic. Also treat yourself to your favorite beer, you saved yourself a boat load of money.


Rock Crawling
Joined: Apr 2008
Posts: 417
Likes: 41
Parts list from the web:
OEM BOSCH : 0123510073
Component OEM Ref Price Rotor 1124035514 -
Stator 1125045590 -
Rectifier 1127319714 RTF39930
D/E Bracket 1125825542 -
D/E Bearing 1120905510 BRG6661 8.16
S/R/E Bracket 1125885551 -
S/R/E Bearing 1120905525 BRG62032RS 2.24
Regulator 1197311549 VRG46472 45.60
Slip Ring 1124303007 SLR39121 2.88
Brush 1127014028 ABR5089 1.44

3rd Gear
Joined: Jun 2012
Posts: 3
Likes: 0
You did an excellent job without access to a professional shop's equipment (bearing puller, press, etc). I like your style. My dad was an engineer for GM; but I can't always drive 600 miles just to use his shop. I have been afraid of the alternator failing on my Disco II while inconveniently up in the Rockies. My Nissan did that in the middle of winter in the tumble weeds of New Mexico (glad not to have that one anymore). I had thought about throwing an extra alternator in my tool box along with an extra rotoflex joint.
Anyway, all of that to say thanks for a great write up!
----------------------------------------------------
2000 Disco II /Epsom Green /4.0V8 /100,000miles /Ready for major service as soon as I can get back to the USA. Waiting to install: Terrafirma +2 Heavy Duty springs & shocks, Heavy Duty shock towers, sway bar disconnects, extended stainless steel brake lines, RTE HP Watts Linkage, Steel winch bumper with brush guard, Warn winch, Dual battery kit, Voyager Roof Rack & Bluetooth Aux Phone conversion from CD changer.


Recovery Vehicle
Joined: Sep 2009
Posts: 1,135
Likes: 14
From: Roanoke Valley, VA
...
Parts:
Voltage Regulator/Brushes (I did not replace, but probably should have): 1197311549
Copper Bushes that go on shaft: I have no idea, but these were worn on mine pretty good
Large Front Bearing: B17-99LLU on bearingsdirect.com; I couldn't find locally. If they try to source it from NTN who originally made it, you will find they stopped producing them in 2005
Smaller Rear Bearing: Koyo 6203
The 6203 bearing in 2RS format (2-sided Rubber Seals) is the same bearing that is on the 70mm serpentine belt pulley, and the belt tensioner pulley. Koyo is just the brand he used in these notes. NTN & SKF are two other good brands. If you are going to the work of replacing bearings rather than paying for a rebuilt alternator or complete pulley, no need to go cheap on the bearings.

https://landroverforums.com/forum/di...rebuild-37001/
However, my local alternator/starter shop that has been around for 40 yrs plus, says they can rebuild my old D2 Bosch alternator for about $55. They rebuilt a lot of alternators and starters for my dad and his company over those years, so I will be going that route.
Last edited by Rover_Hokie; Oct 17, 2012 at 10:40 PM.