When you click on links to various merchants on this site and make a purchase, this can result in this site earning a commission. Affiliate programs and affiliations include, but are not limited to, the eBay Partner Network.
I've seen many talk about this but never post picture or how to do it so I figured I'd take some pics and hopefully help someone reading this 2 years from now.
This is by far the least invasive method of wiring roof lights without drilling or any other permanent method.
What you NEED:
Minimum of 6ft of wire per run
Fishtape or braided aircraft cable (or anything else stiff, rope will not work)
Electrical tape
Wire loom to make things pretty
Figure out how long each wire run you need is and how much runs you'll need for all your lights and the proper guage for your lights, in may case I needed 6, 7ft runs (3 16AWG, 2 14AWG, and 1 10AWG)
Cut your wires to the lengths you need and bundle them tightly, wrap tape around the bundle every 1 foot
Now with your wires nice and tidy get your fishtape and feed it from the top of the A pillar trim down to the engine bay, you will need to play with this to find the hole at the bottom but I promise it is there!
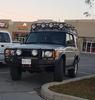
Ignore the cancer on my roof, this is Canada
Where your wire will come out under the hood.
Once you get the wire under the hood you now need to tape your wire bunch to your fish tape, do multiple wraps of tape so it doesn't come off the fish tape while you pull
Now gently pull up on your fish tape, feeding the wire up the A pillar trim, a second set of hands you be helpful here (not make sure the wire bunch doesn't snag
Now put some split loom one the wire where it comes out above the windshield and you can finish wiring your lights.
Or just remove the A-pillar? Granted, the clips on the pillar are pretty fragile. Safelite found that out the hard way and are replacing both a-pillars and lower cowl tomorrow. Ding
Or just remove the A-pillar? Granted, the clips on the pillar are pretty fragile. Safelite found that out the hard way and are replacing both a-pillars and lower cowl tomorrow. Ding
Removing the pillar is a pain and I always break those clips.. this is by far the safest way
Yeah I take my comment back, safelite replaced the pillars today and removing them again looks like a major PITA, even if they are brand new. One time use rivets, etc
I just drilled through my roof and ran the wires on the inside of the A-pillar. Sealed the hole with RTV, but I still need to get some black silicone and a caulking gun to make it look better. Seal holds really well so far through the heavy rain and hail.
I just drilled through my roof and ran the wires on the inside of the A-pillar. Sealed the hole with RTV, but I still need to get some black silicone and a caulking gun to make it look better. Seal holds really well so far through the heavy rain and hail.
Also a good option, likely what I'll end up doing.
You can also get a cable gland for a more durable and cleaner look. They're only about 8 bucks. You drill a ~1/2" hole, insert the gland, and when you tighten the lockring, it hugs the wires tight. Glands can be multi-wire as well. I use one for my solar panel MC4 cables.
Best spot in the forward cab I've found for fuse boxes are
1. Under passenger seat (I removed the cd changer). I have a Blue Sea 150A safetyhub there (and an inverter) which is the distribution point to all other cab fuse panels and high load items (rear circuit breaker panel, under steering wheel fuse panel, inverter)
2. Under steering wheel (remove the styrofoam off that steel plate). I have a blue sea 12 circuit panel that fits perfectly
Runner up: you could put a panel over top the ECU/BCU in the passenger footwell, but access was a bit too tight for my taste
Last edited by Jeff Blake; May 20, 2017 at 12:47 PM.
Also a good option, likely what I'll end up doing.
You can also get a cable gland for a more durable and cleaner look. They're only about 8 bucks. You drill a ~1/2" hole, insert the gland, and when you tighten the lockring, it hugs the wires tight. Glands can be multi-wire as well. I use one for my solar panel MC4 cables.
Best spot in the forward cab I've found for fuse boxes are
1. Under passenger seat (I removed the cd changer). I have a Blue Sea 150A safetyhub there (and an inverter) which is the distribution point to all other cab fuse panels and high load items (rear circuit breaker panel, under steering wheel fuse panel, inverter)
2. Under steering wheel (remove the styrofoam off that steel plate). I have a blue sea 12 circuit panel that fits perfectly
Runner up: you could put a panel over top the ECU/BCU in the passenger footwell, but access was a bit too tight for my taste
I just took a piece of 7x7" lexan I had and made a platform behind the factory fuse box (under hood) to mount my panel and replays to.
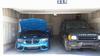
I would attach a pic but my wiring is embarrassingly messy still.
He is what I did for switches if anyone is still looking for ideas and either cant find a D1 switch panel or needs more than 3 switches
Middle switch is my master to turn all AUX lights off
Also a good spot. I have one there too. I dig the switches, but I'm going for a more factory look (which is ironic because I've gutted the entire interior)... with both fog lights gone that leaves about 5 switch spots available on the binnacle. I'm in the process of collecting oem cruise control switches. A teeny white paint brush should work for labeling
What about the rear roof lights? Probably drill another hole there too... my rover is turning into swiss cheese!
Another idea I just had is to drill for one cable gland on the roof, and use a 7-way trailer wire. Use one wire for common ground, and the other 6 should be plenty for whatever lights you want to put up there now and in the future
the trailer wire only has to be like 6 inches to a foot long, just need a common interface to get from the cab to the roof. Better than doing multi-wire cable glands
Last edited by Jeff Blake; May 22, 2017 at 03:49 PM.