
Installing an Oil Pressuge Gauge on a 2003 Disco II
#1
 09-07-2010 | 12:05 PM

Thread Starter
|
Three Wheeling
Joined: Jul 2010
Posts: 71
Likes: 4
Here is a simple "how to" install an oil pressure gauge on a 2003 Disco II. I went with the oil pressure gauge from Glowshift. http://www.glowshiftdirect.com/tinte...ure-gauge.aspx
If you followed my previous install on "how to install a water temp gauge" then you can wire the two gauges together and use only 2 fuse taps for this whole project. You just need to wire up the two red wires together, the two yellow wires together and the two black wires together.
What you need:
Extra 18 Gauge Wire (Red, Black, Green, Yellow)
Splicing Pliers
3/8" Wire loom
Teflon Tape
Adapter M20X1.5 to 1/8 NPT
2x "add a circuit" fuse taps
2x 3amp fuses
and some wire connectors, Everything else including the oil pressure sender comes with the gauge out of the box.
First you need to wire up the gauge. I choose to "add a circuit" into the fuse box. The "add a circuit" connector can be purchased at your local Autoparts store for about $5 each. Dont forget to get some 3amp fuses. The red wire needs to plug into a "switched" 12v source. The black wire needs to be grounded to the vehicle, I chose to ground it to a bolt near the fuse box. The yellow wire needs to plug into an "unswitched" source, meaning a source that has constant 12v power to it when the key is not in the ignition. This is what keeps your lighting settings on the gauge when you turn the vehicle off and back on.

Here is my fuse box with the tap into the two fuses I chose for the red and yellow wires.

Here is where I grounded the black wire right under the fuse box.
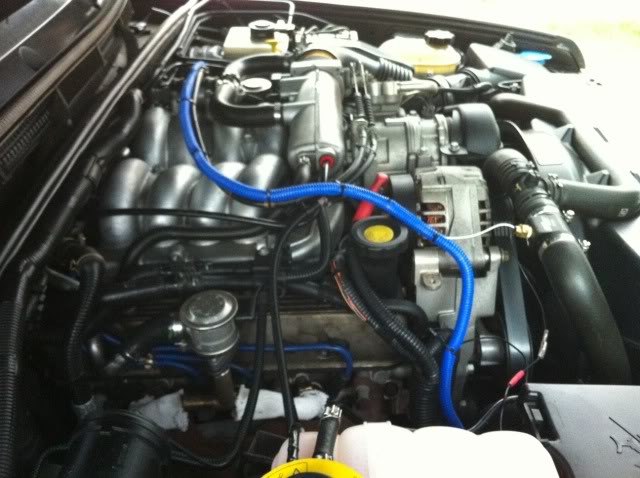
Next run the green wire through the firewall and route it neatly to the sender. I decided to add a wire loom for protection and neatness.
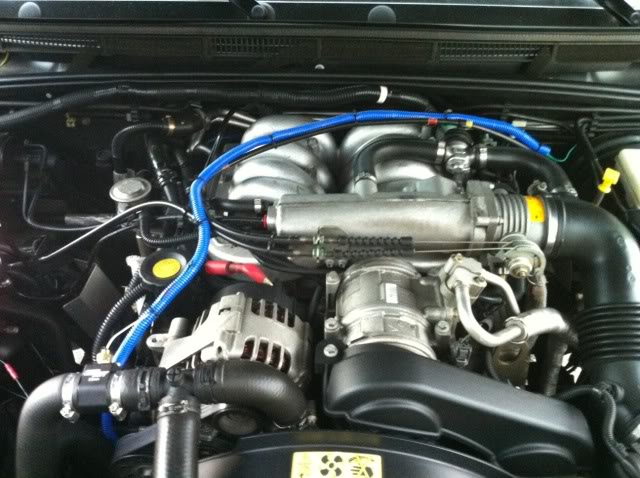
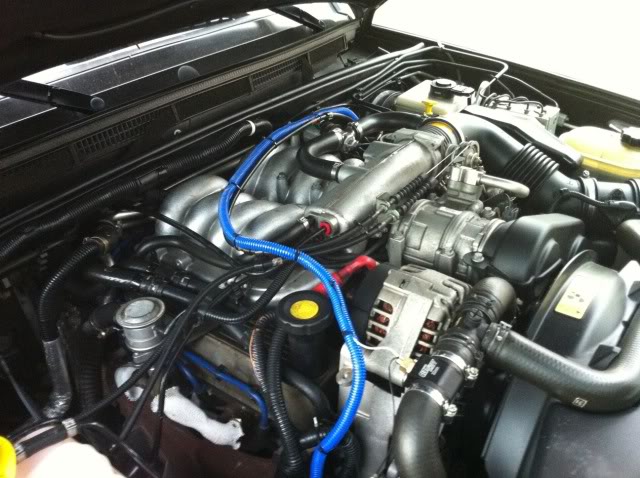
here is the wire routed neatly within the wireloom down to the oil pressure sender.
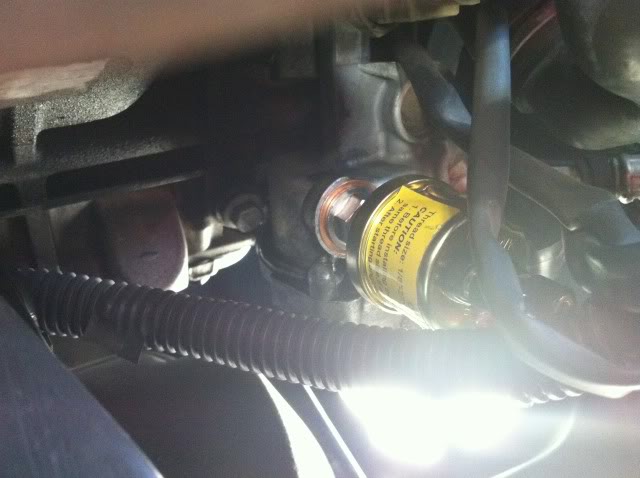
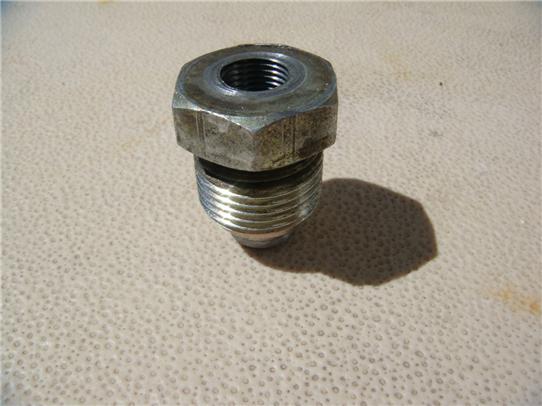
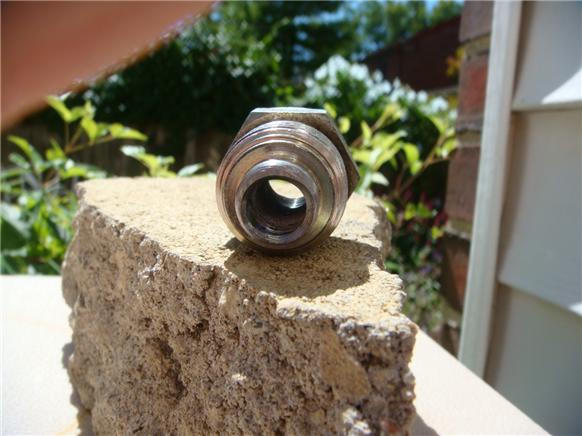
I decided to try a different method and tap into a different oil port for installation of the pressure sender (included with the glowshift gauge). After finding out the proper size of the bolt I was tapping into, it was a rather pretty simple and fast install. This is the bolt I removed.
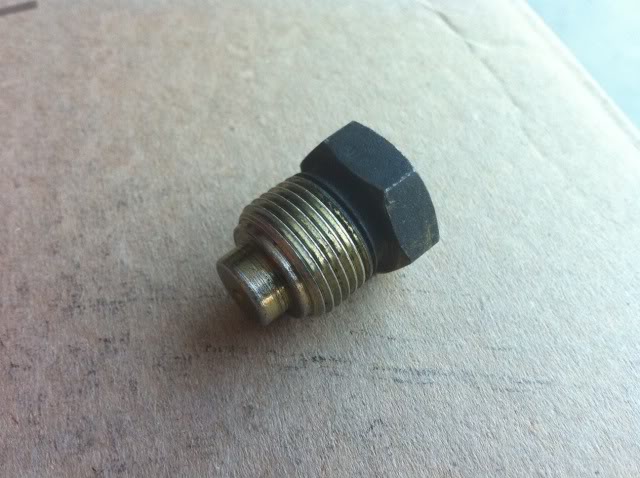
The oil port I removed the bolt from is very easy to reach from under the truck and you dont have to remove anything to get to it. It is located right underneath and slightly to the left of the stock oil pressure switch/sender. This is the adapter that you need to tap into the port. The size is a M20X1.5 to 1/8 NPT I found mine on ebay. http://cgi.ebay.com/ebaymotors/Senso...item5889a5aa34
Even though the listing says its for 1/8 "PT" it is compatible and screws on nicely.
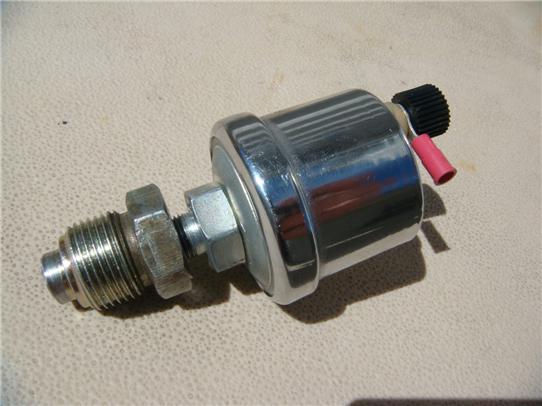
Here is my sender installed and wired up!
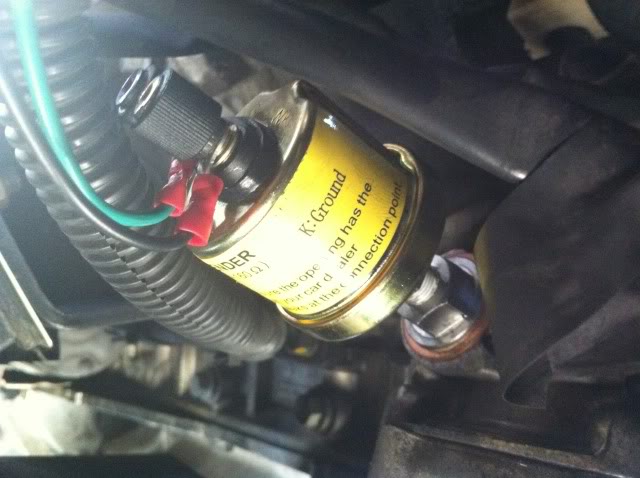
Attach your green wire to the "G" post of the sender and add a black ground wire from the pressure sender "WK" post to a good ground source. I grounded it to the battery.
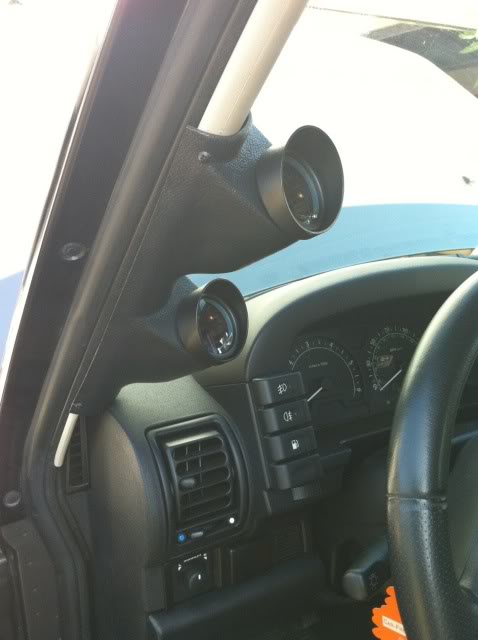
I also purchased a universal dual gauge A pillar pod and works and fits nicely! The only thing you lose is the left tweeter. I disconected it, or you can drill small holes in the A pillar pod for the sound to come out. Here it is! Universal Dual Gauge A Pillar Pod
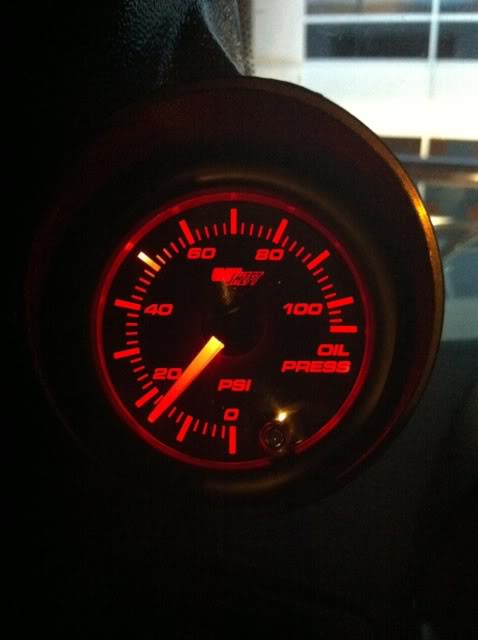
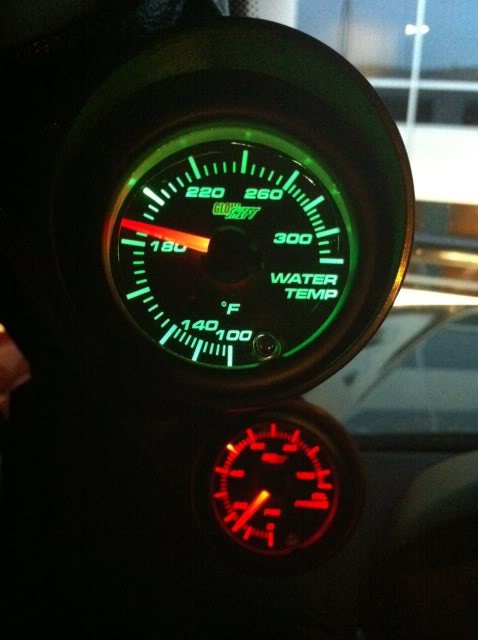
This is what my gauges look like! Installed and working!
Here is a nice 15-16psi at normal operating temp and on idle. (minimum is 10 psi per RAVE)
...and here is my temp!
Hope this write up was helpful.
If you followed my previous install on "how to install a water temp gauge" then you can wire the two gauges together and use only 2 fuse taps for this whole project. You just need to wire up the two red wires together, the two yellow wires together and the two black wires together.
What you need:
Extra 18 Gauge Wire (Red, Black, Green, Yellow)
Splicing Pliers
3/8" Wire loom
Teflon Tape
Adapter M20X1.5 to 1/8 NPT
2x "add a circuit" fuse taps
2x 3amp fuses
and some wire connectors, Everything else including the oil pressure sender comes with the gauge out of the box.
First you need to wire up the gauge. I choose to "add a circuit" into the fuse box. The "add a circuit" connector can be purchased at your local Autoparts store for about $5 each. Dont forget to get some 3amp fuses. The red wire needs to plug into a "switched" 12v source. The black wire needs to be grounded to the vehicle, I chose to ground it to a bolt near the fuse box. The yellow wire needs to plug into an "unswitched" source, meaning a source that has constant 12v power to it when the key is not in the ignition. This is what keeps your lighting settings on the gauge when you turn the vehicle off and back on.
Here is my fuse box with the tap into the two fuses I chose for the red and yellow wires.
Here is where I grounded the black wire right under the fuse box.
Next run the green wire through the firewall and route it neatly to the sender. I decided to add a wire loom for protection and neatness.
here is the wire routed neatly within the wireloom down to the oil pressure sender.
I decided to try a different method and tap into a different oil port for installation of the pressure sender (included with the glowshift gauge). After finding out the proper size of the bolt I was tapping into, it was a rather pretty simple and fast install. This is the bolt I removed.
The oil port I removed the bolt from is very easy to reach from under the truck and you dont have to remove anything to get to it. It is located right underneath and slightly to the left of the stock oil pressure switch/sender. This is the adapter that you need to tap into the port. The size is a M20X1.5 to 1/8 NPT I found mine on ebay. http://cgi.ebay.com/ebaymotors/Senso...item5889a5aa34
Even though the listing says its for 1/8 "PT" it is compatible and screws on nicely.
Here is my sender installed and wired up!
Attach your green wire to the "G" post of the sender and add a black ground wire from the pressure sender "WK" post to a good ground source. I grounded it to the battery.
I also purchased a universal dual gauge A pillar pod and works and fits nicely! The only thing you lose is the left tweeter. I disconected it, or you can drill small holes in the A pillar pod for the sound to come out. Here it is! Universal Dual Gauge A Pillar Pod
This is what my gauges look like! Installed and working!
Here is a nice 15-16psi at normal operating temp and on idle. (minimum is 10 psi per RAVE)
...and here is my temp!
Hope this write up was helpful.
Last edited by tito5590805; 09-07-2010 at 11:50 PM. Reason: added wire loom

#3
09-07-2010 | 01:46 PM
Recovery Vehicle
Joined: Feb 2009
Posts: 1,151
Likes: 30
From: Denver, CO
The M20x1.5 > 1/8" adapter is the slick way to mount the pressure sending unit. I'm ditching the stainless cable setup as I was thinking of doing before. I was curious if one of those other large bolts on the front cover would unscrew and you could do this. Thanks for doing my homework! I found the "add a circuit fuses at AutoZone for $6.99 each.
Nice setup! You beat me to the cool write up. Maybe I will show my digital gauge for kicks.
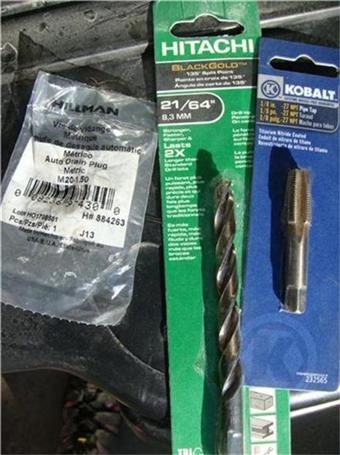
Here is what I did after much research to make installing the presure sensor easy and you dont have to wait 3/4 days for the M20x1.5 adaptor to show up in the mail from eBay.
Nice setup! You beat me to the cool write up. Maybe I will show my digital gauge for kicks.
Here is what I did after much research to make installing the presure sensor easy and you dont have to wait 3/4 days for the M20x1.5 adaptor to show up in the mail from eBay.
- How to tap out the original plug pictured above to 1/8NPT pipe thread. Same as the pressure sensor threads. All purchased at Lowes.
- 1/8" Kobalt pipe tap
- 21/64" drill bit
- Spare M20x1.5 plug form Lowes small part draws $3 (So you can drive around while messing with this).
- You will need to drill all the way through the plug. There is all ready a center indention on the top. Drill press is easiest.
- Use cutting fluid to drill it... any oil will work fine.
- Then tap the hole with the 1/8" pipe tap. It will have to be 3/4 of way deep. Using a hand drill works fastest fine.
- Add a brass/copper crush washer and your ready to thread back into your front cover. Took me about 45 mins.
- Now this is the coolest way to use what you already have
Last edited by bosshogt; 09-09-2010 at 01:42 PM. Reason: added some pictures
#4
09-07-2010 | 02:07 PM
Thread Starter
|
Three Wheeling
Joined: Jul 2010
Posts: 71
Likes: 4
The M20x1.5 > 1/8" adapter is the slick way to mount the pressure sending unit. I'm ditching the stainless cable setup as I was thinking of doing before. I was curious if one of those other large bolts on the front cover would unscrew and you could do this. Thanks for doing my homework! I found the "add a circuit fuses at AutoZone for $6.99 each.
Nice setup!
Nice setup!
I like this clean easy setup. I used teflon tape on the installation (adapter and sender) and no leaks whatsoever! I like it!
#6
09-07-2010 | 03:23 PM

Banned
Joined: Jun 2010
Posts: 1,368
Likes: 4
#7
09-07-2010 | 03:29 PM
Winching
Joined: Jun 2010
Posts: 609
Likes: 11
From: Pittsburgh, PA USA
Yes they are the same, but.... they have oil coolers that use those ports. So either disconnect your oil cooler (I don't think so) or fashion a T for the sensor - this is the part that becomes tricky. The 2003/2004 Discos do not have oil coolers, that is why they have those spare ports.
I guess it's back to planning to do it as described here: http://www.landroverclubvi.com/oil-gauge.html
#8
09-07-2010 | 04:10 PM
Banned
Joined: Jun 2010
Posts: 1,368
Likes: 4
I'm using a M12 adapter on the spare port above the stock sensor, then some 1/8 nylon oil gauge hose you get at Advance and Autozone to plumb to the sensor. I will see if I can get my lazy *** to post some pictures, but it is a pretty simple setup and avoids complex T's and extension hoses.
#9
09-07-2010 | 04:49 PM
I'm using a M12 adapter on the spare port above the stock sensor, then some 1/8 nylon oil gauge hose you get at Advance and Autozone to plumb to the sensor. I will see if I can get my lazy *** to post some pictures, but it is a pretty simple setup and avoids complex T's and extension hoses.
#10
09-07-2010 | 09:44 PM
Banned
Joined: Jun 2010
Posts: 1,368
Likes: 4
Photo #1: oil pressure sending unit with the 1/8 nylon tubing kit from Advance.
Photo #2: M12 adapter and one end of the nylon tubing attached. I used a spare piece of black tubing slipped over the 1/8 nylon tubing for protection.
Photo #3: My test gauge attached to the other end of the 1/8 tubing. Plan A was to use a mechanical oil gauge and so I used a long piece of tubing, I have since changed my mind and got an electrical gauge.
Photo #4: I want to make a bracket to hold the sending unit and attach it to one of the 2 bolts, or use the spare hole. The thick cable is the battery earth on the alternator bracket.
Photo #5: I made a bracket for sender unit, I bent a piece of aluminum into an L and drilled 2 holes and bolted it on with the battery earth bolt.
Last edited by Bundu; 09-09-2010 at 01:42 PM.