When you click on links to various merchants on this site and make a purchase, this can result in this site earning a commission. Affiliate programs and affiliations include, but are not limited to, the eBay Partner Network.
I used very little, and after several months, decided to hear some tunes. Turn on, Nope. Dead. Fuses are good, wiring supplies correctly the +12V at battery pin and +12V at accessory pin. Display blank. I suspect the push-on switch may be flaky as lately, the volume control did not respond and had to use the steering buttons instead.
Dismantled it, probed, and found the pushbutton not making contact.
Anyone knows its part number ? Anyone with a discarded junked front panel portion of the radio behind spider webs, to salvage the push switch ?
Edited... How does buying an used radio works with the 'code' enabling ? What has anyone replacing the radio done to solve it ?
Last edited by Externet; Jul 29, 2024 at 11:01 AM.
Repaired the flaky push switch and probed the circuitry. Found the printed traces are waaaay too hidden behind the plastic multi-connector assembly; risk to destroy something. The +12V accessory does not show path to anywhere. With unobtanium schematic there is no resurrection Getting a radio from the junk yard risks the disabled status of needing a 'code' to make it functional.
Called Alpine technical customer service. They do not know sheet other than aftermarket radios newer than 7 years. No schematic diagram, no service manual, no assistance, no nothing, no anti-theft codes. Sent me to call LandRover. Guess who LandRover sends to call ?
Last edited by Externet; Aug 20, 2024 at 11:16 AM.
Reason: Added text
Dove painfully deep into it. Dismantled both boards to probe traces. Fixed !
Found 2 corroded vias next to inductor label L801 on main board. Good chance the product of fu**n sunroof drip got in, plus wrong design passing the +12V BAT supply into so tiny vias. Inserted 2 wires top to bottom and soldered to traces. Used the opportunity to clean the gummied guts of the volume control that was getting worse leaving only the steering control as volume. Works as new. Am happy.
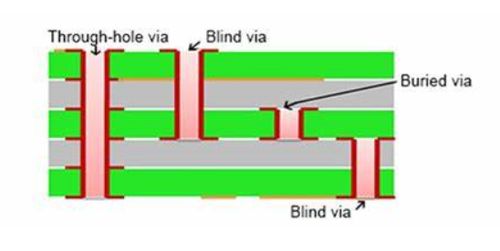
Hi. It is a plated hole trough layers of a printed circuit board to interconnect them.
See the circles that do not end connecting a component : they connect into other layers of the printed circuit board which make a complex tridimensional conductor set. They have low current conducting capability. Think of it as pages of a book, a via can connect a conductive trace on page 2 with another on page 5.
Did not take pictures of the surgery; but the underlined words are key to find the place where mine failed (by the rear of the main board). I will assist you if you show your board pictures and symptoms.
Last edited by Externet; Aug 23, 2024 at 06:42 PM.
Will get pics tomorrow, but if I understand correctly you identified two corroded vias and insert wires down the center and soldered to the end of the via.
Hi. Is better scraping the trace next to the via to bare copper and bend the inserted wire over the scraped trace to solder it there. For your coming photos, get one from the center rear after removing the top lid (2 screws) By the large inductor coil.
I do PCB design and vias have very low resistance. Even a tiny via can conduct at least 1A at negligible losses. Moisture alone shouldn't do much damage, but it can lead to electrolytic corrosion if a voltage is applied. It's not a flawed design, probably the via corroded while it was wet and the head unit was used.


 Getting a radio from the junk yard risks the disabled status of needing a 'code' to make it functional.