
Rear AC blower aka Project Cool


Thread Starter
|
Three Wheeling
Joined: Dec 2008
Posts: 81
Likes: 0
From: Orlando, Fl.
OK, OK, cheesey title I know.
A little background; I live in sunny Florida where it tends to get rather warm. Especially with a dark blue Disco that sits in the sun. With the AC on to the main vents and the feet, the rear AC is inadequate to cool off the rear passengers. Even with the blower on feet only, it takes a looooong time to cool off the rear area. Sweaty toddler + cranky newborn = Very unhappy wife = Grief for Daddy. This little project took about three hours to complete and cost a grand total of about $25.00! The reason it took even that long is because I making everything up as I went along. To do it again would probably only take a couple of hours.
If anyone has any questions PM me and I can call you back.
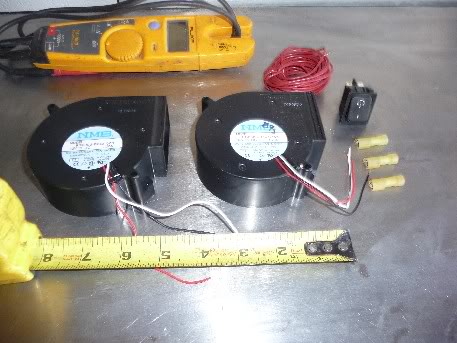
1) I bought the squirrel cage blower fans from Skycraft Surplus for $8.95 each, a switch for $2.50 and I had the wire and connectors. The fans only draw 1.1 amps at 14V and the switch is rated at about 8 amps, so I did not worry about a relay set up as the switch can easily handle the load. I had the wire and various connectors, but they only cost a couple of bucks for a good assortment.
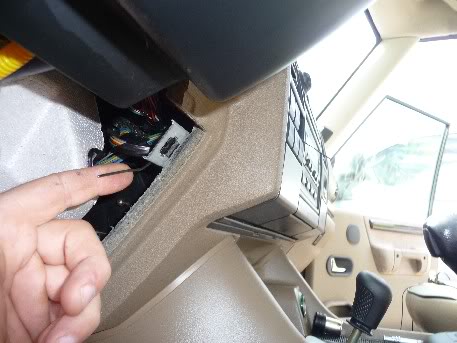
2) I opened the fuse access panel and ran a piece of bailing wire through the blank spot where my new switch will reside. This is essentially a poor man’s fish tape.
3) Run a second piece if bailing wire up over the lower vent on the drivers side.
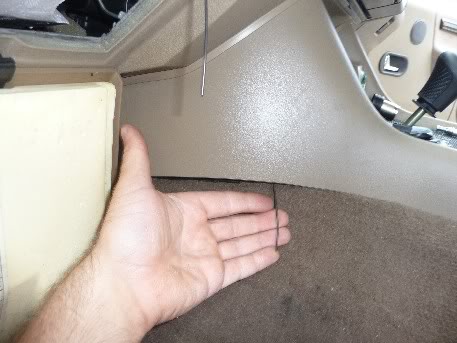
4) Tape a 4’ piece of wire to the lower bailing wire and pull up over the lower vent.
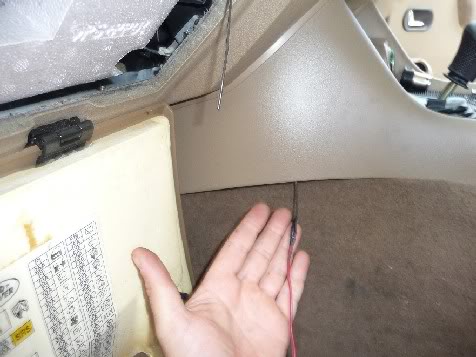
5) Cut another 2 �’ piece of wire to run to your fuse panel. Tape these two pieces of wire to switch fish tape and pull both them up through the switch hole in the dash.
6) Run another piece of bailing wire through the transmission cover back to the rear of the cover. I removed the switch panel for my windows for easier access, but in hindsight I would have removed the rear cover first (the part with the ashtray) and not even bothered taking out the window switch plate.
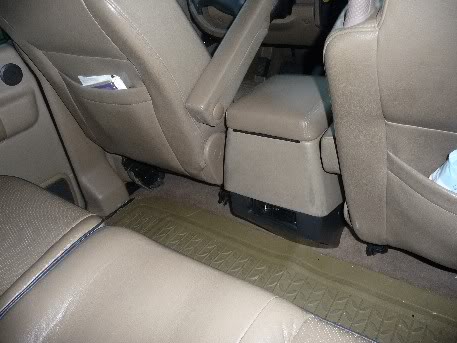
7) Remove the back lower cover panel. It has two Phillips screws on either side of the panel. Move the front seats as far forward as necessary for easy access to the screws.
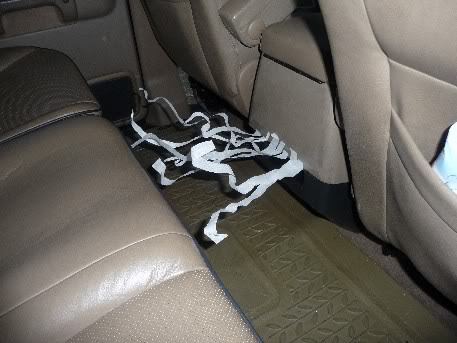
8) Tape the long end of the 4’ piece of wire to this fish tape and pull it back to the back of the truck. I gently pried up the transmission tunnel with a flat head screw and tucked the wired neatly out of sight.
9) Drill a hole into the discharge side of the two fans and bolt them together. I used a 1/4” bolt because that is what I had laying around. A smaller bolt would have worked just as well.
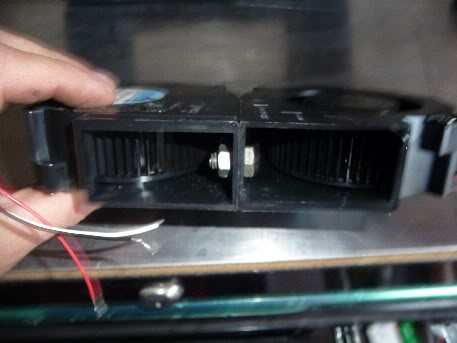
10) Remove the ashtray. I made a makeshift mount out of a square 5 gallon bucket. I used a putty knife that I heated with a plumbing torch as a hot knife to cut the plastic. I then used the plumbing torch to heat the mount to form it to the inside of the rear panel. I used JB stick to glue the mount to the inside of the panel and then used more JB stick to mount the fans to the new mounting plate. The discharge side of the fans fit snugly into the mounting plate and they are really very light. To make sure they were secure, I shook the snot out of the assembly. Nothing moved, so I am happy! I hooked the red wires (+) together and the black (-) wires together. The white wires are for a thermostat and are not used in this application. I cleaned up the wiring before installation, but you can see the basics here. I admit it’s not the prettiest assembly, but I was making up as I went along and it does work. I also eventually used some black zip ties to secure it.
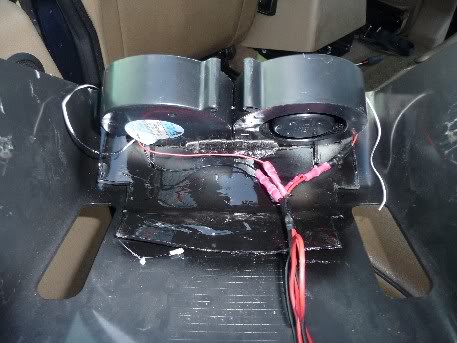
11) This is a front view of the assembly. One of my dogs, Bailey, is in the background.

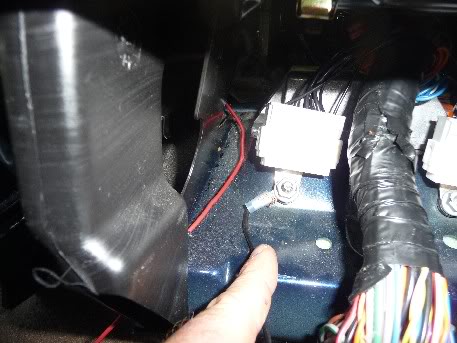
12) I attached a ground wire to the body under this 7/16“ nut.
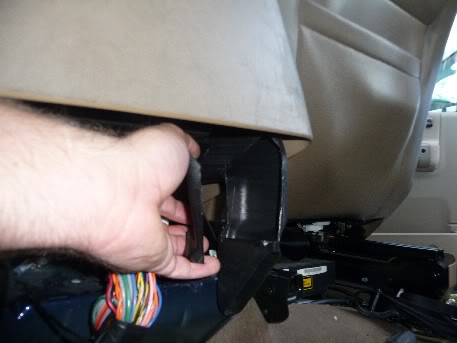
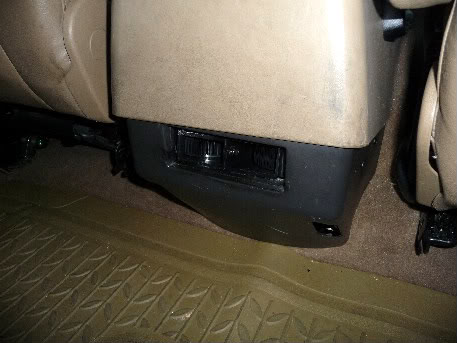
13) With my “hot knife” I cut the inside section of both sides of the AC ducts. This allows for cold air flow into the intake side of the new fans. I left the outside part of the tubes and the lower trumpet section to maintain passive air flow when the fans are not in use and to maintain the stock fit and finish when everything is reinstalled.
14) I connected my hot lead and ground to the fans and reinstalled the panel.
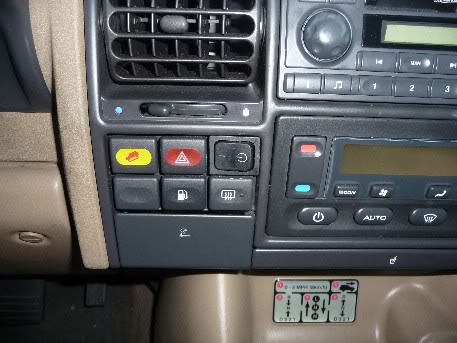
15) A little dremmel surgery and I connected and installed the switch. I could have tracked down a stock Rover switch, but this one was only $2.50 and it looks pretty damn good installed. I replaced the accessory fuse (#26) with a fuse that has a blade sticking out of the back and connected my hot lead there. I made sure it was a switched fuse so the fan could not be turned on without the key on.
16) I need to buy a little plastic vent cover to go over the discharge side of the fans, but that’s not a big deal. Maybe a junk yard item.
17) The fans put out an awesome amount of airflow. They are somewhat noisy, but no more than the stock blower fan on high. Having them switched lets me get it cool in the back and then shut them off. You can still have a normal conversation with people in the back and hear the radio. It really is an acceptable noise level for the performance.
18) Fans $18, switch $2.50, wiring and odds and ends $2.50. Happy wife = PRICELESS!!!!!!
A special thanks to Spike555 for helping me figure out how to embed the pictures in this post and thanks to Disco Mike for putting up with my nagging phone calls!
If anyone wants a Word document with this write up, PM me. It's only about 850k so it's easy to email.
A little background; I live in sunny Florida where it tends to get rather warm. Especially with a dark blue Disco that sits in the sun. With the AC on to the main vents and the feet, the rear AC is inadequate to cool off the rear passengers. Even with the blower on feet only, it takes a looooong time to cool off the rear area. Sweaty toddler + cranky newborn = Very unhappy wife = Grief for Daddy. This little project took about three hours to complete and cost a grand total of about $25.00! The reason it took even that long is because I making everything up as I went along. To do it again would probably only take a couple of hours.
If anyone has any questions PM me and I can call you back.
1) I bought the squirrel cage blower fans from Skycraft Surplus for $8.95 each, a switch for $2.50 and I had the wire and connectors. The fans only draw 1.1 amps at 14V and the switch is rated at about 8 amps, so I did not worry about a relay set up as the switch can easily handle the load. I had the wire and various connectors, but they only cost a couple of bucks for a good assortment.
2) I opened the fuse access panel and ran a piece of bailing wire through the blank spot where my new switch will reside. This is essentially a poor man’s fish tape.
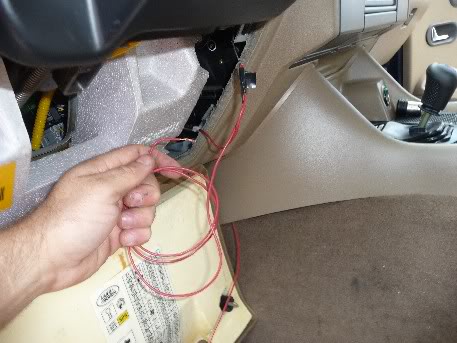
3) Run a second piece if bailing wire up over the lower vent on the drivers side.
4) Tape a 4’ piece of wire to the lower bailing wire and pull up over the lower vent.
5) Cut another 2 �’ piece of wire to run to your fuse panel. Tape these two pieces of wire to switch fish tape and pull both them up through the switch hole in the dash.
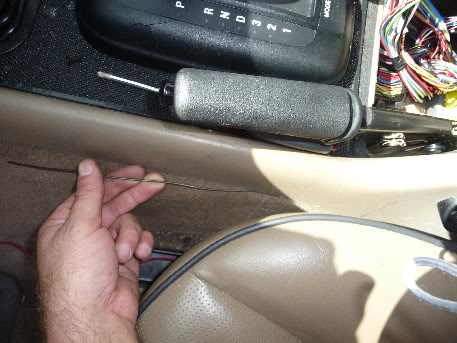
6) Run another piece of bailing wire through the transmission cover back to the rear of the cover. I removed the switch panel for my windows for easier access, but in hindsight I would have removed the rear cover first (the part with the ashtray) and not even bothered taking out the window switch plate.
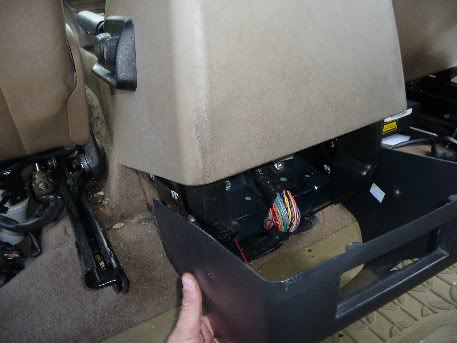
7) Remove the back lower cover panel. It has two Phillips screws on either side of the panel. Move the front seats as far forward as necessary for easy access to the screws.
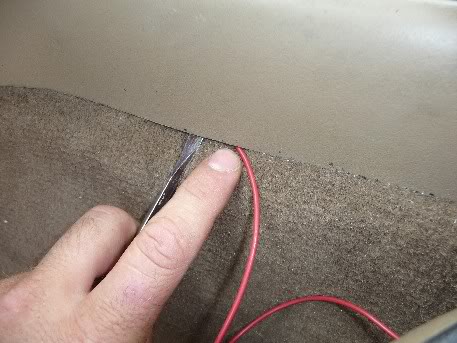
8) Tape the long end of the 4’ piece of wire to this fish tape and pull it back to the back of the truck. I gently pried up the transmission tunnel with a flat head screw and tucked the wired neatly out of sight.
9) Drill a hole into the discharge side of the two fans and bolt them together. I used a 1/4” bolt because that is what I had laying around. A smaller bolt would have worked just as well.
10) Remove the ashtray. I made a makeshift mount out of a square 5 gallon bucket. I used a putty knife that I heated with a plumbing torch as a hot knife to cut the plastic. I then used the plumbing torch to heat the mount to form it to the inside of the rear panel. I used JB stick to glue the mount to the inside of the panel and then used more JB stick to mount the fans to the new mounting plate. The discharge side of the fans fit snugly into the mounting plate and they are really very light. To make sure they were secure, I shook the snot out of the assembly. Nothing moved, so I am happy! I hooked the red wires (+) together and the black (-) wires together. The white wires are for a thermostat and are not used in this application. I cleaned up the wiring before installation, but you can see the basics here. I admit it’s not the prettiest assembly, but I was making up as I went along and it does work. I also eventually used some black zip ties to secure it.
11) This is a front view of the assembly. One of my dogs, Bailey, is in the background.
12) I attached a ground wire to the body under this 7/16“ nut.
13) With my “hot knife” I cut the inside section of both sides of the AC ducts. This allows for cold air flow into the intake side of the new fans. I left the outside part of the tubes and the lower trumpet section to maintain passive air flow when the fans are not in use and to maintain the stock fit and finish when everything is reinstalled.
14) I connected my hot lead and ground to the fans and reinstalled the panel.
15) A little dremmel surgery and I connected and installed the switch. I could have tracked down a stock Rover switch, but this one was only $2.50 and it looks pretty damn good installed. I replaced the accessory fuse (#26) with a fuse that has a blade sticking out of the back and connected my hot lead there. I made sure it was a switched fuse so the fan could not be turned on without the key on.
16) I need to buy a little plastic vent cover to go over the discharge side of the fans, but that’s not a big deal. Maybe a junk yard item.
17) The fans put out an awesome amount of airflow. They are somewhat noisy, but no more than the stock blower fan on high. Having them switched lets me get it cool in the back and then shut them off. You can still have a normal conversation with people in the back and hear the radio. It really is an acceptable noise level for the performance.
18) Fans $18, switch $2.50, wiring and odds and ends $2.50. Happy wife = PRICELESS!!!!!!
A special thanks to Spike555 for helping me figure out how to embed the pictures in this post and thanks to Disco Mike for putting up with my nagging phone calls!
If anyone wants a Word document with this write up, PM me. It's only about 850k so it's easy to email.
Last edited by stu44mag; May 5, 2009 at 09:03 PM. Reason: added info


Rock Crawling
Joined: Apr 2006
Posts: 258
Likes: 2
From:
Looks good. I'm in FL also.. No kids yet, so it's just my bitching friends, but when kids come along, i'm sure i'll be in the same boat, and maybe emailing u for some help. I thought about trying to put some extra voltage, maybe 18 or so to the blower to help. But I think ur solution is better for the rear, and less damaging.
Thread Starter
|
Three Wheeling
Joined: Dec 2008
Posts: 81
Likes: 0
From: Orlando, Fl.
Where in Florida? If there is a Skycraft surplus near you, you can kill an entire day just looking at stuff. They have everything for all kinds of projects and their prices are reasonable. They website doesn't do the store justice though. I'm going to do a few LED projects soon and I'll get everything from them. They are very knowledgeable there as well and I don't feel stupid asking basic questions.

Recovery Vehicle
Joined: Dec 2008
Posts: 1,175
Likes: 9
From: Chandler,AZ
I have a question, the stock ducts (I guess thats what they would be) under the center console, that you cut into for the cold air. where do they go? and does anyone know if I have them in my D1?
Thread Starter
|
Three Wheeling
Joined: Dec 2008
Posts: 81
Likes: 0
From: Orlando, Fl.
They discharge right at the rear passengers feet in the center console. There is still passive air flow down there when the fans are turned off. I don't know if the D1 has them or not, but someone will chime in. It really has made a world of difference for the rear passengers.

 I might try something similar with my factory rear a/c (gotta love the SE's) this summer if I get too hot.
Thread Starter
|
Three Wheeling
Joined: Dec 2008
Posts: 81
Likes: 0
From: Orlando, Fl.
A few people have asked me which fans I used.
http://skycraftsurplus.com/index.asp...OD&ProdID=1552
They are $1.00 more on the website than at the store. If people want to buy from Skycraft, but get hosed on shipping, PM me and we can figure something out. Any reason to go to the store.
92 degrees in Orlando today and they are AWESOME!
http://skycraftsurplus.com/index.asp...OD&ProdID=1552
They are $1.00 more on the website than at the store. If people want to buy from Skycraft, but get hosed on shipping, PM me and we can figure something out. Any reason to go to the store.
92 degrees in Orlando today and they are AWESOME!

Thread
Thread Starter
Forum
Replies
Last Post
Corrigan
Retired - Private For Sale/Trade Classifieds
0
Apr 26, 2013 02:38 PM
Joseph David
General Range Rover Discussion - Archived
7
Mar 14, 2011 04:04 AM
Rover_Hokie
Retired - Private For Sale/Trade Classifieds
5
Jan 8, 2011 09:56 PM
dinandan
Retired - Private For Sale/Trade Classifieds
0
Jun 6, 2006 09:26 AM