
Roof Rack Build Attempt
#31
 01-03-2013, 08:13 AM


One thing to keep in mind with the horizontal bolt as a clamp is that it won't create much force in a vertical direction. Thule racks use a bolt that is horizontal, but the feet and the clamp are bent at a slight angle to create a ramp. As the bolt is tightened, the outer clamp piece slides up on the foot so that it clamps the gutter both horizontally and vertically: Thule 953 Super High Rain Gutter Foot Pack
#32
01-07-2013, 10:42 PM
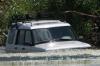
Here is the mock up from a couple days ago to test if the mounts were the correct width apart to fit in the gutters. Fit like a glove! Still had a couple things to weld up yet.


Finished welding up some things and put the light mounts on it. Just need to fabricate the air deflector and should be good to go for painting.


Finished welding up some things and put the light mounts on it. Just need to fabricate the air deflector and should be good to go for painting.
Last edited by BrandonS; 01-07-2013 at 10:45 PM.
#33
01-08-2013, 12:03 AM

Mudding
Join Date: Jul 2010
Location: In the Disco!
Posts: 129
Likes: 0
Received 0 Likes
on
0 Posts
Brandon -
First, my apologies, I totally forgot about getting you some better pictures on how my rack attaches to the gutter, things just got busy for me.
Did your original idea for the clamps work?
Second, I am not sure if you have considered this or not but if not, if you have any tubing left over consider welding a piece which would be tucked on the underside of the rack on one side, the full length of the rack for your wiring to run through for your rear lights. Or you could even use some small ABS electrical conduit and paint it the same color as your rack. I don't have that, the guy before me just wrapped the wire run in electrical wiring and attached it to the rack which is okay but not the greatest to protect if from the elements.
The rack looks Fantastic by the way!
#34
01-08-2013, 12:26 AM

Rock Crawling
#35
01-08-2013, 06:28 AM
Dave, with that concern you brought up I've be been thinking about this for a while because I am really at a loss how to move it with the tools I have and not wanting to spend a lot of money which really was the point of this.
In any case, I decided to look up what type of structure is behind the sheet metal because That's what is bearing the load. I found this picture:
http://www.discoweb.org/roofrails/8.JPG
There looks to be a beam that runs across the top of the window to a beefed up rear support area. I'm thinking I will be alright because the mount is located towards the rear of the window and fairly close to this beam. For any problems to occur this beam would need to fail.
I think at this point a larger concern would be the ~16g drip rail on the exterior of the vehicle failing.
I would be interested to see if you have seen a window shatter or that area collapse though, but I honestly think the drip rail will be the weak point and not the area it's over.
Last edited by BrandonS; 01-08-2013 at 06:31 AM.
#36
01-08-2013, 07:46 AM


#40
01-10-2013, 11:52 PM
Thanks all... wasn't going to bump this again until I had it on, but since it's near the top again. I got the windscreen on; used plexiglass. The seam isn't perfect as I used a dremel with the router attachment and a #561 bit. I did place it so it is mostly behind a front light and is less visible though. As well as painted. I had a hard time finding paint that would stick to galvanized metal; which I was aware was a problem when I started. I ended up finding a self etching primer that was compatible, sanded it then used a name brand spray paint satin top coat. This will allow me to make changes as I see fit and then when the design and my wallet are solidified maybe have it powder coated.
You can also see the little circle stubs on the light mounts. The reason for this was because the Hella 700ff's will not point down. I had to angle the light brackets forward and then use these "spacers" to get front bottom portion of the lights to clear the bar.
Guru you can see the outside brackets in the bottom right of the bottom picture and on the top one you can see the nuts welded on. I think for the power wires I will either zip tie like you have or I'm even contemplating just drilling a hole, using a grommet and running them down the inside of the rack.
Last edited by BrandonS; 01-11-2013 at 12:06 AM.