
Transfer case inspection plate Torque and bolt sealant?


Ok I used Permatex Gear Oil RTV Sealant for the inspection plate and the blue loctite on the inspection plate bolts. but my torque wrench is to long to use under my disco so I had to guess at the 18 LBS torque for the bolts. I just hope it doesn't leak.
Last edited by aftermath431; Jul 29, 2014 at 08:21 PM.

Recovery Vehicle
Joined: Jan 2012
Posts: 1,064
Likes: 16
From: San Antonio,Tx
I have to reseal the inspection plate on the transfer case because I did not put any sealant on the inspection plate bolts and now they are leaking. can someone till me what the torque is on the inspection plate bolts and what I should use on the bolts to keep them from leaking gear oil? also if any knows the sequence on what order to tighten down the bolts that would help.
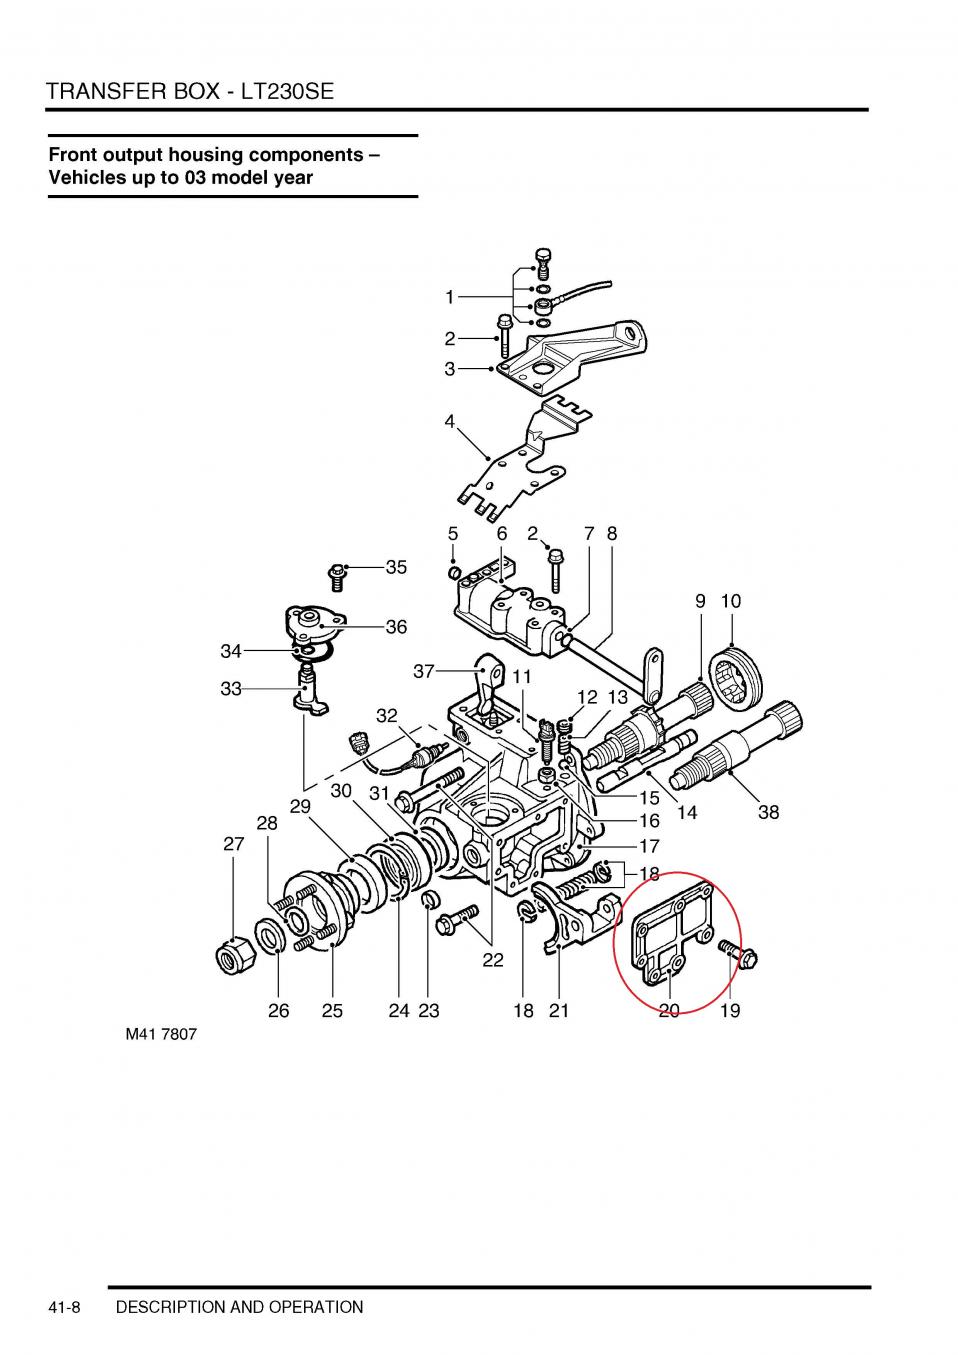
Here is most of what you need:
1) T-Case Bottom cover.pdf
2) The bolts get 18lbf.ft
3) I follow this guide to find a substitute for the Land Rover sealants. So use Loctite 243.
STC50550 : Loctite 5900
STC50551 : Terostat 8586
STC50552 : Loctite 243
STC50554 : Loctite 648
STC3811 : Hylomar 101 (Amine curing RTV silicone sealant - engineering grade)
STC4404 : Hylomar 607 (Oxime curing RTV silicone sealant adhesive)
STC4600 : Hylomar 3400
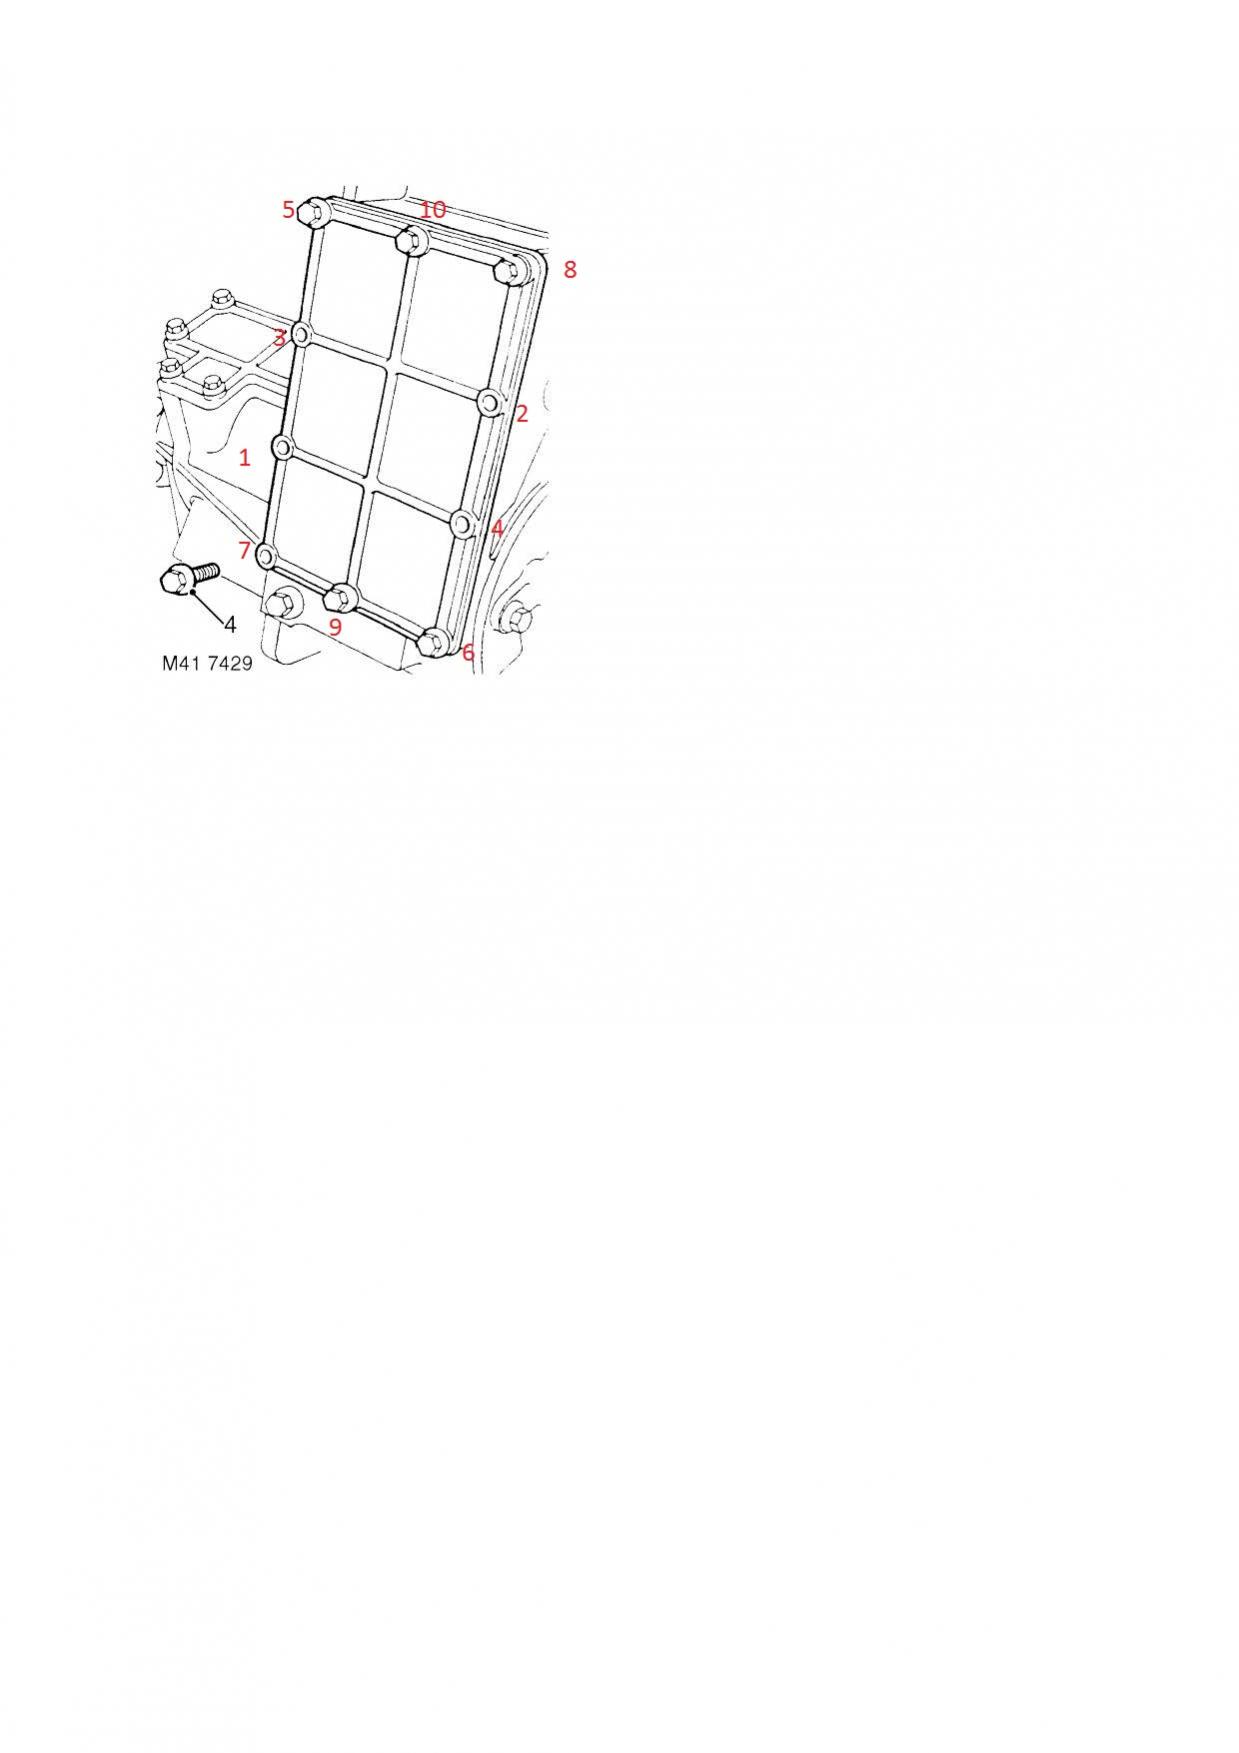
4) The RAVE does not indicate a pattern to tighten the bolts in so use a typical cross pattern. I work from the middle out and then recheck everything after the first torque down. (right click on the picture below and pick open in new tab, then open the new tab and click on the picture to zoom in.)
Last edited by Jared9220; Jul 28, 2014 at 05:53 PM.

Has anyone removed the upper transfer case inspection cover without taking out the transfer case? It would appear to me that the clearance is too tight to remove the bolts as they hit the transmission.
I am also resealing my lower inspection cover in the near future, is it necessary to remove the cross member? Any advise on removing it, even with a big breaker bar the bolts seem to be frozen. If i sent up snapping them... can you insert a new nut in behind?
Sorry to have thread jacked a little...
I am also resealing my lower inspection cover in the near future, is it necessary to remove the cross member? Any advise on removing it, even with a big breaker bar the bolts seem to be frozen. If i sent up snapping them... can you insert a new nut in behind?
Sorry to have thread jacked a little...
Recovery Vehicle
Joined: Jan 2012
Posts: 1,064
Likes: 16
From: San Antonio,Tx
Has anyone removed the upper transfer case inspection cover without taking out the transfer case? It would appear to me that the clearance is too tight to remove the bolts as they hit the transmission.
I am also resealing my lower inspection cover in the near future, is it necessary to remove the cross member? Any advise on removing it, even with a big breaker bar the bolts seem to be frozen. If i sent up snapping them... can you insert a new nut in behind?
Sorry to have thread jacked a little...
I am also resealing my lower inspection cover in the near future, is it necessary to remove the cross member? Any advise on removing it, even with a big breaker bar the bolts seem to be frozen. If i sent up snapping them... can you insert a new nut in behind?
Sorry to have thread jacked a little...
I have looked at the cover closely and I think that you can remove all but 1 of the bolts with the T-Case in place. I think I might try and remove all of the bolts I can and just loosen the one bolt right up against the trans pan. I think I might be able to swing the plate down and apply the new gasket with it still attached. (This is only a guess at this point though. It might not work)
Use liquid wrench on the frozen bolts and let it sit.
Some people have had luck using oil stop leak so that might be worth a try before you start unbolting things.
I have some white Shepperd/blue devil stop leak here that I intent on putting in once I reseal the t-case inspection covers as good measure for future leaks and main seals. Let me know how the side cover goes.
Thanks for the help Jared your information is going to make things a'lot easier. I have one more question. What about the end of the bolts does anyone use sealant around the ends to keep them from leaking our is there crush washers on them? since the sealant only goes around the bolt holes on the inspection plate and the threads of the bolts. last time I did this I got a few leaks coming from the inspection plate bolts because I didn't seal them with anything. I found out that there is a relatively new sealant for use with synthetic gear oils called Permatex 81182 Gear Oil RTV Gasket Maker. I think i'm going to try this stuff if I can find it in the auto store.
Last edited by aftermath431; Jul 29, 2014 at 07:15 AM.
(update) Iv'e tried the black RTV sealant on the inspection plate in the passes and it still leaked. This time using Permatex gear oil RTV sealant and a little lock tight on the bolt treads along with some blue devil for good measure. It hasn't leaked a drop since repair. So I would say if you have a inspection plate leak this is the way to go. Just do your best to torque the bolts to spec's.
Last edited by aftermath431; Dec 20, 2014 at 11:14 AM.

Mudding
Joined: May 2014
Posts: 112
Likes: 9
From: Colorado Springs, Co
FWIW. I tried 3 times to get my inspection cover sealed with Gear Oil specific RTV to no avail. Eventually built a paper gasket and used RTV and that finally did the trick. Definitely would advise using a real gasket to avoid doing the nasty job twice.

Super Moderator
Joined: Jul 2013
Posts: 5,794
Likes: 211
From: dallas texas
for best results in this method. use compressed cardboard. large corrugated cardboard is a no go.....it will not last. (a suitcase of beer will completely do a couple of motorcycle engines)
*take the piece, that needs a gasket, and cover it with a thin layer of oil.
*lay the piece onto the unfinished side of the cardboard and press
*remove the piece and you now have an outline of the surface area.
*cut with a razor blade(scissors will compress edges)
*drill or punch out bolt holes (leather punch or paper hole punch works on small ones)
*sandwich
Last edited by dusty1; Dec 22, 2014 at 11:26 AM.

Mudding
Joined: Mar 2014
Posts: 155
Likes: 14
Cheers!
Georges