When you click on links to various merchants on this site and make a purchase, this can result in this site earning a commission. Affiliate programs and affiliations include, but are not limited to, the eBay Partner Network.
First off, a BIG hats off to p_gill who babysat me through my first serpentine belt replacement (as well as the reservoir and the tensioner pulley). He was instrumental in my decision to not only tackle the project, but also document it. And he was kind enough to not only point me to his own threads where he provided step-by-step instructions but other's threads as well, and even took my calls on more than a few occasions when I hit an impasse.
While all the info and tutorials are enough to get you through the process, there are holes that I think can be filled to make the process even smoother, which is what i hope my experience will do for you if you attempt to tackle it yourself.
DOs
Be patient
Make sure to have a SHORT 18/19 mm wrench
Know that the space you'll be working in is TIGHT. At times you will think "there ain't no way in hell...!" Hell and I both assure - there is a way.
Follow my pitfalls so you can avoid them
Consider ordering other parts you'll be exposed to while you're at the water pump (listed below with part numbers)
DON'TS
Be on a clock (it took me 7 hours; i was being cautious and trying to decipher what was actually going on with the pics i was looking at; but i'll say that by the third time - yes, third (i'll get to that) i was in and out of the hood in less than an hour)
Give up hope - it can be done (and with what I'm going to share, in a fourth of the time it took me; in fact, if i had to do the entire thing over again knowing what i know, i bet i could put the new belt on, swap out the idler pulley and tensioner in an hour, hour-and-a-half tops!)
Disregard my pitfalls. It will save you time and grief.
Be intimidated
Remove any fluid lines - it makes it harder on the front end but saves on the backend not having to bleed lines (AC, power steering, etc)
REFERENCE
Here are all of the links I was provided so you can familiarize yourself with everything. I'm a firm believer in the more complete a picture is painted, confidence increases while mistakes decrease.
PARTS LIST Best prices on OEM out there!
I ordered a couple of parts from these guys off ebay and the order came with a card to this site; hands down the cheapest supplier of OEM parts out there. Here is a list of everything you could replace if you have to do the belt (in no particular order):
LR006861 Water pump
LR006072 Water pump gasket
LR003203 Thermostat
LR006071 Thermostat Housing
LR001517 Thermostat gasket
LR005993 Drive pulley (special tool required to remove)
LR006076 Idler pulley
LR004667 Tensioner
LR007207 Power steering pump
LR009387 Power steering pump seal
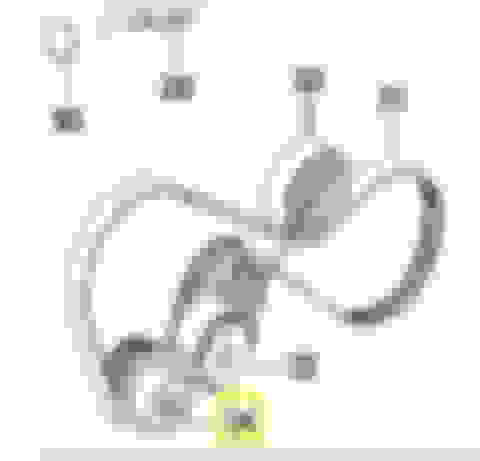
BELT ROUTING
The larger loops to the left and right are the AC compressor (L) and the power steering pump pulley (R).
BELT NOTE: When putting on the belt, make sure the flat side is on the exterior and the grooves on the interior. Also, once you get the belt around passed the pumps, don't worry about putting it around the power steering pulley. Immediately, route the belt following the routing pic at the beginning, making sure to route the belt under the drive pulley. This will save you some from having to do what i did and remove the tensioner completely to route the belt.
SYMPTOMS
Steering wheel began grabbing and squealing on turns. Mild at first but progressively worsened. A European auto shop i use wanted to charge me $2800 and they did nothing more than pop the hood to show me that a third of my belt was missing and that I shouldn't drive. Anyway, after getting in i found the problem:
Something seems, oh, i dunno, off. Like, the pulley!
The bearing seized and the belt just ground off the pulley. The exposed locking washer then sheared off the edge of the belt:
Who knew washers could kill?
Though I didn't discover that the tensioner was missing its pulley until later, it was obvious from all the belt debris that something had gotten ahold of it.
INSTALLATION (belt, tensioner pulley in my case)
REPAIR PATH OF LEAST RESISTANCE
There are a number of things p_gill and others have shared that can be attributed to squealing, like a dirty reservoir, fluid, etc. So, as they did, I recommend start with the easy stuff before going deep under the hood.
Remove bracket between ac compressor and steering pump
Free the bracket behind steering pump (remove the top bolt; only loosen the bottom)
Remove the power steering pump and the pulley
Disconnect MAF
Squeeze the small tab at the bottom while grasping the sides of the connection on top of the air intake and pulling
Disconnect Intake
Pretty obvious: squeeze the spring ring and separate
Remove Cabin Filter Box
TIP: no need to remove the cover or the filter. The entire housing comes off intact. Just pull straight up to remove the legs from the rubber grommets.
Remove Battery and Tray
To release tray, pull slightly up and back
Lock Open the Tensioner
roughly, the correct orientation of the tensioner while on the vehicle
Here's where the short 18/19 mm wrench is key. If you have it, great! All you need to do is use it to push down the tensioner (top, right "hook") all the way. And when you think you've gone far enough - you haven't. You have to go far. While you're applying pressure (and the wrench is grinding into your palm), you need to slip the hex key into the hole. You'll know if you've applied enough tension when, as you ease off the tension, the hex key is shouldering all the tension. And you're onto the next step.
If, however, all tension is returned back to the belt, you haven't gone far enough. Try again, young Jedi. Once you get it locked open, move to the next step, Removing the AC Compressor. Otherwise, continue reading if your wrench is too long (that's what she said) or just can't seem to get the tensioner to lock open.
Long Wrench Solution (you'll need two wrenches)
So, I tried this both ways, with and without tension on the belt. The only real advantage of the belt under tension is you have access to that part where the wrench fits. However, if your wrench is too long, the power steering pump will prevent you from releasing enough tension to successfully drop the hex key into the hole to lock it open. Even positioning your wrench to extend between the steering pump pulley and the pump itself won't allow it because the axle of the pump obstructs you completely.
When p_gill said you have to "push down far" he meant it. You have to push far.
First, you'll need to remove the AC compressor so jump to the next step and then finish reading below...
Oh, hey. That was fast. OK, with all of the bolts holding the compressor on removed, place one of your wrenches on the cabin-side of the tensioner (top, right hook in pic) and push back as far back as you can go. Then find something long (i used a socket extension), go under the supply line of the steering pump, over the wrench handle and into a hole of the power steering pulley effectively wedging open the tensioner (see pick). With tension now off of the belt, you can move the AC compressor out of the way. With tension on the belt you can't do that.
Tension is relieved so you can move the AC compressor
With the compressor freed from its mount and out of the way, use one of the wrenches to access the tensioner from the front (left hook in pic). Going straight back (right, toward cabin) will cause you to bang against the brake vacuum so you will need to go slightly back then slightly right to clear the housing (it's not much more clearance, but it's enough). Now, while you're holding tension from the front, tension on the back will be relieved allowing you to take the wrench and turn it so the angle of the wrench is pointed up. Doing so gives you about another half- to full inch clearance than if it was pointed with the angle down.
This will allow you to push the tensioner to its stopping point and allow the hex key to successfully lock it open.
Remove the AC Compressor
Remove the 3 bolts on the black plate that runs from the engine block to the bottom of the AC Compressor.
Remove support by rotating counterclockwise 90-degrees and sliding under conduit
Remove the 3 other bolts holding the compressor
With tension off the belt, and the bolts removed, you can now move the compressor. I found that moving it forward allowed me to remove the belt from the compressor pulley more easily. once you get the belt off, move the compressor back and as far left as you can manage. This does two things: allows you to see the drive pulley below (not visible in this pic) AND gives you access to the tensioner bolt in the event you have to remove it as I did.
Compressor moved back and left, exposing the drive pulley (not visible) and the tensioner bolt (red)
Remove Braces Between Compressor and PS Pump and from the PS Pump Itself TIP: Don't remove the lower bolt on the power steering pump. I didn't because I knew it looked to impossible to get back on (p_gill did and confirmed it's as bad as it seems). Just loosen it enough so you don't remove but that when you remove the top one, the bracket moves freely without impeding separation of the pump.
Remove Power Steering Pump
Now for the fun part. Honestly, it's not as difficult as I thought it would be to remove the PS pump. It's awkward but doable. The real challenge is everything behind it. ugh boy.
The 2 bolts you need to remove are located here: The second bolt is in the same spot on the other side. Use a socket to access.
Separate Power Steering Pulley from Water Pump
Two Torx screws are all that's keeping you from separating everything at this point. At first it doesn't seem like you can access. With some angling, I found the perfect way:
Come in with your tool from behind the supply line.
Now that the bolts are off comes perhaps what i consider to be the absolute test of patience and sanity: getting the power steering pump out of the way. Behind the steering pump is the water pump. Between these two are the components that spin the water pump, specifically a spring. FORTUNATELY mine never separated with the water pump, but p_gill warned me that it might and that if it did it needs to be reinserted correctly. Otherwise, expect a "clicking" if i recall his words.
So, with everything unscrewed, pull out and away from the engine and lift up to clear a small lip/ridge of the engine bay housing. According to p_gill's updated tutorial, removing the high pressure line of the power steering makes this job considerably easier. To be honest, with it attached and if the spring came out with the power steering pump, i just don't see how you could get the spring back in much less determine if you did it correctly - there is JUST. NO. ROOM. You can't see anything. And i barely had enough room to slide the belt in there.
Belt Removal/Replacement
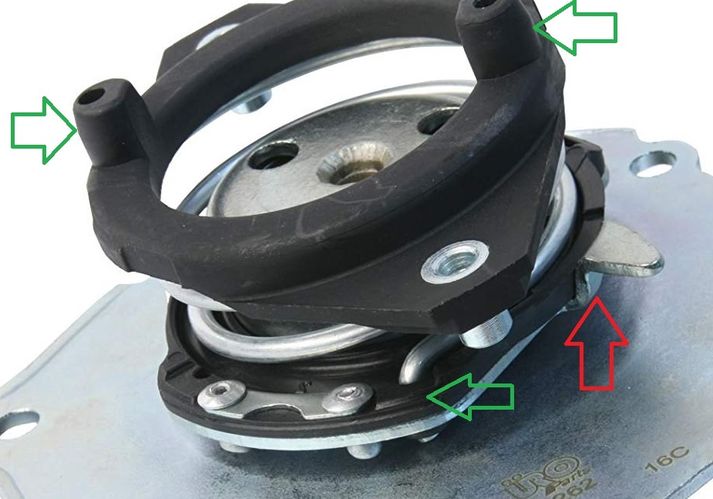
At any rate, pull out on the steering pump until you're able to remove the old belt and/or install the new one. With any luck, your spring remains intact. If not, p_gill's updates should at least keep you going. Here is the pic he supplied (note the spring at the bottom):
If your spring doesn't come out with the ps pump, all you will need to do to reinstall the pump is make sure the black points (where the 2 green arrows are) go into the respective holes on the power steering pulley. To get the steering pump back onto the water pump, angle the pump so the bottom of the pulley clears the lip/ridge of the engine bay first. You'll need to spin the water pump or pulley so that the black "pins" line up. As long as they go in and everything lines up, you're good to go.
At this point, you are fully aware of the cluster that is the belt replacement. It only makes sense to replace parts you already have access to (most of which are fairly inexpensive): power steering (pricey, even at $500 though JCWhitney has an A1 Cardone for $175 after 15% off with email address), tensioner, pulleys, water pump (i think the thermostat is in this area but looking at the manual really quickly for pics, I think i saw that it's at the front of the engine).
Regardless, it's something to consider. I didn't have the luxury of preparing in advance but knowing what I'm against, I don't mind going back in to replace these parts soon. However, I'm sure there will be something you have to deal with then that you don't have to now if you're only replacing the belt - fluids.
You Made It!
If you got this far, congratulations! You're home free. Here's the wrap-up:
Route the belt following the pic at the beginning of this guide
Replace the 2 TORX screws on the steering pulley
Reattach the ps pump's 2 screws
Reattach the bracket that secures the back of the ps pump
Replace the brace between the ps pump and the ac compressor
Realign and partially rethread all but the one screw that will also feed through the black bracket atop the compressor and engine block
Reinstall the black bracket then reattach screws, including the final compressor one
Reinstall the battery tray and battery
Reinsert the air intake housing
Reconnect the MAF sensor
Finally, congratulate yourself for a job well done.
Last edited by razorgaze; Feb 12, 2019 at 01:15 PM.
High Mileage Maintenance items for 3.2
1. Serpentine belt, tensioner, idler - replaced mine at 113,000 miles/10 years
6. Power steering fluid and reservoir replaced due to noisy heavy steering
From your pictures it appears that you will need to consider the O-rings for the brake vacuum pump
10. O-Rings for Vacuum pump (~10 years or sooner if the leak is large) - the Volvo part has new X- shaped o-rings for better sealing Volvo part number 31401556
I can't believe that the belt destroyed the pulley on the tensioner and the belt didn't snap.
That is one tough Land Rover.
For reference here is the link to the list of high mileage maintenance items.
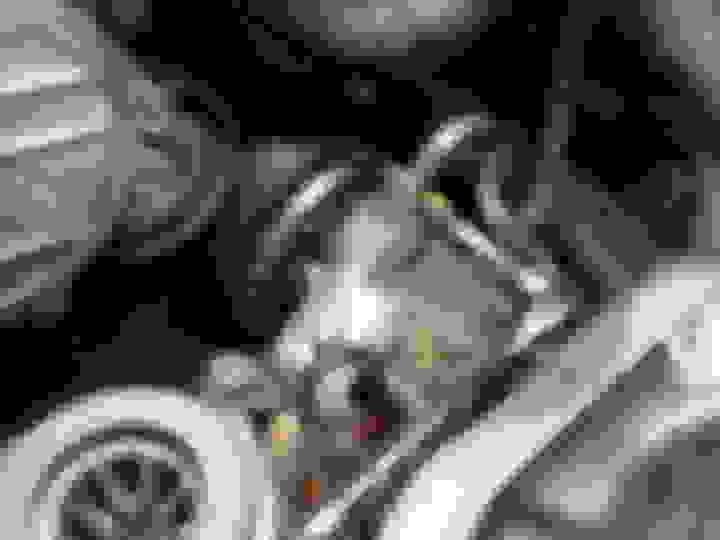
I just finished replacing the serpentine belt, and both pulleys on my 2010 LR2 with 110K miles on it. Your write up is great and used it to navigate the task...thank you! I am about to put back the air cleaner box and the battery tray, but there is a vacuum hose that I dont recall where it attaches (or if it does attach to anything). I used one of your photos with a yellow arrow to show the hose. Do you know what this is for and if it attaches to something? I would appreciate your help.
hey croz, i do not know what it is but do know it isn't connected to anything (on the top) and is more or less just a hook of some sort. I'll reach out to paul who will know!
this is me holding it up or pushing it in this is how it currently sits
I need some help I've got the power steering pump back on but I have to push it in in order for it to connect all the way and I have to hold it there and I don't understand what the 2 torque screws are for because they don't screw into anything so right now I'm trying to determine whether I have it in there right. Also the bracket that goes on the right side of the power steering pump does that have a 12 mmBolt on the bottom that sticks out a little far because all the other bolts have been 10 mm.
Yes it is slightly under tension. once i tightened the bolts it appears secure but im unsure if its correct. whats the worst thing that could happen if its not connected to the water pump correctly?