

Cheapo LR3 build


Thread Starter
|
Mudding
Joined: Dec 2013
Posts: 147
Likes: 13
Had an affinity for Jeeps in the past owning 2 WJ grand cherokee 4x4's. They were just fine but I just grew tired of the Jeep "thang".
After tons of research I narrowed down to the GX470 and LR3. Short version I liked the LR3 better.
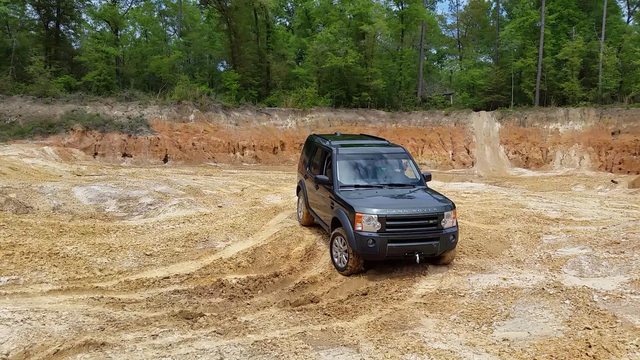
Bought an 06' Tonga Green LR3 HSE with 127k miles for $7,500.
Day I bought her.
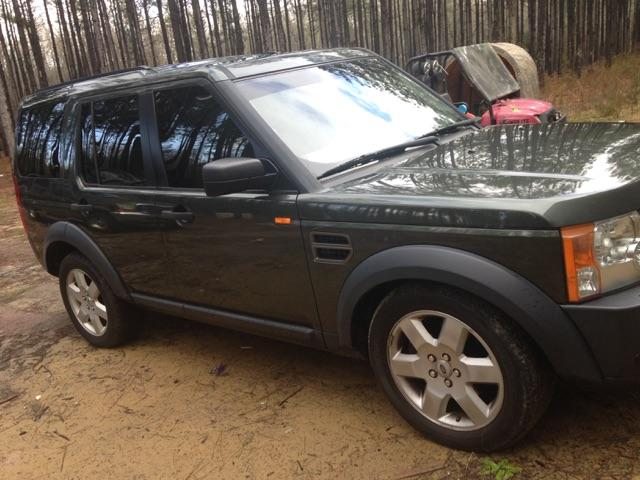
The previous owner maintained the vehicle as best as you'd expect someone who bought one second hand because it looked like a cool way to haul kids around.
I had a week off and the following weekend the wife and I were off to Asheville,NC(1,000 mile round trip) for vacation so I got busy prepping the truck. The Smokies just sounded less fun in my car.
I drained and filled every fluid. Short sentence.. Alot of work.
New front rotors and pads..(rust was a pain in the you know what)
Only the rear AC was working so after research I ordered a resistor being a common failure point(original looked bad). Figuring why not clean the blower fan I discovered the blower brushes were just mangled. New blower ordered but wouldn't make it in time for Asheville. Grand total was $29 from rock auto .
.
Then I addressed the rust. I have before pictures but not after so I'll hold off. I knocked off the flaky bits, treated with Ospho, and painted with rustoleum. Ospho is an acid that literally converts the rust to a black iron oxide that's both strong and essentially metal. I've had awesome results with it in the past.
I bought a set of 18" wheels with 60% tires for $400. They are very street oriented but i'm running them for now. AT's later. I put up the 19's for sale @ $200 but so far no bites.
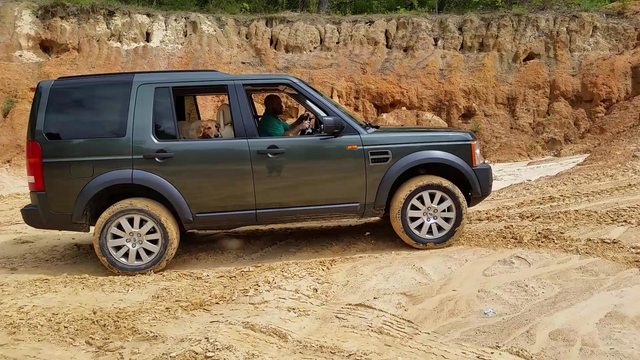
Off we went and everything went great. I even had time to hit a trail.. Hurricane Creek trail on the way to Max Patch. I was alone and a bit nervous but the LR3 literally walked the whole trail with barely a tire slipping(on street slicks).. Color me impressed.
There was a DEEP crossing but too occupied with everything to take pictures.
Poser water crossing.
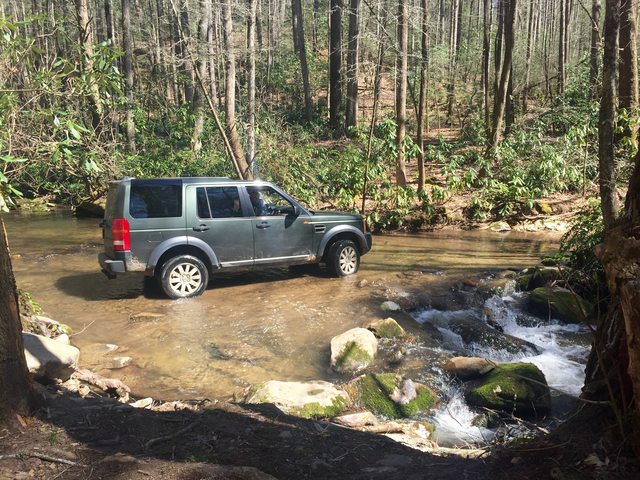
Got a video of this and even taking a hard line it just idled over(tons of rain overnight).
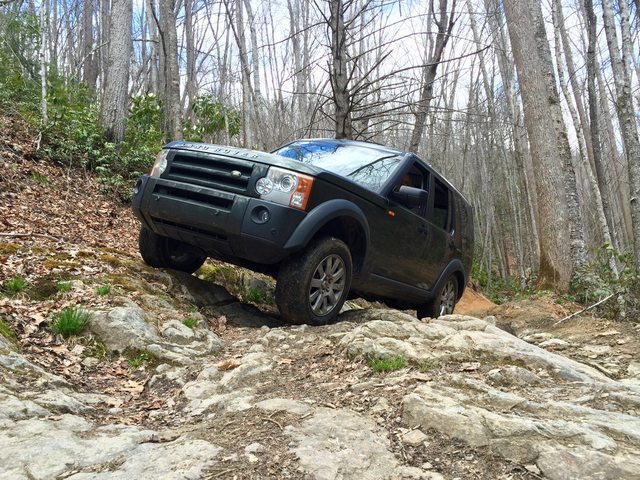
Got back home and played in the mud a little bit with a riding buddy. I even tested some articulation.
Decided since I like to explore alone to invest in a winch.
I ended up drilling/bolting a harbor freight universal winch mount to the frame with heavy duty hardware. I was prepared to weld if needed but it wasn't. It's strong and surely hold up to any pulls I may have(not trying to go nuts alone). I paired it with a 9000lb Badlands winch for a grand total of $300. Works great.
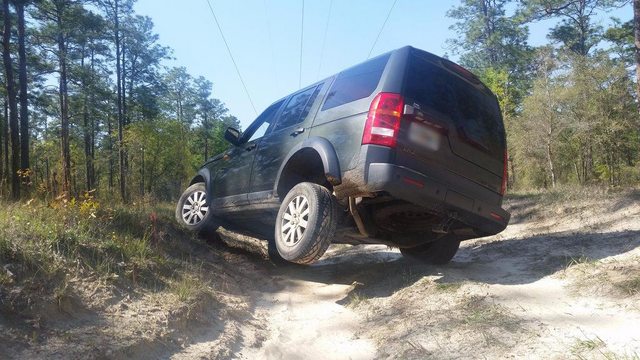
Here's how she sits now
After tons of research I narrowed down to the GX470 and LR3. Short version I liked the LR3 better.
Bought an 06' Tonga Green LR3 HSE with 127k miles for $7,500.
Day I bought her.
The previous owner maintained the vehicle as best as you'd expect someone who bought one second hand because it looked like a cool way to haul kids around.
I had a week off and the following weekend the wife and I were off to Asheville,NC(1,000 mile round trip) for vacation so I got busy prepping the truck. The Smokies just sounded less fun in my car.
I drained and filled every fluid. Short sentence.. Alot of work.
New front rotors and pads..(rust was a pain in the you know what)
Only the rear AC was working so after research I ordered a resistor being a common failure point(original looked bad). Figuring why not clean the blower fan I discovered the blower brushes were just mangled. New blower ordered but wouldn't make it in time for Asheville. Grand total was $29 from rock auto
.Then I addressed the rust. I have before pictures but not after so I'll hold off. I knocked off the flaky bits, treated with Ospho, and painted with rustoleum. Ospho is an acid that literally converts the rust to a black iron oxide that's both strong and essentially metal. I've had awesome results with it in the past.
I bought a set of 18" wheels with 60% tires for $400. They are very street oriented but i'm running them for now. AT's later. I put up the 19's for sale @ $200 but so far no bites.
Off we went and everything went great. I even had time to hit a trail.. Hurricane Creek trail on the way to Max Patch. I was alone and a bit nervous but the LR3 literally walked the whole trail with barely a tire slipping(on street slicks).. Color me impressed.
There was a DEEP crossing but too occupied with everything to take pictures.
Poser water crossing.
Got a video of this and even taking a hard line it just idled over(tons of rain overnight).
Got back home and played in the mud a little bit with a riding buddy. I even tested some articulation.
Decided since I like to explore alone to invest in a winch.
I ended up drilling/bolting a harbor freight universal winch mount to the frame with heavy duty hardware. I was prepared to weld if needed but it wasn't. It's strong and surely hold up to any pulls I may have(not trying to go nuts alone). I paired it with a 9000lb Badlands winch for a grand total of $300. Works great.
Here's how she sits now
Thread Starter
|
Mudding
Joined: Dec 2013
Posts: 147
Likes: 13
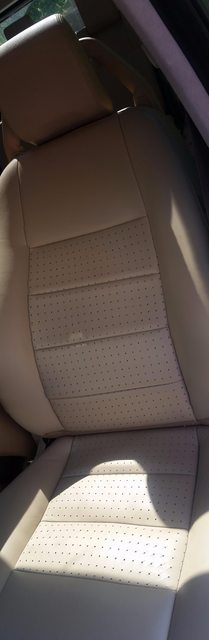
I tackled restoring the driver seat today.
Huge shout out to furniture clinic. I've used leatherique in the past with decent results but heard about this company on a BMW forum I frequent. You can do your own research as there's 100's of threads out there(and probably some here too).
I'll keep this short. Input my color code online, ordered kit for $75 and did the whole seat in a couple hours. IMO the $75 kit is enough for 2 seats.
Step one
Wipe with prep/brillo pad
Step two
Wipe with Alcohol
Step 3
Apply thin coat with provided foam "brush"
Step 4
Apply colorant with provided airbrush
Step 5
Apply Clearcoat/protectant.
This system is the same way all factory leather is dyed and the color of your leather is just a painted/dyed piece of cow Hyde.
I feel the result speaks volumes.
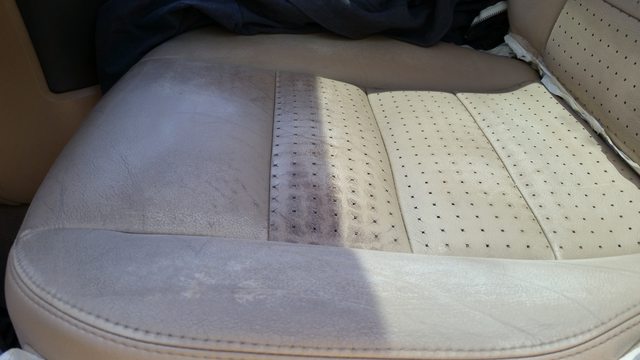
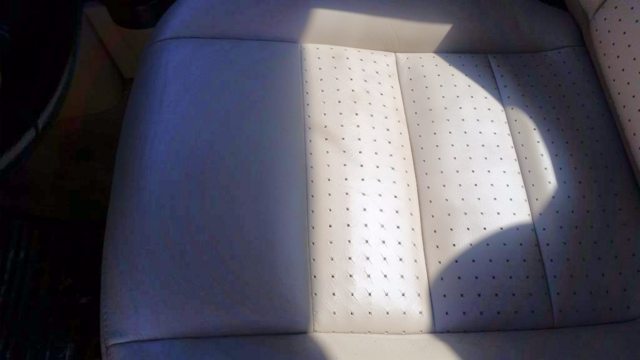
Before.
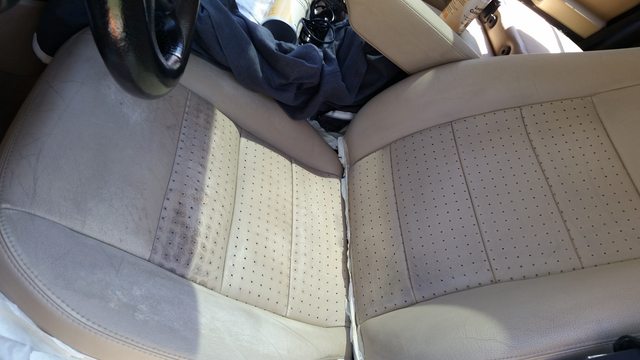
After.
A trained monkey could do this as to which i'm proof positive.
If you're thinking of doing it then just go for it..
Huge shout out to furniture clinic. I've used leatherique in the past with decent results but heard about this company on a BMW forum I frequent. You can do your own research as there's 100's of threads out there(and probably some here too).
I'll keep this short. Input my color code online, ordered kit for $75 and did the whole seat in a couple hours. IMO the $75 kit is enough for 2 seats.
Step one
Wipe with prep/brillo pad
Step two
Wipe with Alcohol
Step 3
Apply thin coat with provided foam "brush"
Step 4
Apply colorant with provided airbrush
Step 5
Apply Clearcoat/protectant.
This system is the same way all factory leather is dyed and the color of your leather is just a painted/dyed piece of cow Hyde.
I feel the result speaks volumes.
Before.
After.
A trained monkey could do this as to which i'm proof positive.
If you're thinking of doing it then just go for it..
Last edited by MrWesson; Apr 17, 2016 at 09:25 PM.
Thread Starter
|
Mudding
Joined: Dec 2013
Posts: 147
Likes: 13
Pretty sure it was just the blower motor that went bad.. To explain the brushes you'd have to have an understanding of how an electric motor works.
Basically the blower motor was shot to hell on the inside. It looks as though it overheated and the plastic got between the copper brushes and the magnet.

Recovery Vehicle
Joined: Sep 2013
Posts: 831
Likes: 146
From: Herndon, VA
Interesting. I took my blower motor out a couple of months ago because it was starting to make a fairly pronounced whining sound when turned on. I wouldn't say my brushes were mangled, but I did have a hell of a lot of carbon dust everywhere from the brushes wearing down. I cleaned it up as best I could, sprayed some WD-40 in there and reassembled. The noise was reduced by about 90%. It's still there, but just barely. I have 96k miles on mine and generally leave the fan on all the time.
On a side note, I'm still having A/C issues as well. When it gets hot, my A/C just randomly decides to stop working for a while, then it starts up again. I've checked my pressures and both low and high appear to be good for the operating temperatures that day, so I think my system is charged. I actually think I overcharged it, so let some out until the pressures came down to where I liked them. Is the resistor that you're talking about, the same as the final stage resistor in the range rovers? In other words, it just controls fan operation... it wouldn't have any influence on the A/C, would it?
On a side note, I'm still having A/C issues as well. When it gets hot, my A/C just randomly decides to stop working for a while, then it starts up again. I've checked my pressures and both low and high appear to be good for the operating temperatures that day, so I think my system is charged. I actually think I overcharged it, so let some out until the pressures came down to where I liked them. Is the resistor that you're talking about, the same as the final stage resistor in the range rovers? In other words, it just controls fan operation... it wouldn't have any influence on the A/C, would it?
Last edited by cmb6s; May 12, 2016 at 09:34 AM.

Baja
Joined: Mar 2009
Posts: 5,736
Likes: 230
From: south n.j. and ne va.
X 2 on how you mounted the winch
Also I would have bought the 12 k, same physical size
Also its worth buying synthetic line and a polished aluminum fair lead, makes the road manners better less weight in center since iirc its like 30+ # of cable
Lr3 is extremely capable off road it weakness is the height sensors and wiring in wheel well areas , a stick pops up or tire throws it in there and it breaks a wire or sensor you will be on the ground
If you want this moved to the build section let me know

Baja
Joined: Aug 2013
Posts: 6,919
Likes: 794
From: Huntington Beach CA
I sent a pm, did you just type in Alpaca beige for your color?
I tackled restoring the driver seat today.
Huge shout out to furniture clinic. I've used leatherique in the past with decent results but heard about this company on a BMW forum I frequent. You can do your own research as there's 100's of threads out there(and probably some here too).
I'll keep this short. Input my color code online, ordered kit for $75 and did the whole seat in a couple hours. IMO the $75 kit is enough for 2 seats.
Step one
Wipe with prep/brillo pad
Step two
Wipe with Alcohol
Step 3
Apply thin coat with provided foam "brush"
Step 4
Apply colorant with provided airbrush
Step 5
Apply Clearcoat/protectant.
This system is the same way all factory leather is dyed and the color of your leather is just a painted/dyed piece of cow Hyde.
I feel the result speaks volumes.
Before.

After.


A trained monkey could do this as to which i'm proof positive.
If you're thinking of doing it then just go for it..
Huge shout out to furniture clinic. I've used leatherique in the past with decent results but heard about this company on a BMW forum I frequent. You can do your own research as there's 100's of threads out there(and probably some here too).
I'll keep this short. Input my color code online, ordered kit for $75 and did the whole seat in a couple hours. IMO the $75 kit is enough for 2 seats.
Step one
Wipe with prep/brillo pad
Step two
Wipe with Alcohol
Step 3
Apply thin coat with provided foam "brush"
Step 4
Apply colorant with provided airbrush
Step 5
Apply Clearcoat/protectant.
This system is the same way all factory leather is dyed and the color of your leather is just a painted/dyed piece of cow Hyde.
I feel the result speaks volumes.
Before.
After.
A trained monkey could do this as to which i'm proof positive.
If you're thinking of doing it then just go for it..
Thread Starter
|
Mudding
Joined: Dec 2013
Posts: 147
Likes: 13
Doing so would require a bumper removal and I moved through it pretty fast/didn't take pics.
I've had some really hard pulls with it and its holding up just fine.
That being said the install is totally custom and if you can get a mount for around $300 I'd go that route if I did it all over again.
I've had some really hard pulls with it and its holding up just fine.
That being said the install is totally custom and if you can get a mount for around $300 I'd go that route if I did it all over again.