

Thermostat Housing Tabs Broken Off


Thread Starter
|
1st Gear
Joined: Sep 2014
Posts: 1
Likes: 0
Hey there-
First time post here, but really glad I came across this forum.
Recently my thermostat dash gauge has been going up much higher than its typical mid-point. I'm at 104k miles, and figured it was time for a new thermostat. So I purchased a new thermostat and housing O-ring seal and went to install it today.
Howver, when I removed the three screws holding the thermostat housing onto the rest of the housing, the thermostat was loose inside. Furthermore, both tabs had broken off. One was still stuck to the proper place and I was able to retrieve it, but the other fell down into the angled pipe and into the coolant.
I tried to retrieve it with both a long-handle flathead screwdriver and with needle-nose pliers, neither of which worked.
Given the fragility of the housing tabs, I went ahead and purchased a full new thermostat housing: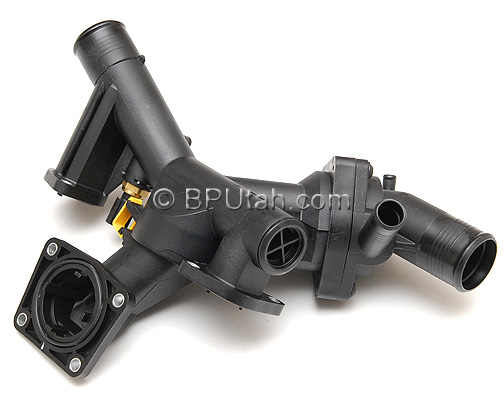
However, my question is, how the heck do I make sure that tab doesn't get into the engine and block a coolant channel? I'm afraid that when I go to drain the coolant in order to replace the full housing, that the tab will get pulled down into the engine and I'll never get it out without it costing a ton of money. It's possible that it's still in the housing, in a horizontal portion of the piping, but I'm not positive.
Any tips/tricks would be extremely appreciated!
Eric


Pro Wrench
Joined: Sep 2008
Posts: 1,673
Likes: 153
From: Edmonton Alberta Canada
Maybe I would just try removing all the rest of the plastic without doing any draining.
Yes, it would be more mess but the odds are the broken bit is still within the removed plastic. If so, draining could also move the broken bit further into the system. Once I had the plastic parts removed, then I would inspect them and hope the broken bit was within. if not, it may be easier to find the bit in the engine or maybe it will flow out with the spilled coolant.
All the plastic cooling system parts gets brittle with time so what you are doing, replacing the whole assembly is the correct procedure; also you get a new "free" thermostat properly installed. As is usual with a Land Rover, installing the thermostat is not simple.
You will also see a plastic tee in one of the upper small hoses, part number LR027661 that you should replace as well.

Pro Wrench
Joined: Sep 2008
Posts: 1,673
Likes: 153
From: Edmonton Alberta Canada
If you know where the piece is and if you think it will flow into your bucket rather than into some internal engine pocket, then yes.
I did not realize that you still knew where the piece was - just gone from view it would seem instead of gone who knows where.
Anyway, replacing all the plastic is good practice. I assume you will be putting new Land Rover accepted coolant in? The aluminum block is fussy regarding corrosion concerns.
Orange coloured Chevron Texaco Havoline Extended Life XCL seems to be the correct stuff.
Bleeding the all the air out is near impossible by the way - takes hours.

Thread
Thread Starter
Forum
Replies
Last Post
Ron Gomes
General Range Rover Discussion - Archived
3
May 11, 2013 05:49 PM