When you click on links to various merchants on this site and make a purchase, this can result in this site earning a commission. Affiliate programs and affiliations include, but are not limited to, the eBay Partner Network.
There is a super nice wireless system by Trigger ($235USD that switches 4 12V circuits) that doesn't require punching a hole through the firewall: Trigger
For both systems, the switching box can be mounted in the engine compartment near the easy to access factory 12V power take off points and ground point that are at the right front of the engine compartment.
Or....
If you want to go super economical but still very usable and if you don't need expandability and just want to switch one circuit with the minimum of wiring/effort, get these really nicely made $19 pre made/water resistant wiring harnesses w/ 12V switching relays to wire up the lights: One Circuit wiring harness or Dual Circuit wiring harness
If you don't want to punch a hole through the steering wheel grommet to run the physical switch that is included, get this $22 RF switch module to plug into the above harnesses instead of the wired switch (can even run them in addition to the wired switch): RF Remote Switch
The cool thing is that if you don't want to just use the little included Key Fob to control the lights, it runs on the same radio frequency as garage door openers and you can just program one of your Homelink learning garage door opener buttons on the Defender's rear view mirror to activate the light! A very clean solution if you have simple needs, and cheap too!!!
This is exactly the type of thing I am looking for. Seems like I can get all the wiring/switch for about $40. Dual circuit and RF switch. is it pretty straight forward to program the garage door opener button on the mirror to activate them? I really like that idea.
Now I just need to shop for some bargain-brackets.
Sorry @paule i don�t have photos of the brackets. The install shop handled all of that.
as far as performance, absolutely great! It gives you way more confidence off road and on super dark / abandoned desert roads.
I will have to say my tests have been very enjoyable but not extensive yet. Haven�t had as much time off road lately as I�d hope.
if I have any concern it�s that I think on really hilly or undulating terrain, such as �whoops� these are mounted low enough that they will cast shadows.
Every mounting position has tradeoffs. I could have avoided this if I had mounted ditch brackets on the hood, but then I�d have to deal with wind noise, which was a no-go from me.
One other question I have is whether I have affected the engine�s cooling since these do block some airflow. So far no issues whatsoever but I will have to monitor it when the weather gets hot and / or if I tow heavy.
This setup was ideal for my particular situation! YMMV.
This is exactly the type of thing I am looking for. Seems like I can get all the wiring/switch for about $40. Dual circuit and RF switch. is it pretty straight forward to program the garage door opener button on the mirror to activate them? I really like that idea.
Yes, if you have the 3 buttons on your Defender's rear view mirror (labeled 1 2 3) then you have the HomeLink� RF learning remote function built into the car (I think it works with all 430 MHz garage door remote transmitters). The little keychain remote that comes with that $21 wireless switch uses button A to turn the switch on/off constant mode (the other buttons toggle through different flash patterns, but check this when you get it).
To program the rear view mirror learning remote check your owner's manual or this video:
You only need 1 of the 3 available learning remote memory slots to turn the RF switch on/off but if you're not using any of the other memory slots, you can program the other strobe mode buttons or another RF switch that you want to control.
It's a pretty nifty/clean solution : ) good luck and feel free to PM me if you have any questions or problems.
Yes, if you have the 3 buttons on your Defender's rear view mirror (labeled 1 2 3) then you have the HomeLink� RF learning remote function built into the car (I think it works with all 430 MHz garage door remote transmitters). The little keychain remote that comes with that $21 wireless switch uses button A to turn the switch on/off constant mode (the other buttons toggle through different flash patterns, but check this when you get it).
You only need 1 of the 3 available learning remote memory slots to turn the RF switch on/off but if you're not using any of the other memory slots, you can program the other strobe mode buttons or another RF switch that you want to control.
It's a pretty nifty/clean solution : ) good luck and feel free to PM me if you have any questions or problems.
thanks again mate. Really appreciate it.
yes. I have the three buttons but only use 1 for my garage.
Well I decided I couldn't bear not to light up my local ditches.
$175 all in. Taxes, shipping, the lot.
Went with the @Saltek Motorsports brackets as they seem to be beefier than Lk8 (Proud Rhino?) and a quality looking single piece rather than their two. A little more expensive but what you gonna do. Debated going with the clamp to the hood brackets but decided against it. Down the track I can add a sand-flag mount.
Wiring (dual output) and switch from the SuperBrightLED links above. Splurged for 10' of 1/2" loom too.
If nothing else I'll glean an hour or two of fun from the install and wiring. These little mods are really fun to do. Looking forward to it.
Nice to hear! Please take lots of photos to document!
Well I decided I couldn't bear not to light up my local ditches.
$175 all in. Taxes, shipping, the lot.
Nice! The Saitek's are a great choice and they have ways to add stuff onto those mounts (like an antenna, etc) if you ever need that in the future. Post pics of your results.
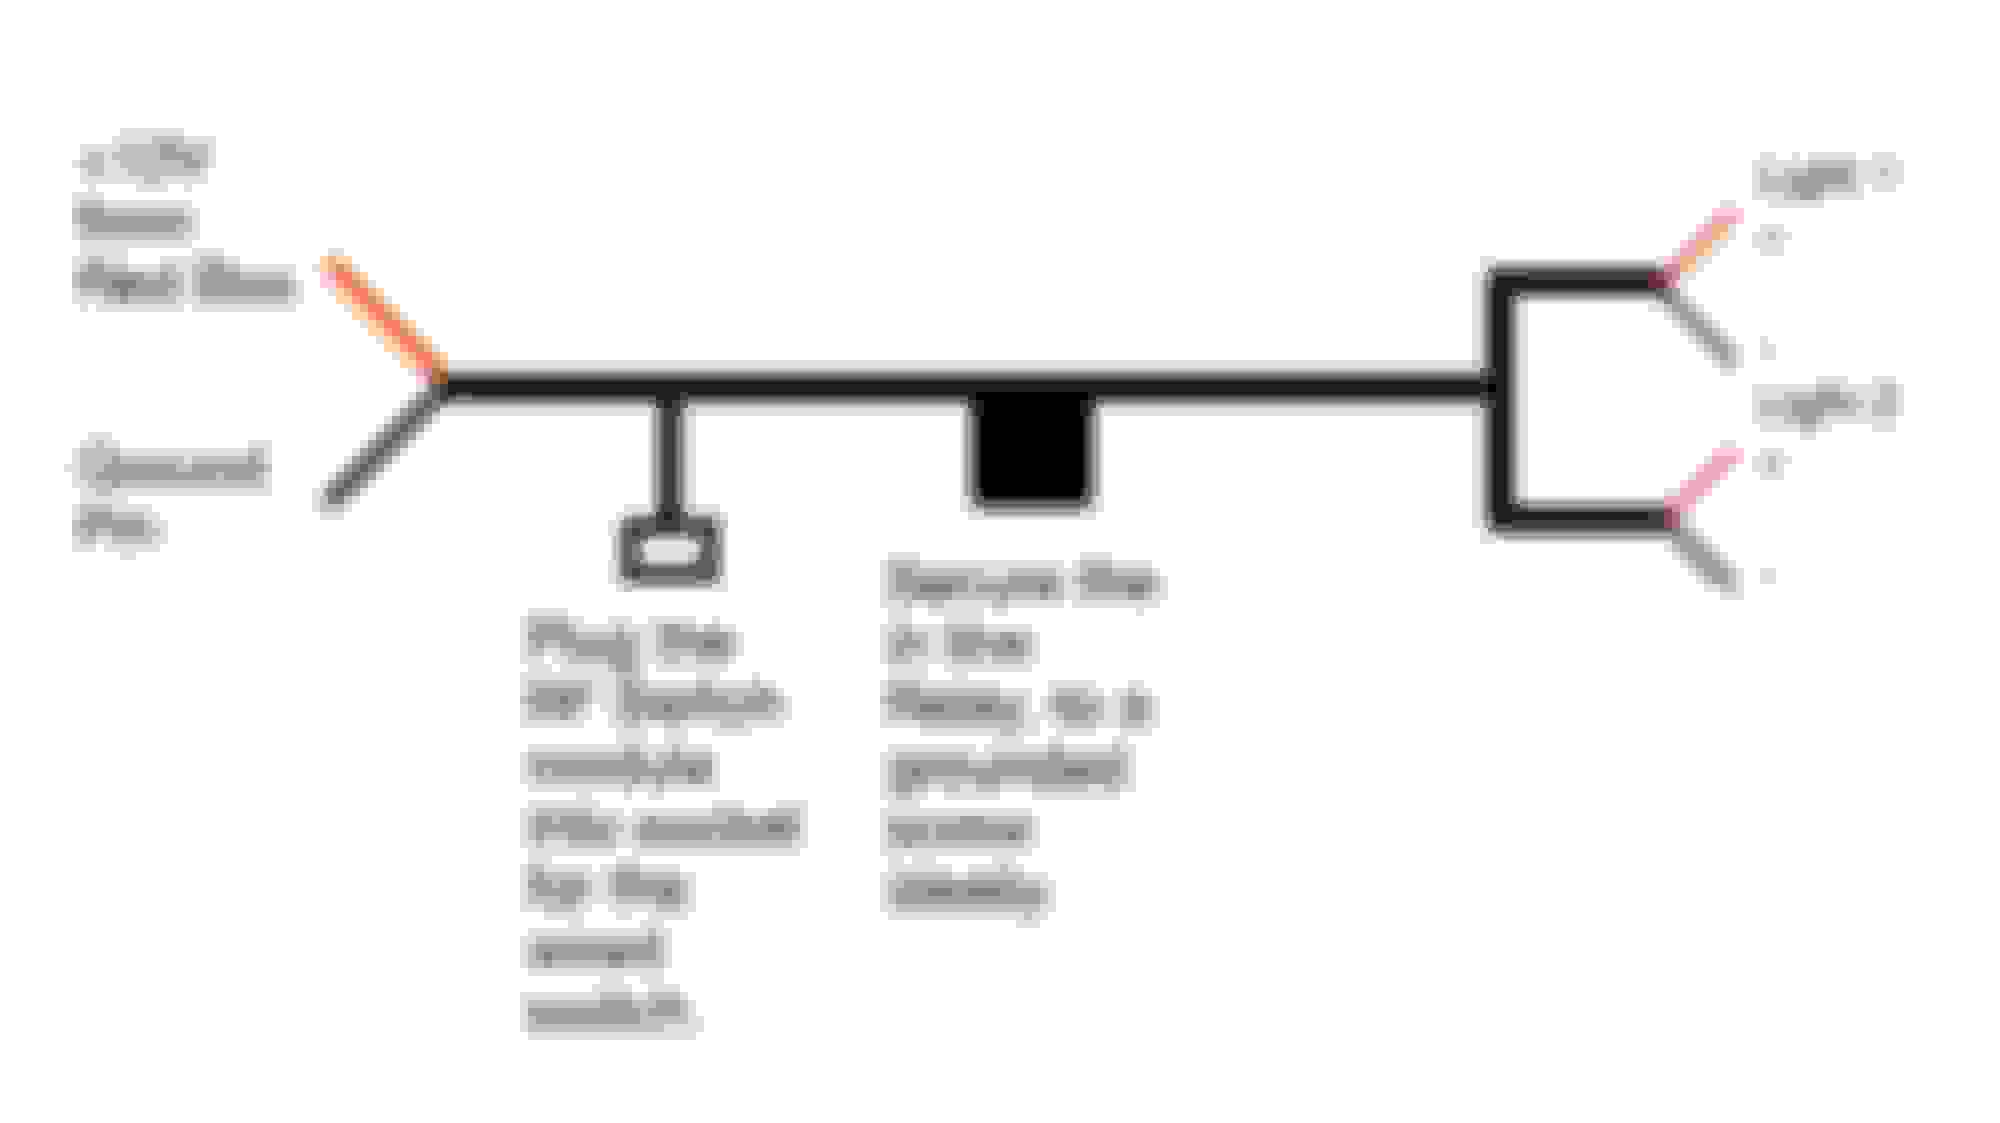
The wiring up is pretty straight forward, LR was nice enough to locate a 2 fused power take off points (you have to go buy the fuses yourself) at the right front fender/engine compartment area right near a threaded ground point:
The wiring harness from super bright LED is easy to hook up (going from memory here so it may not be exact depending on if the wiring harness has been changed), this is how it hooks up:
I ended up securing the excess wiring harness length w/ zip ties to something in the engine compartment. The relay has a metal grounding tab w/ a hole so if you can anchor it to a grounded screw that would be ideal. The RF Switch box I stuck to the body work out of the way w/ double sided foam tape.
Oh and since it sounds like you're mounting up ditch lights, if you take power off that red box, it is not switched by the ignition so even with the engine off you can actuate the light w/ the little key fob remote (ie. take that out of the Defender while you're doing work around the car as an extra way to control the lights). IIRC the HomeLink buttons only respond/work when the ignition is on/on accessory power.
Nice! The Saitek's are a great choice and they have ways to add stuff onto those mounts (like an antenna, etc) if you ever need that in the future. Post pics of your results.
The wiring up is pretty straight forward, LR was nice enough to locate a 2 fused power take off points (you have to go buy the fuses yourself) at the right front fender/engine compartment area right near a threaded ground point:
The wiring harness from super bright LED is easy to hook up (going from memory here so it may not be exact depending on if the wiring harness has been changed), this is how it hooks up:
I ended up securing the excess wiring harness length w/ zip ties to something in the engine compartment. The relay has a metal grounding tab w/ a hole so if you can anchor it to a grounded screw that would be ideal. The RF Switch box I stuck to the body work out of the way w/ double sided foam tape.
Good luck!
Seems like the harness has fuses in it already. Per the description and pictures on their site. Maybe I've got that wrong.
Yes, you are correct, I forgot to include the built in fuse in my crude diagram. The harness has a 20 Amp fuse (if that yellow color in the photo is accurate), hopefully the two lights you're running are under that for current draw.
I didn't use an additional fuse to the harness fuse when I hooked the harness up to the hot terminal (the one closer to the front of the car) inside that red power take off box. But you could if you wanted to be extra OCD or wanted extra protection if you were hooking up multiple items to one circuit (I guess fuses are cheap, car electronics not so much : ).
I'd recommend first laying out and hooking up your lights/harness on the ground next to the car, hooking up the ground, then the +12V lead and running some tests w/ the wired switch, then put in the RF switch and program the RF key fob to your HomeLink button and making sure it all works well before finalizing and running all your wires. When I did my lights, it worked first try when hooked up in this way so hopefully all goes smoothly for you too.
fed the wiring through the foam padding to make use of the space under the plastic cowling that covers the wiper stuff and brake fluid reservoir
Screwed the relay to the metal cross frame in the engine bay and used the space in it to hold the switch.
hot from the proximal screw. The one before the fuse. Not sure if it makes a difference. I can easily change it to the distal one.
ground from the big obvious one where the suspension is attached.
home link button works great. $40 on wiring. $110 on brackets. A bit of shopping and tax. Lights were free. $175 all in. Engine bay electrical fires are a free bonus.

 05-11-2024, 09:54 PM