
radio installation


Recovery Vehicle
Joined: Dec 2008
Posts: 1,175
Likes: 9
From: Chandler,AZ
to use the factory amp, options 1 and 2 which are metra harness 70-1786, or SLC4 or both depending on your aftermarket radio. (they will both come with instructions, or I can try to explain how to wire whatever route you choose)
or to bypass the factory amp or not use it, option 3 run new wires from aftermarket radio directly to the speakers (or for an easier job, go right to the 8 output wires from the factory amp, and use the factory wires from there out to each speaker), you will unplug the amp if you go this route so the amp will be obsolete, you can even remove the amp if you want, but I always suggest keeping it in just in case you ever want to return the setup to stock.
or to bypass the factory amp or not use it, option 3 run new wires from aftermarket radio directly to the speakers (or for an easier job, go right to the 8 output wires from the factory amp, and use the factory wires from there out to each speaker), you will unplug the amp if you go this route so the amp will be obsolete, you can even remove the amp if you want, but I always suggest keeping it in just in case you ever want to return the setup to stock.

Recovery Vehicle
Joined: Aug 2009
Posts: 851
Likes: 0
From: Golden, CO
What a wealth of info Chris! Thanks!
I am getting ready to replace my factory unit. Want to install a iPhone 4 friendly unit with bluetooth, any recommendations? I am seriously considering gutting the factory system out of my rig and putting in all new stuff. Already have 2 nice alpine speakers in the sub spots.
I am getting ready to replace my factory unit. Want to install a iPhone 4 friendly unit with bluetooth, any recommendations? I am seriously considering gutting the factory system out of my rig and putting in all new stuff. Already have 2 nice alpine speakers in the sub spots.
Recovery Vehicle
Joined: Dec 2008
Posts: 1,175
Likes: 9
From: Chandler,AZ
What a wealth of info Chris! Thanks!
I am getting ready to replace my factory unit. Want to install a iPhone 4 friendly unit with bluetooth, any recommendations? I am seriously considering gutting the factory system out of my rig and putting in all new stuff. Already have 2 nice alpine speakers in the sub spots.
I am getting ready to replace my factory unit. Want to install a iPhone 4 friendly unit with bluetooth, any recommendations? I am seriously considering gutting the factory system out of my rig and putting in all new stuff. Already have 2 nice alpine speakers in the sub spots.
ultimately I would do 2 things, go to Best Buy and play with the units on the sound board, listen to them, learn the features and capabilities then find out what ones you think you will use. Almost all of the major brands list the info of their products on their websites so take a look and do your research at home.
I like the iDA-X305S, it is a bit pricey (about $450 with the blutooth module) but it will do so much including Pandora radio through your Iphone and maybe some other apps.
Recovery Vehicle
Joined: Aug 2009
Posts: 851
Likes: 0
From: Golden, CO
I used to own a 87 Audi 4kQ and I had a Ipod/iphone only deck. It was one of the entry level Alpine decks but worked amazing! plus no CD skipping for off road. I do alot of offroading with my rig. Probably 50% of its use.
Only thing I did not like is the bluetooth cost. Also thinking of doing a flip up touch screen with nav capability. Any suggestions in that neighborhood? I could give up the bluetooth in exchange for a good sat nav integrated system.
Only thing I did not like is the bluetooth cost. Also thinking of doing a flip up touch screen with nav capability. Any suggestions in that neighborhood? I could give up the bluetooth in exchange for a good sat nav integrated system.
Recovery Vehicle
Joined: Dec 2008
Posts: 1,175
Likes: 9
From: Chandler,AZ
well I was certified by alpine as a product specialist a few years back so I am a bit biased toward them  . with Alpine just about every unit I believe will need some sort of module for bluetooth. however for navigation I might actually suggest Eclipse (if you can find a local dealer) they have some pretty good products at a pretty good price, and a few years ago they would offer some pretty good deals! unfortunately I don't remember them having much nav stuff in single din but it they may have something that meets all your needs in 1 unit. plus eclipse has pretty heavy duty security features! may suggest AVN7000
. with Alpine just about every unit I believe will need some sort of module for bluetooth. however for navigation I might actually suggest Eclipse (if you can find a local dealer) they have some pretty good products at a pretty good price, and a few years ago they would offer some pretty good deals! unfortunately I don't remember them having much nav stuff in single din but it they may have something that meets all your needs in 1 unit. plus eclipse has pretty heavy duty security features! may suggest AVN7000

to use the factory amp, options 1 and 2 which are metra harness 70-1786, or SLC4 or both depending on your aftermarket radio. (they will both come with instructions, or I can try to explain how to wire whatever route you choose)
or to bypass the factory amp or not use it, option 3 run new wires from aftermarket radio directly to the speakers (or for an easier job, go right to the 8 output wires from the factory amp, and use the factory wires from there out to each speaker), you will unplug the amp if you go this route so the amp will be obsolete, you can even remove the amp if you want, but I always suggest keeping it in just in case you ever want to return the setup to stock.
or to bypass the factory amp or not use it, option 3 run new wires from aftermarket radio directly to the speakers (or for an easier job, go right to the 8 output wires from the factory amp, and use the factory wires from there out to each speaker), you will unplug the amp if you go this route so the amp will be obsolete, you can even remove the amp if you want, but I always suggest keeping it in just in case you ever want to return the setup to stock.

Recovery Vehicle
Joined: Dec 2008
Posts: 1,175
Likes: 9
From: Chandler,AZ
this is where it is in my truck, your trucks location should be relatively close if not the same. this picture is shown with the glove box removed, the arrow is pointing to the amplifier.

reaching up from underneath it is pretty easy to unplug the harness from the bottom of the amp, you may need to remove the glove box if you can't get it from underneath, then it is just a matter of attaching new speaker wires from that plug up to the back of the new radio. I take one length, about 10' or so of 16 or 14 AWG speaker wire fold it in half twice, cut the bends to make 4-2.5' lengths, tape the 2.5' lengths together in a loom like this:

you may want to label the wires at each end to make it easier for yourself.
reaching up from underneath it is pretty easy to unplug the harness from the bottom of the amp, you may need to remove the glove box if you can't get it from underneath, then it is just a matter of attaching new speaker wires from that plug up to the back of the new radio. I take one length, about 10' or so of 16 or 14 AWG speaker wire fold it in half twice, cut the bends to make 4-2.5' lengths, tape the 2.5' lengths together in a loom like this:
you may want to label the wires at each end to make it easier for yourself.
Last edited by Rover Chris; Jan 27, 2011 at 10:41 PM.
Just took out the head unit, the glove compartment, and I see the amp. Now what I want to do is rewire the speakers. So bring 8 wires from the amp to the speakers right? (2 each speaker). Problem is I can't see where the wires from the amp to the speakers are. You said underneath but I'm having trouble doing it. Will try tomorrow.
Recovery Vehicle
Joined: Dec 2008
Posts: 1,175
Likes: 9
From: Chandler,AZ
unplug the harness from the amp and in that harness you will find 8 wires that go from that plug out to the speakers. at that point you will connect your new wires and run them from there to the back of the radio. The purpose is to bypass the amp without having to run new wires all over the truck. all you are doing is running new wires from the back of the radio to the wires in the amp harness(close to the plug). I would not cut the wires in the harness and I would suggest tapping into them roughly 4 to 5 inches from the plug.
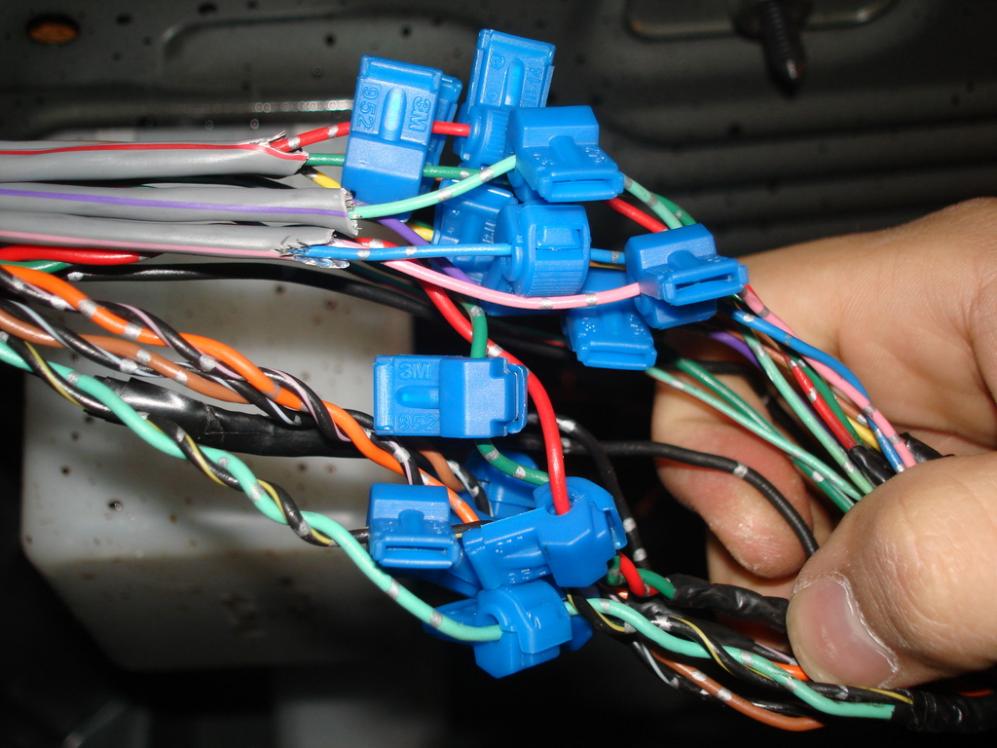
you may find it easier to go to walmart and buy some T taps (like the blue ones in this picture) and male spade connectors to make your connections. the 8 wires you are looking to tap into will be twisted in pairs similar to a few in this picture. you will want to crimp male spades onto the end of your new speaker wires (only at one end). let me know what color wires you have found and I will do my best to tell you what wires go to which speakers.
you may find it easier to go to walmart and buy some T taps (like the blue ones in this picture) and male spade connectors to make your connections. the 8 wires you are looking to tap into will be twisted in pairs similar to a few in this picture. you will want to crimp male spades onto the end of your new speaker wires (only at one end). let me know what color wires you have found and I will do my best to tell you what wires go to which speakers.
Last edited by Rover Chris; Jan 30, 2011 at 05:17 PM.
Recovery Vehicle
Joined: Dec 2008
Posts: 1,175
Likes: 9
From: Chandler,AZ
amp bypass walk through:
what you will need:
about 12 feet of speaker wire (16 to 12 gauge will work although 12 is harder to run through the dash, also pick a speaker wire that you can easily tell polarity I would suggest a red and black set)
electrical tape
wire stripper and crimper (either all in one tool or 2 separate tools)
at least 8 - blue T taps ( and maybe a small pair of pliers to close these)
at least 8 - blue male spade connectors
at least 11 - blue butt connectors
handful of zip ties for a cleaner install (the zip ties are optional)
you can get all of this at Walmart
step 1: remove the radio, remove the glove box, locate the amp and unplug the plug/harness.
step 2: hold the plug in hand (do not let go until the next step) and locate the 8 speaker wires in that plug. The 8 wires should be as follows:
Black/Brown = left front -
Black/White = left front +
Black/Red = right front -
Black/Pink = right front +
Black/Orange = left rear -
Black/Yellow = left rear +
Black/Blue = right rear -
Black/Green = right rear +
each set of speaker wires will be twisted together a couple inches from the plug (for example the black/brown wire and black/white wires will be twisted together for the left front speaker)
step 3: you can now let go of the plug. Crimp the T taps on to each of the above wires roughly 4 inches from the plug that was just in your hand. (these wires may all be wrapped up together a few inches from the plug, just try to remove a few inches of this wrapper)
step 4. cut your speaker wire into 4 equal lengths of 3 feet each. Label each length LF,RF,LR, and RR at each end with some masking tape (see step 8). (if you have the zip ties you can zip tie the 4 runs of wire together into 1 thick run of wires)
step 5. crimp the male spade connectors to one end of the 8 speaker wires
step 6. connect the male spades to the T taps be sure to align your labels to there corresponding wires. (example your front left labeled wire will be attached to the black/brown and black/white wires).
step 7. run the other end of your wires up through the dash to the back of the radio. this will take some time, and I will warn you there is nothing safe behind the dash, I have drawn blood about 75% of the time doing this part of the job! you may find using a straightened metal coat hanger will help you run these wires where your hands can't get.(when your done, zip tie the wires clear of moving parts like the glove box and heater cables)
step 8. determine what wire is what at the loose ends of your new speaker wires. Hopefully you labeled them correctly, if not you will need to "pop" the speakers with a AA battery (hopefully you won't need to do this but if you do I will walk you through it)
step 9. connect your new wires to the wires on the back of the aftermarket radio with the blue butt connectors.
aftermarket radio colors are as follows:
white = front left +
whit/black = front left -
gray = front right +
gray/black = front right -
green = left rear +
green/black = left rear -
purple = right rear +
purple/black = right rear -
you can use your Metra harness for the yellow, red, and black wires (power wires).
step 10. connect the antenna and test, if it works then install the radio in the dash and put everything together.