
Replacing Indicator swtich


Thread Starter
|
3rd Gear
Joined: Jan 2012
Posts: 3
Likes: 0
Im attempting to replace my indicator switch on my Disco I, 96'. I read some members had a similair probelm to mine, which is as follows:
Switching the to I position lights up the dash/inside lights/back lights, but no headlights. Switching it to the II position lights up headlights, but the dash and back lights go off.
I found out it was the switch problem because at times i would turn the switch much harder and at an angled twist, and everything lit up perfectly. I was only able to do this a few times. After that, the trick wouldn't work.
So I got a replacement switch, disconnected the battery, took off the steering shroud. But ran into a problem. I saw that there were two screws that held the switch assembly in place. With difficulty i removed them, it was difficult because the steering wheel is kind of in the way of removing them.
Anyway...it seems something else is still holding the switch assembly in place. I cant find what it is. Do i have to remove the whole steering wheel to take it off?
Also, i read that the reason the switch acts up like this is because it gets dirty, and disassembling it and cleaning it out fixes the problem as well. Should i attempt that rather than replacing the whole thing?
I have the RAVE disc manual, but i cant seem to find how to replace the switch. Can someone help me out on this? I would be so grateful
Thread Starter
|
3rd Gear
Joined: Jan 2012
Posts: 3
Likes: 0
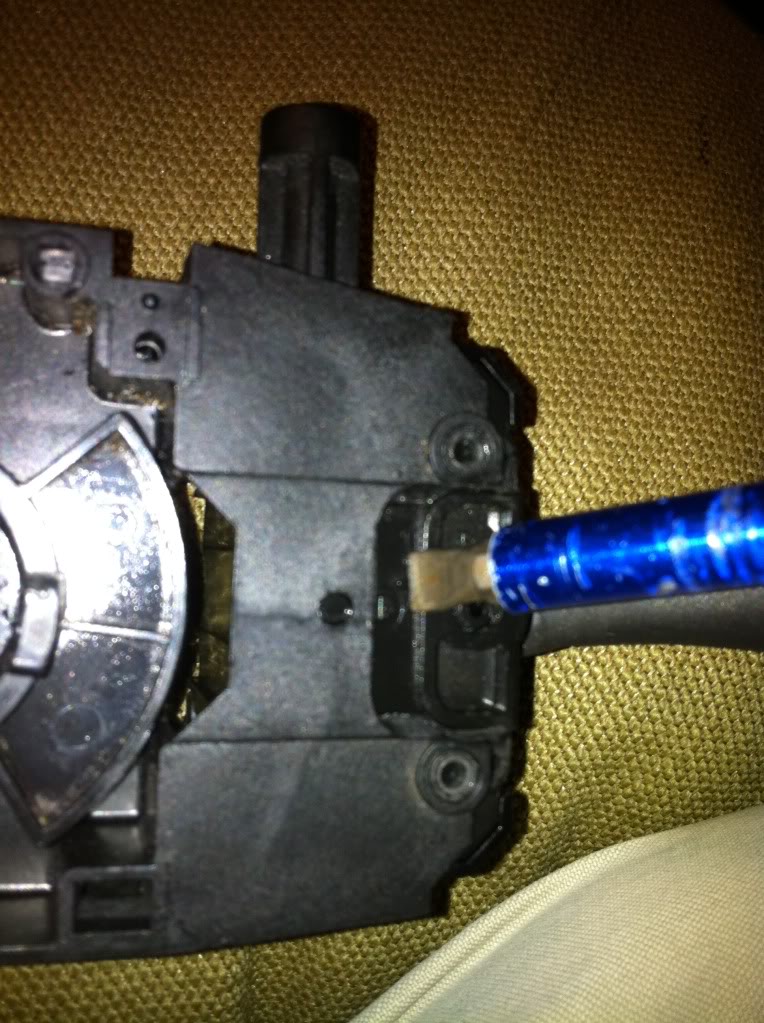
It popped right out! thanks so much, but now i have another issue. As i puled the old indicator switch off, i look at the larger connection that was on it and it seems off color. Like it may have over heated. Im pretty sure this is a problem right? I looked at the pin where it connected to on the switch and around the pin, the plastic looks to have melted slightly.
I dont know what to do from here. Im afraidthat connecting the new switch, the same thing may happen to it immediately.
Any help on this?
I dont know what to do from here. Im afraidthat connecting the new switch, the same thing may happen to it immediately.
Any help on this?

Super Moderator
Joined: Jan 2011
Posts: 16,322
Likes: 88
From: Savannah Georgia
1. Take black wire off the battery under the hood, to prevent sparks.
2. On the discolored connector, use a small wire brush or something to make the metal parts of the connectors clean and sorta shiny. You can put a little dielectric grease (sold in packets at the parts counter as "bulb grease") or very light coating of vaseline to keep out air.
2.5 Reconnect black battery wire.
3. What caused this to happen was slight oxidation or corrosion of these small metal parts, which made a resistance build up. As substantial current passed through this contact, heat was generated by also having to pass thru the resistor. Like the heating element in a toaster, on a very small scale. It was warm, and over time discolored the plastic and the metal, eventually building up so much resistance and warping the metal contacts that function was lost. Happens to tail light bulb holders as well.
Thread Starter
|
3rd Gear
Joined: Jan 2012
Posts: 3
Likes: 0
Awesome! I will try this tomorrow. Thanks a lot! i love this site by the way, i know it says im a new user but thats because i havent been on the site in a while. Ive been help on here about my gas pump, radiator hoses, and brake/rotor replacements.
Thanks again so much!
Thanks again so much!


Thread
Thread Starter
Forum
Replies
Last Post
03discoman
Retired - Private For Sale/Trade Classifieds
0
May 13, 2010 08:28 PM