
Fender Flares back to new looking

Winching
Joined: Jan 2011
Posts: 515
Likes: 36
From: Central Idaho
I did mine with black liquid shoe polish and used the foam applicator on the bottle. Rubbed it out with an old t-shirt and they look good. I also did the plastic strip between the f/r tires and didn't have to mask off anything.
Overlanding
Joined: Jul 2011
Posts: 19
Likes: 3
From: Johns Island, SC
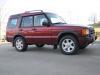
Your flares look good. I did mine like that some time ago but they faded again so I'm taking a new approach and also updating the look of my 2003 at the same time by color matching the plastic parts on the Disco. Started with the handle cover on the cargo door and then did one flare to see how they would come out. Lot of people like the flat look of the plastic but I really like the way they look color matched.
I shouldn't have to ever paint these again...4 good coats of clear did the trick.
I shouldn't have to ever paint these again...4 good coats of clear did the trick.

Winching
Joined: Jan 2011
Posts: 515
Likes: 36
From: Central Idaho
I did mine in November and it is holding up very well. Mine gets parked inside most of the time though. I've used the liquid shoe polish for years on my other cars with plastic flares and it's really easy to do a touch up once or twice a year.

Mudding
Joined: May 2012
Posts: 149
Likes: 0
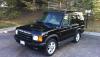
Your flares look good. I did mine like that some time ago but they faded again so I'm taking a new approach and also updating the look of my 2003 at the same time by color matching the plastic parts on the Disco. Started with the handle cover on the cargo door and then did one flare to see how they would come out. Lot of people like the flat look of the plastic but I really like the way they look color matched.
I shouldn't have to ever paint these again...4 good coats of clear did the trick.
I shouldn't have to ever paint these again...4 good coats of clear did the trick.
Overlanding
Joined: Jul 2011
Posts: 19
Likes: 3
From: Johns Island, SC
1. Remove flares. I did it on a hot day, poured some adhesive remove along the seam and then doubled some fishing line and worked it back-n-forth to cut the tape. The factory tape is super strong so best way to remove leftover tape is to use a hairdryer and use your fingers to rub it off.
2. Mine were real rough so dry sand with 220 until smooth. Wet sand with 220 until you get all rough spots, gouges. This is key, because everything will show through, even with hi-build primer. Wet sand with 400.
3. Clean and spray with adhesion primer (I use Duplicor but any brand will work).
4. Let that dry for about 10 minutes and then start spraying the hi-build primer. Use as many coats as necessary. (I used Duplicolor but SEM makes a great product).
5. You can wet sand the primer same day but can do next day as well. Use 600 grit wetsand to smooth out. This should give you a nice surface.
6. Don't clean primer with anything but a little soap and water.
7. Spray basecoat color. Automotivetouchup.com will put all LR colors in a spray can. I used that on the rear door cover but tried the Duplicolor "Color-Match" product for the flare since the price was much better. I used Hyundai black and it was super close. Spry 2-4 coats of base.
8. Shoot your clear after base. Typically wait time is between 15-30 minutes after base. The clear coat from automotivetouchup.com is great. Much better than Duplicolor, which I used on flare. Getting the right clear is critical to good shine. Spray at least 4 coats of clear.
9. I didn't color sand the clear coats so it would match the factory orange peel a little better.
10. I used 3M Super Strength tape to reattach flare. Works well. By the 1/4 inch and cut exactly in half and that's perfect for the flares.
Hope that helps and good luck!

Thread
Thread Starter
Forum
Replies
Last Post