
few tips on rotoflex delete?


Thread Starter
|
Camel Trophy
Joined: Nov 2012
Posts: 3,717
Likes: 248
From: Longview, Texas
I have a new rear driveshaft and rotoflex delete arriving today and wondered if I can get a few tips on the rotoflex delete. I have read threads and howto's and watched videos (a while ago) but this will be yet another new thing for me to do. I'll work on it tonight.
As I understand it, the big thing to overcome is the industrial strength green loctite.
Any tips to make this job painless?
As I understand it, the big thing to overcome is the industrial strength green loctite.
Any tips to make this job painless?

Mudding
Joined: Aug 2015
Posts: 193
Likes: 54
You have the new 4 bolt drive shaft coming I assume, so I believe the only thing left for you to do is switch the rear diff from a 3 bolt flange to a 4 bolt flange, is that correct?
Here is the basic idea.
1) remove the rear drive shaft
2) unbolt roto flex from flange
3) Remove the centering peg (this part can be the most difficult, Mine came out without much issue however)
4) Remove the nut securing the flange
5) (optional but recommended) Replace oil seal while flange is out
6) Install new 4 bolt flange and torque down nut
7) bolt up new drives haft with new hardware
(I don't think you need to drain the diff but it might be a good time to change fluids if you haven't)
Last edited by R0VERGUY; Aug 28, 2015 at 03:00 PM.
Mudding
Joined: Aug 2015
Posts: 193
Likes: 54
TIPS:
-If you block the front wheels, jack up the rear, and put the truck in "N" with the brake off, you can turn the rear driveshaft to get all the bolts with an impact gun.
-This is the basic process I used to pull the centering peg out.
-If you block the front wheels, jack up the rear, and put the truck in "N" with the brake off, you can turn the rear driveshaft to get all the bolts with an impact gun.
-This is the basic process I used to pull the centering peg out.
Last edited by R0VERGUY; Aug 28, 2015 at 03:13 PM.
Thread Starter
|
Camel Trophy
Joined: Nov 2012
Posts: 3,717
Likes: 248
From: Longview, Texas
Very helpful. I have a ball joint kit in the driveway right now and the spacers in it will make the pulling a snap. I don't have sockets that big. I do have a harmonic balancer puller but this should be easy!
What I don't have is the correct torque for the big nut on the front of the pinion. Yikes I'd better find that. Sounds critical.
Thanks for the detailed post.
What I don't have is the correct torque for the big nut on the front of the pinion. Yikes I'd better find that. Sounds critical.
Thanks for the detailed post.
Mudding
Joined: Aug 2015
Posts: 193
Likes: 54
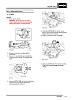
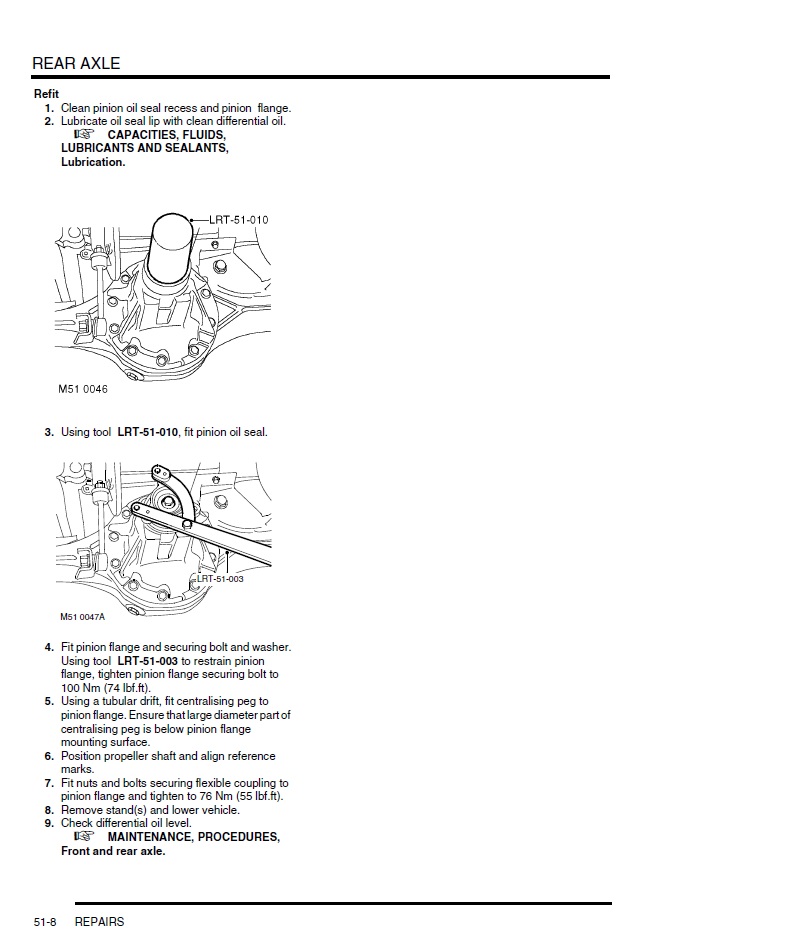
100 Nm (74 lbf.ft) for the flange bolt
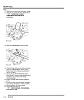
And if you are going to be replacing the oil seal while you have the flange off then a seal puller will be your best friend. Yay, another tool to buy!!!


And if you are going to be replacing the oil seal while you have the flange off then a seal puller will be your best friend. Yay, another tool to buy!!!
Last edited by R0VERGUY; Aug 28, 2015 at 03:51 PM.
Thread Starter
|
Camel Trophy
Joined: Nov 2012
Posts: 3,717
Likes: 248
From: Longview, Texas
Well, my plan went to poop in regard to removing the pinion setup and I am so glad that you published that video on using a bolt remover/harmonic balancer whosits. I ended up using that but instead of the 3 3/8" socket extensions I used a ring from the ball joint kit I had already rented to do... BALL JOINTS... with a buddy of mine.
For anyone who might read this thread looking for information, I took much longer than I should have removing the rotoflex setup. First, I removed the drive shaft, leaving the rotor flex attached. That was easy. Pulling the centering pin (which is what I was the most afraid of and I think what keeps a lot of people from doing this operation) proved difficult while I tried to outsmart the video above. Ultimately, I did use the exact tool shown in the video with a slight twist only because I did not have 3 3/8" socket extensions--I used a ball joint removal spacer (big metal cylinder, to keep the puller straight and allow the centering pin to pull out). I did have to buy an M8 bolt (50mm), some washers, and some nuts for the operation. Once I employed the method shown in the video, removal of the centering pin was a snap. After that, I put two of the original flange bolts back in loosely and used a bar between the two bolts, wedged against the ground, to protect the gears while I took the main bolt off. I used a torque wrench to get it off.
Honestly, the most difficult part of the operation was removing the seal, and I ended up mangling it with a screwdriver then picking it out with some small tools. I wish I had followed Roverguy's advice and gotten the seal puller because when I reached that point I was hot and tired and it was dark, and messing with the wrong tools was a real trial for my temper.
Luckily, the ball joint kit had the exact size socket (I do not know the size, but I would guess somewhere around 2 1/2 inches) to seat the new seal. From there I just slid the new flange on, put some red loctite on the nuts, cinched it to 100 ft/lbs, installed and greased the dirveshaft, and I was done.
If I did this again it would probably take an hour and a half.
I have mentioned in other threads that it is super handy to have a winch with a remote because I just sit under the truck and ooch it forward or backward to reach the bolts and nuts on the driveshafts and grease them.
Speaking of drive shafts, what I installed was a GBR HD double cardan rear driveshaft (double cardan because of about 4 inches of lift). I ordered it a few days ago and speaking with Bill and GBR. Originally, I was going to order from Lucky8 and get a Tom Woods shaft, and that would have saved me about a hundred dollars, but I needed it quick and I was already on the phone with Bill at GBR about gears, so I ended up with a GBR shaft. Lucky8 is a sponsor of this forum and a great bunch, and I generally try to order from them, but it just happened. Also, Bill was so exceptionally helpful (he even talked me OUT of a multi-cardan front driveshaft during the call) that I would have felt like a sh**heel taking the good info he gave me and ordering elsewhere. I am pleased with the purchase.
Anyway, it is driving me CRAZY to not hop in and give it a spin but I want to give the loctite some time to dry.
Roverguy, you are the KING. Thanks for the timely help!
Regarding the GBR driveshaft... WOW! It is HUGE. The tube is so wide I thought it would hit the charcoal canister. It fits with no issues but it is a whole different category of drive shaft than the original. If drive shafts were wood, the original is a twig and the GBR skips branch and goes straight to limb. Really beefy. Unless I fail to grease it, this thing looks like it will outlast me. The grease fittings are lined up as they should be, so I have no excuses. I tried a little grease in each one but it arrived full and ready to go.
My only misgiving in this project is that I have now rendered my 3 spare rear drive shafts useless. There is no way that I am going to reverse the set up unless it wobbles, and I have no reason to suspect that will happen. Look out eBay! ANybody know what I would need to do to convert one or two of them to four flange?
Also, the box the driveshaft was in had been dragged by someone, so the shaft got a little scratched with it wore through the box, or the box wore through (whichever). No big deal but it didn't have the perfect paint job it should have. Probably happened in shipping.
I can also report that my buddy received his FRONT double cardan drive shaft from GBR in the same shipment and MY LORD it is heavy and beefy. I already have a front HD double cardan drive shaft and the GBR version is heavier. Feels like it was made for the military.
Last edited by Charlie_V; Aug 28, 2015 at 11:31 PM.
Mudding
Joined: Aug 2015
Posts: 193
Likes: 54
I posted the torque for the flange bolt was 100 Nm (74 lbf.ft). Not 100 lbf.ft. If you did 100 lbf.ft then you over torqued it. I hope that was just a typo or was it the drive shaft nuts you torqued down and I misunderstood you. If you did over torque then I would just go back and take it off, install a new washer, and torque it down again.
Last edited by R0VERGUY; Aug 29, 2015 at 12:25 AM.
Thread Starter
|
Camel Trophy
Joined: Nov 2012
Posts: 3,717
Likes: 248
From: Longview, Texas
I posted the torque for the flange bolt was 100 Nm (74 lbf.ft). Not 100 lbf.ft. If you did 100 lbf.ft then you over torqued it. I hope that was just a typo or was it the drive shaft nuts you torqued down and I misunderstood you. If you did over torque then I would just go back and take it off, install a new washer, and torque it down again.
The only washer I have is th super thick one that was on the bolt before. It was unharmed. Is there a different washer I should be using??? The kit didn't come with any washers.
Last edited by Charlie_V; Aug 29, 2015 at 01:42 AM.

Thread
Thread Starter
Forum
Replies
Last Post