
How to: Paint Worn Fender Flare Arches Properly


i ripped my flares off because the original adhesive apparently had all but given up. pretty easy to paint them and then epoxy them back on the truck. =-) i used wal mart flat black. 4 cans. one for each flare.


3rd Gear
Joined: Oct 2010
Posts: 3
Likes: 0
As these trucks get older, one of the first things to show age is the plastic fender flare arches. Its a common problem, but an easy fix. If your arches are getting rough and turning gray, don't pay nearly $400 to have them replaced! Just follow these steps and repaint them yourself, you'll really like the outcome, and you don't even have to take them off.
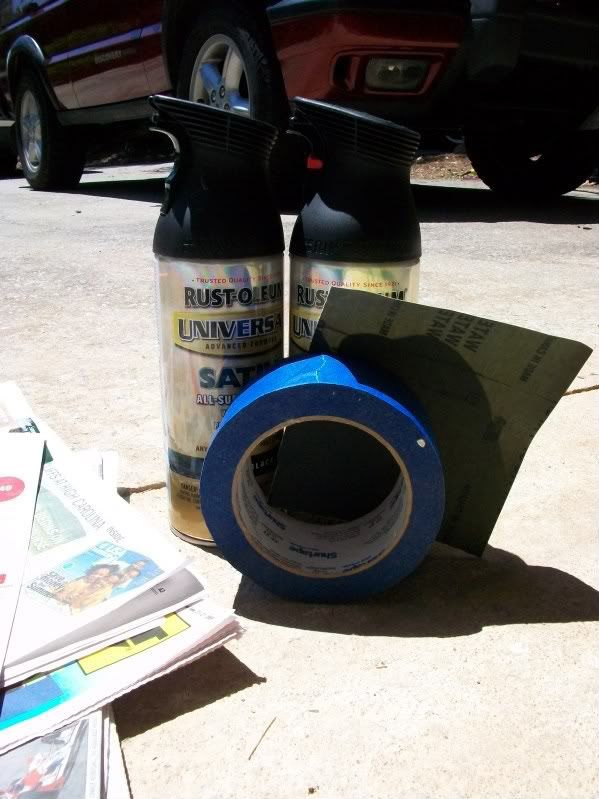
Here's what you'll need
-2 Cans of Black paint from the list below (Flat or Satin, your choice)
-Fine grit sandpaper (220-400 grit)
-Ammonia or rubbing alcohol to clean/prep arches
-Old newspaper and some painters tape
For the paint, you must use a good quality paint for plastic. I wouldn't go cheap here because you won't like how it holds up 2 years from now. A majority of the people who have done this used Krylon Fusion or Rustoleum Universal Plastic paint. Flat or Satin is up to you, I personally liked the Rustoleum satin because it was close to the original finish of the arches. Below is a list of paints that have been used successfully by other members:
-Krylon Fusion
-Rustoleum Universal Plastic Paint
-Dupli-Color Bumper Coating (Found at Autozone)
-Dupont Single stage paint (If you're really serious)
-Plastikote-Bumper Color Paint
-Bondo Easy Finish Bumper Black
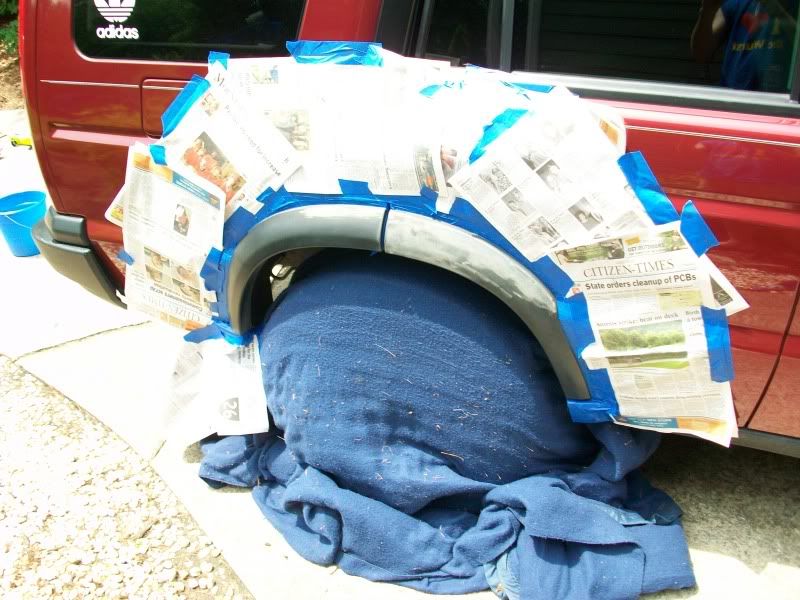
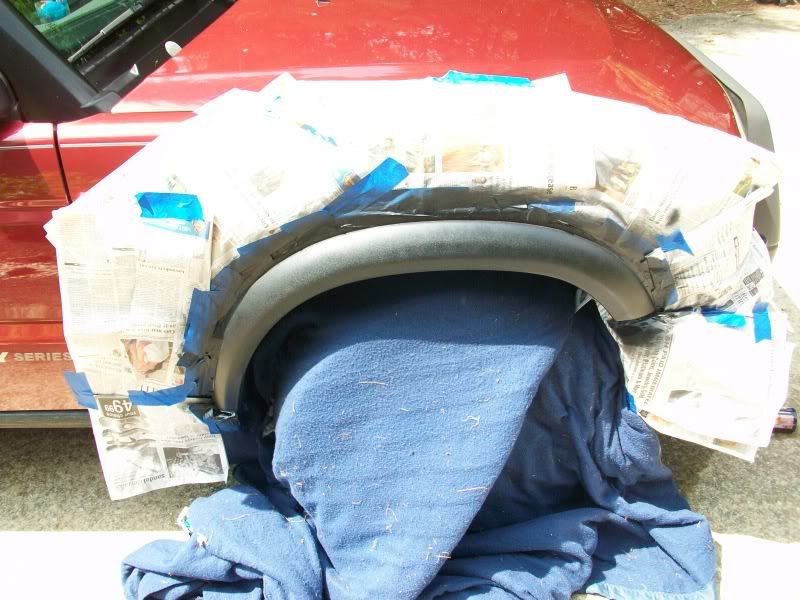
First, sand the arches and take your time doing this. The smoother the better. When you think they are smooth enough, do it one more time. It may help to finish it off with with a lighter grit sandpaper depending how rough they are. For example, Start with 220 grit and finish with 400. The picture below the taping step shows what they will look like after taping and sanding too.
Next, wipe down the arches with ammonia or rubbing alcohol. This will get off all the sanding residue, armorall, or that back to black stuff you tried before resorting to painting.
Next tape off the arches with painters tape and newspaper to give you more room to spray. Some people have taken the arches off to repaint them, but I've been told they'll never go on quite the same so I avoided doing that. When taping, take your time. You don't want black paint beyond the arches. Mine may look like overkill, but it was worth it:
Now that your arches are perfectly clean and nicely taped off, you can begin to paint. Do a bunch of VERY LIGHT coats. I'm talking 7 or 8. Make sure you let it dry between coats. It takes more time, but the end result is worth it. You will also have better, even coverage that way.
Once the paint is dry, remove the tape and newspaper and enjoy your nice BLACK fender flares!
(Proceed with painting at your own risk)
Here's what you'll need
-2 Cans of Black paint from the list below (Flat or Satin, your choice)
-Fine grit sandpaper (220-400 grit)
-Ammonia or rubbing alcohol to clean/prep arches
-Old newspaper and some painters tape
For the paint, you must use a good quality paint for plastic. I wouldn't go cheap here because you won't like how it holds up 2 years from now. A majority of the people who have done this used Krylon Fusion or Rustoleum Universal Plastic paint. Flat or Satin is up to you, I personally liked the Rustoleum satin because it was close to the original finish of the arches. Below is a list of paints that have been used successfully by other members:
-Krylon Fusion
-Rustoleum Universal Plastic Paint
-Dupli-Color Bumper Coating (Found at Autozone)
-Dupont Single stage paint (If you're really serious)
-Plastikote-Bumper Color Paint
-Bondo Easy Finish Bumper Black
First, sand the arches and take your time doing this. The smoother the better. When you think they are smooth enough, do it one more time. It may help to finish it off with with a lighter grit sandpaper depending how rough they are. For example, Start with 220 grit and finish with 400. The picture below the taping step shows what they will look like after taping and sanding too.
Next, wipe down the arches with ammonia or rubbing alcohol. This will get off all the sanding residue, armorall, or that back to black stuff you tried before resorting to painting.
Next tape off the arches with painters tape and newspaper to give you more room to spray. Some people have taken the arches off to repaint them, but I've been told they'll never go on quite the same so I avoided doing that. When taping, take your time. You don't want black paint beyond the arches. Mine may look like overkill, but it was worth it:
Now that your arches are perfectly clean and nicely taped off, you can begin to paint. Do a bunch of VERY LIGHT coats. I'm talking 7 or 8. Make sure you let it dry between coats. It takes more time, but the end result is worth it. You will also have better, even coverage that way.
Once the paint is dry, remove the tape and newspaper and enjoy your nice BLACK fender flares!
(Proceed with painting at your own risk)
TVM for the advise and steps,
did u do all the side and front and rear fenders? if not, did you notice a difference in color on the wheel fenders vs the side trip and backs? I am afraid of the 2 tone color being visibly noticeable
h
Recovery Vehicle
Joined: Feb 2009
Posts: 1,151
Likes: 30
From: Denver, CO
I'll tell you guys. After doing my fender arches with the Rusolium Truck bed liner spay on. I'm sold. I like how it went on evenly. It left a nice textured finish. It has held up now since May with no fading or chipping. Its not cheap at about $6/$7 a can and takes about 5 cans, but it looks great. My new steel rear Borrtof bumper will get the same coating this weekend. Its not as cheap as paint by any means but neither is premium gas or anything that will last and take a few rubs.
Here is writeup from a few months back.
https://landroverforums.com/forum/sh...778#post193778
Here is writeup from a few months back.
https://landroverforums.com/forum/sh...778#post193778

Rock Crawling
Joined: Jul 2010
Posts: 435
Likes: 4
From: Lakeland, FL
Hey guys, I decided to join in on the fun and painted my flares this weekend. They really didn't look that bad and the color wasn't that faded, but they were pitted pretty bad (and still are in some areas) and I said, why not?
Total Cost from scratch: $22.40
Total time: 4 hours (can be done quicker or take longer)
Wal-mart - newspaper ($1), Rub alcohol ($1), sand paper 400grit ($3.27), sand paper 200 grit ($3.27), scotch painters tape ($3), Rust-oleum sandable primer ($4.27)
Advance Auto - Dupli color Bumper Coating ($6.59)
2-3 coats of primer, 4 light coats of bumper spray
(and yes I have leaky bags)

Mudding
Joined: Mar 2007
Posts: 204
Likes: 1
From: Harlingen, TX
OK, so one of mine was about to come off, so I just took them all off. Thinking about painting them, but I kind of like the look of them not being there. I was able to remove most of the adhesive, but what can I use to remove it all without jacking up my clearcoat? Thanks.


Mudding
Joined: Aug 2010
Posts: 187
Likes: 9
From: Columbus, OH
Hey guys, I decided to join in on the fun and painted my flares this weekend. They really didn't look that bad and the color wasn't that faded, but they were pitted pretty bad (and still are in some areas) and I said, why not?
Total Cost from scratch: $22.40
Total time: 4 hours (can be done quicker or take longer)
Wal-mart - newspaper ($1), Rub alcohol ($1), sand paper 400grit ($3.27), sand paper 200 grit ($3.27), scotch painters tape ($3), Rust-oleum sandable primer ($4.27)
Advance Auto - Dupli color Bumper Coating ($6.59)
2-3 coats of primer, 4 light coats of bumper spray
(and yes I have leaky bags)
Total Cost from scratch: $22.40
Total time: 4 hours (can be done quicker or take longer)
Wal-mart - newspaper ($1), Rub alcohol ($1), sand paper 400grit ($3.27), sand paper 200 grit ($3.27), scotch painters tape ($3), Rust-oleum sandable primer ($4.27)
Advance Auto - Dupli color Bumper Coating ($6.59)
2-3 coats of primer, 4 light coats of bumper spray
(and yes I have leaky bags)

Winching
Joined: Aug 2008
Posts: 677
Likes: 12
From: Austin, TX
Brian
