
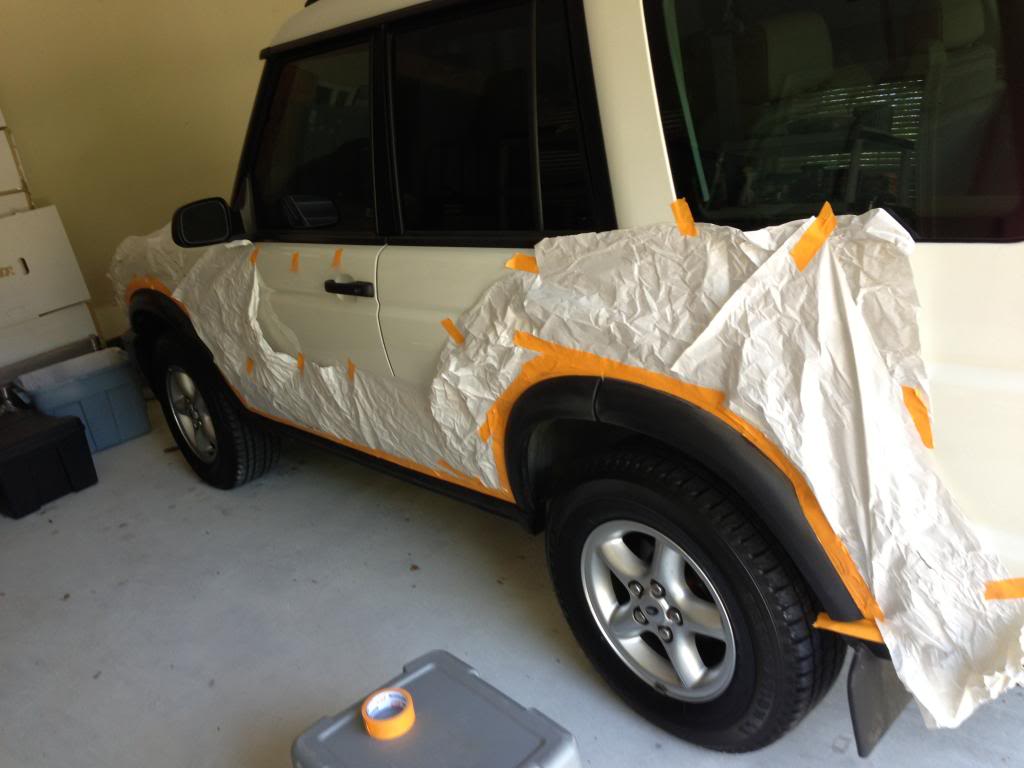
How to: Paint Worn Fender Flare Arches Properly


With this type of sanding, you're not fully eliminating the texture, you're just removing extreme roughness that you'll find after years of sun damage. The need textured surfaces generally applies to heavy latex paints, not a simple coat of spray-can paint. Make sure if you do this project to do multiple light layers, that adds longevity and reduces risk of peeling (which would happen with any type of paint when applied too thick).

4th Gear
Joined: Aug 2012
Posts: 4
Likes: 0
Dude! that looks amazing! wow. I was contemplating doing it but wasn't sure if I just wanted to pay a friend to do it but after seeing that, I'm gonna try it myself.

Drifting
Joined: Sep 2011
Posts: 29
Likes: 1
I've repainted my arches about three times in seven years. Just as seen in the pictures except I used Rustoleum w/the textured finish. I was just about to paint them a fourth time when Disco Fever told me to used Kiwi Shoe polish. I was skeptical at first. How durable would it be and how dark and consistent would the finish turn out?
Today I went the Kiwi route. It took about three coats. The nice thing about it is the applicator. It's wedged and is easy to apply tight to the fender. I'm sure Disco Fever can give his insight too. I remember him saying it lasted about 18 months? The nice thing about it is that it dries with a hard finish. The water repels and beads off. I imagine it would since it has a wax type of consistency.
The best part was the time it took to do it. Minutes. I prepped it w/alcohol and went at it that included Beck's Light too. Therefore there were two types of alcohol w/this latest mod.
Also you mention you had to "prepare" it, what type of preparations did you do?
How are the results after several months?
Thanks.

4th Gear
Joined: Sep 2012
Posts: 4
Likes: 1
Thanks for the awesome write up. I did this to my disco II over the weekend and it looks awesome. So awesome in fact that I noticed my door handles looking a bit faded against the sweet new fenders. I did the same process but with a little less sanding and the door handles looks perfect. Then I noticed the back door latch cover  It wasn't looking new like the rest. I busted out the can of spray paint and went to town. I know feel satisfied for the moment with all the trim pieces looking good as ever. So I say this thread needs to have a WARNING. You may be compelled to paint the rest of your truck lol.
Here's what I went with...
Rust-Oleum Black Trim and Bumper Paint.
Thanks,
Joey
Disco II 2003 HSE7 125,000 miles
It wasn't looking new like the rest. I busted out the can of spray paint and went to town. I know feel satisfied for the moment with all the trim pieces looking good as ever. So I say this thread needs to have a WARNING. You may be compelled to paint the rest of your truck lol. Here's what I went with...
Rust-Oleum Black Trim and Bumper Paint.
Thanks,
Joey
Disco II 2003 HSE7 125,000 miles


4wd High
Joined: Jun 2013
Posts: 9
Likes: 0
From: santa barbara
Having 15 years in the auto refinishing world, I thought Id share a few tips.
First, use pre kleeno to prep. This will remove any armor all or other topical treatment
There is no need to sand the bejeesus out of them. Hit them with 220, then apply several coats of SEM high build primer. (gray) Do not use any other brand. Spray 2 coats of primer, then lightly fog them with some flat black. Sand again with 220. If you see black paint after sanding, there are still pits or other imperfections. Repeat until all flaws are gone. Then sand with 320, 400, and finally 600.
At this point you can paint your flares. Or you can apply a light texture. Sure Tex makes a great flexable aerosol texturing used for various interior bits. Experiment with it on some scrap to get the feel for it. Increasing the distance between the can and the piece being painted decreases the amount of texture.
Once dry, you can paint. I have had excellent results with Rustoleum satin black. If you have access to a compressor and a paint gun, SEM makes sprayable satin black that really matches most OEM black finishes.

Mudding
Joined: Dec 2013
Posts: 117
Likes: 3
Just pulled mine off yesterday. I don't think it looks any better or worse--just different. I might put them back on in the future, but we'll see. No need for a heat gun or hair dryer for me. The adhesive was pretty aged and didn't put up much of a fight.
If I do end up putting them back on, it will be easy to repaint them this way. And if I never make it that far, the truck looks fine without the flares. However, I do need to give those areas of paint some TLC with wax.
If I do end up putting them back on, it will be easy to repaint them this way. And if I never make it that far, the truck looks fine without the flares. However, I do need to give those areas of paint some TLC with wax.

Baja
Joined: Aug 2013
Posts: 5,845
Likes: 368
From: Near Bordeaux, France
Good write up Camdisco24 and some good tips from Ranger Magnum.
I'm into my second set of flares fitted by the main LR dealers (under warranty years ago) and they look pretty awful on a couple of them. Waste of cash buying yet another set so I'll paint mine later on.
My trucks Vienna Green https://www.google.co.uk/search?q=la...15%3B630%3B473 do you think they would color code OK in that colour?
Last edited by OffroadFrance; Apr 17, 2014 at 05:22 PM.