
Replace Wires Without Removing IM

Thread Starter
|
Mudding
Joined: Sep 2007
Posts: 165
Likes: 6
2003 Discovery Wire Replacement
Yes, it is possible to replace the wires on your 2003 or similar Disco without removing the intake manifold. And it�€™s not that difficult.
First �€“ be aware that you will see a decal on each of the two coils indicating HIGH VOLTAGE!!!!! Before you begin; educate yourself as to why the manufacturer placed the decal there, how not to include your body in an electrical circuit and what bad things can happen if you get complacent. Believe me, I�€™ve been shocked by a coil. It�€™s not something I want to experience again.
A flashlight, couple of screwdrivers and a few wrenches are all that is necessary to accomplish this task �€“ making this a field serviceable task.
Step one:
Remove the IAC valve and the two accompanying hoses.
1 plug
2 bolts
2 clamps
This will provide immediate access to the coils via a space on the right side of the IM.
Step two:
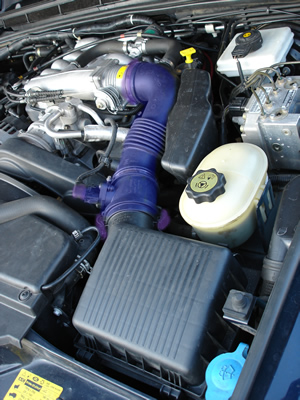
Remove the MAF and accompanying tube.
1 plug
2 latch
1 clamp
This will provide access to the driver�€™s side plugs.
Step three:
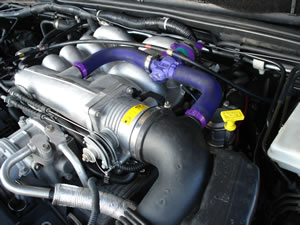
Remove the wiring bundle that traverses the rear of the engine compartment from the clips. This provides better access to the coils and provides working space to remove the tube that connects the 2 SAI valves.
Step four:
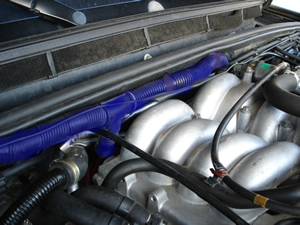
Remove the tube-s located above the coils that connect the two SAI valves.
6 clamps
2 nuts
Slide the tube towards the driver�€™s side. Then unthread it from under the throttle cable and cooling hoses. Then slide it towards the passenger side and with a little twisting and finesse it will free.

At this point you have reasonable access to the coils from several points.
When replacing wires, it is good habit to work with one wire at a time to reduce the possibility of crossing leads. Not possible on this project!!! Have a printed copy of the coil configuration and the wire diagram handy. To access the lower terminals you must remove the top 2 wires from the coil packs. So you will be working with 3 open terminals at times. Use your brain and work methodically.
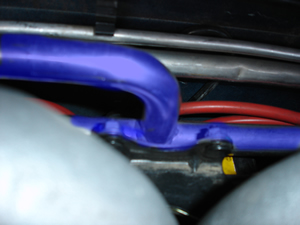
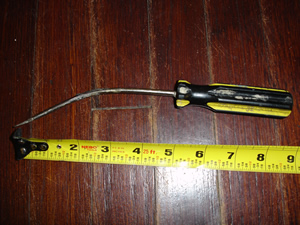
Removing the wires from the coil is very difficult, unless you make this wonderful tool. Bend a cheep screwdriver to replicate the one in the image below. It worked perfectly. Cover the working end with electrical tape or shrink tube to (help) prevent SHOCK and to protect your new wires. The tool will easily slip down into the coil area. Simply get under the L portion of the rubber boot and lift the wire off the terminal.
Putting the new wires on is a snap. Lower the wire boot to the CORRECT coil terminal and with the aid of your custom screwdriver guide it onto the terminal. Once it�€™s �€œkind-of�€� in place reach in and seat it properly with your hand. I have medium sized hands and had no problem with this task. Connect the opposite wire end to the CORRECT sparkplug, check for accuracy and move on to the next wire. I�€™m going to say it again�€� Use your brain and work methodically. You will have 3 possible open terminals, don�€™t cross wires.
It took me about 5 hours to replace my sparkplugs and wires (taking my time). If I had this direction the job would have been 3 hours tops. For the wires alone 2 hours.
I suggest taking images of the tube that connects the 2 SAI valves. There are several lines threaded over or under the tube that will need to be reestablished in their proper place. This tube is the only real challenge.
I don�€™t think I need to explain how to put everything back on the engine. Straight forward.
Have fun and good luck.
MWmG
Yes, it is possible to replace the wires on your 2003 or similar Disco without removing the intake manifold. And it�€™s not that difficult.
First �€“ be aware that you will see a decal on each of the two coils indicating HIGH VOLTAGE!!!!! Before you begin; educate yourself as to why the manufacturer placed the decal there, how not to include your body in an electrical circuit and what bad things can happen if you get complacent. Believe me, I�€™ve been shocked by a coil. It�€™s not something I want to experience again.
A flashlight, couple of screwdrivers and a few wrenches are all that is necessary to accomplish this task �€“ making this a field serviceable task.
Step one:
Remove the IAC valve and the two accompanying hoses.
1 plug
2 bolts
2 clamps
This will provide immediate access to the coils via a space on the right side of the IM.
Step two:
Remove the MAF and accompanying tube.
1 plug
2 latch
1 clamp
This will provide access to the driver�€™s side plugs.
Step three:
Remove the wiring bundle that traverses the rear of the engine compartment from the clips. This provides better access to the coils and provides working space to remove the tube that connects the 2 SAI valves.
Step four:
Remove the tube-s located above the coils that connect the two SAI valves.
6 clamps
2 nuts
Slide the tube towards the driver�€™s side. Then unthread it from under the throttle cable and cooling hoses. Then slide it towards the passenger side and with a little twisting and finesse it will free.
At this point you have reasonable access to the coils from several points.
When replacing wires, it is good habit to work with one wire at a time to reduce the possibility of crossing leads. Not possible on this project!!! Have a printed copy of the coil configuration and the wire diagram handy. To access the lower terminals you must remove the top 2 wires from the coil packs. So you will be working with 3 open terminals at times. Use your brain and work methodically.
Removing the wires from the coil is very difficult, unless you make this wonderful tool. Bend a cheep screwdriver to replicate the one in the image below. It worked perfectly. Cover the working end with electrical tape or shrink tube to (help) prevent SHOCK and to protect your new wires. The tool will easily slip down into the coil area. Simply get under the L portion of the rubber boot and lift the wire off the terminal.
Putting the new wires on is a snap. Lower the wire boot to the CORRECT coil terminal and with the aid of your custom screwdriver guide it onto the terminal. Once it�€™s �€œkind-of�€� in place reach in and seat it properly with your hand. I have medium sized hands and had no problem with this task. Connect the opposite wire end to the CORRECT sparkplug, check for accuracy and move on to the next wire. I�€™m going to say it again�€� Use your brain and work methodically. You will have 3 possible open terminals, don�€™t cross wires.
It took me about 5 hours to replace my sparkplugs and wires (taking my time). If I had this direction the job would have been 3 hours tops. For the wires alone 2 hours.
I suggest taking images of the tube that connects the 2 SAI valves. There are several lines threaded over or under the tube that will need to be reestablished in their proper place. This tube is the only real challenge.
I don�€™t think I need to explain how to put everything back on the engine. Straight forward.
Have fun and good luck.
MWmG
Last edited by DeepBlueWater; Mar 21, 2009 at 06:50 PM.


Winching
Joined: Nov 2007
Posts: 538
Likes: 9
From: Houston, Texas
Did you remove the hood of the car or have to push it up higher to get access to the firewall area?
Thanks for the excellent post and the clear instuctions and pictures. Was Photoshop used to highlight the selected parts??
Thanks for the excellent post and the clear instuctions and pictures. Was Photoshop used to highlight the selected parts??


Administrator
Joined: Apr 2006
Posts: 25,707
Likes: 107
From: Denver, Colorado
Great job, hope other people start posting information on how to do things.
I am going to see if we can set up a technical section for post like this.
I am going to see if we can set up a technical section for post like this.

Winching
Joined: Nov 2007
Posts: 538
Likes: 9
From: Houston, Texas
This is a great posting of the non-IM removal method.
My only question is: Is it easier then just removing the IM and having good access to run all the wires? How much time should that job reasonably take to complete and are there any other costs besides a IM gasket?
Just wondering.
My only question is: Is it easier then just removing the IM and having good access to run all the wires? How much time should that job reasonably take to complete and are there any other costs besides a IM gasket?
Just wondering.

Mudding
Joined: Apr 2006
Posts: 102
Likes: 0
From:
I agree, great post.
Maybe I just have small hands or something, but I did it a few years ago without removing anything but the old wires. Did them 1 at a time so I could avoid swapping any wires. Took me about 90 minutes of reaching and contorting, but no destroyed knuckles or significant hand damage.
Maybe I just have small hands or something, but I did it a few years ago without removing anything but the old wires. Did them 1 at a time so I could avoid swapping any wires. Took me about 90 minutes of reaching and contorting, but no destroyed knuckles or significant hand damage.