
Clancy '97 D1


Camel Trophy
Joined: Nov 2009
Posts: 4,079
Likes: 227
From: IL
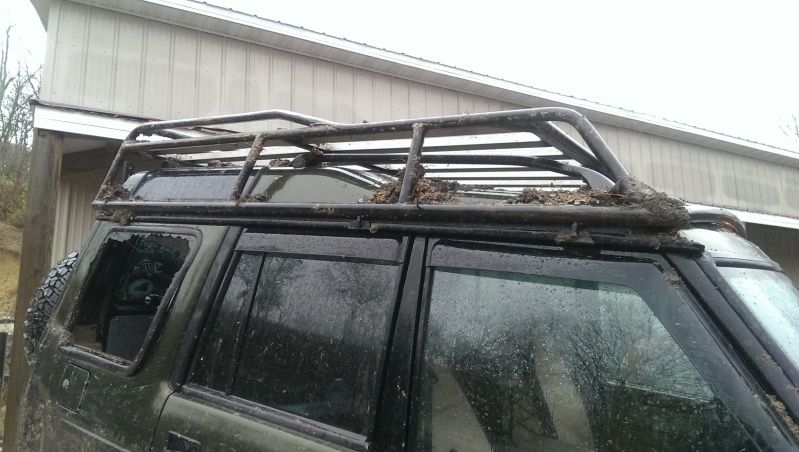
After all the racks I've built over the years and actually field tested.... The gutter rail is what takes the true abuse of the system, not the pillars. The best thing to do is have a mount with a wide foot (3"-6") to even further distribute the load. Less psi per running load width is what we are after.
Jason
The whole rack pushed back against a bank a little. It saved my roof, but not my window.


Your rack look good. There's some good critique on Dweb. Way to knock out these projects!

Thread Starter
|
Former Sponsor
Joined: Oct 2015
Posts: 528
Likes: 13
From: Redding, CA
This. I've got a rack whose "foot" runs the length of the rain gutter. There's only 3 or 4 clamps per side but the load bearing area runs the full length.
The whole rack pushed back against a bank a little. It saved my roof, but not my window.
Your rack look good. There's some good critique on Dweb. Way to knock out these projects!
The whole rack pushed back against a bank a little. It saved my roof, but not my window.
Your rack look good. There's some good critique on Dweb. Way to knock out these projects!
I built some racks years ago for the Land Cruiser FJ55 Piggies that was very similar to that. I think Brad, sorry if I got the name wrong, wanted to do the exact same thing I was trying to achieve 1) distribute the weight beyond the strength of the gutter rails
 and 2) use the gutter rail in conjunction with the rack as a roof slider, so to speak.
 Jason
Thread Starter
|
Former Sponsor
Joined: Oct 2015
Posts: 528
Likes: 13
From: Redding, CA
And here is the revised LO-PRO rack. This is where it will stay until its rotisserie jig is made.
At that time I will lengthen the tail about 1-3/4" and stretch the rear mount. Drop the lower front bar approx 5/8" to be more flowing with the roof line. I'll reduce by approx. 5 degrees to smooth this out.
I also finalized my front bumper and got the dimensions within a range I'm happy with 1/8" on all points. This will go to the laser cutter for reverse engineering the first week in January. I hope to have the rear finalized by then as well.
Thanks all
Jason
Thread Starter
|
Former Sponsor
Joined: Oct 2015
Posts: 528
Likes: 13
From: Redding, CA
that looks great, it really does.
I have question though shouldn't the weight be carried by the A B C D pillars?
in other words should the front and rear brackets be pushed out to the ends of the rack, rather than setting the weight over window openings? the weight would be transferred to the A & D pillars. just an idea
great work
I have question though shouldn't the weight be carried by the A B C D pillars?
in other words should the front and rear brackets be pushed out to the ends of the rack, rather than setting the weight over window openings? the weight would be transferred to the A & D pillars. just an idea
great work
Drow, I got the mounts spread a little more with the new front revision.
Jason

Thread Starter
|
Former Sponsor
Joined: Oct 2015
Posts: 528
Likes: 13
From: Redding, CA
Thanks,
This is something I will look at. I see what a few are saying, just need to make that bend and look at it. I think it will look out of place with the other three per side being straight vertical.
So, I think it will look out of place to a 1/3 of the people, a 1/3 will like it and the other 1/3 probably won't even notice..
I responded to your PM.
Jason

Thread Starter
|
Former Sponsor
Joined: Oct 2015
Posts: 528
Likes: 13
From: Redding, CA
Looks like this rack will weigh is around the 70# mark with floor.
Started on the rear base today. Frame/recovery mounts are complete, center section is roughed in. I will be cutting this UP a tad more. I have the ends and 1/4 panel guards pictured in my head, just need some time next week.
The quarter panel guards will be connected to the frame, NOT THE FENDER WELL!! Just want to make it where it will be the most rigid and easiest for the end user to make the proper connection.
Rear bumper will be available in 3 models.
Base-- no frills, just METAL
Base w/ quarter guards
Loaded-- with integrated swing arm and option for Hi-Lift and RotPax/jerry can, LED light pole.
Jason
Started on the rear base today. Frame/recovery mounts are complete, center section is roughed in. I will be cutting this UP a tad more. I have the ends and 1/4 panel guards pictured in my head, just need some time next week.
The quarter panel guards will be connected to the frame, NOT THE FENDER WELL!!
Just want to make it where it will be the most rigid and easiest for the end user to make the proper connection. Rear bumper will be available in 3 models.
Base-- no frills, just METAL
Base w/ quarter guards
Loaded-- with integrated swing arm and option for Hi-Lift and RotPax/jerry can, LED light pole.
Jason
Thread Starter
|
Former Sponsor
Joined: Oct 2015
Posts: 528
Likes: 13
From: Redding, CA
So, I think I've looked at every picture that every company that sells sliders for the D1 and D2 in the world makes...
I have a good idea of what I want to build and offer to the Rover community.
BUT, what is a price (BARE METAL) , that would really grab the attention of all perspective buyers? NOT FREE or a 1$ ... serious comments here.
I build good quality, HEAVY DUTY sliders. The Rover slider is simple in comparison to other makes and models I build.
Jason
