
So what did you do to your Disco today?


Mudding
Joined: Oct 2011
Posts: 162
Likes: 4
From: Brighton, MI
definitely would like to know how well this set up works out. been thinking of doing for awhile. just concerned on how the axle will stay located under the truck at higher speeds. if the upper locating arm on axle will be fine with the ball joint. also it looks pretty strong, but the front mounting looks like it could be a weak spot. I could be wrong as I am no structural engineer. Would you mind keeping us informed after its been put through some stresses of offroading and street driving?
Cheers.

Camel Trophy
Joined: Nov 2009
Posts: 4,079
Likes: 227
From: IL
definitely would like to know how well this set up works out. been thinking of doing for awhile. just concerned on how the axle will stay located under the truck at higher speeds. if the upper locating arm on axle will be fine with the ball joint. also it looks pretty strong, but the front mounting looks like it could be a weak spot. I could be wrong as I am no structural engineer. Would you mind keeping us informed after its been put through some stresses of offroading and street driving?
The frame mount will be plenty strong. All the plate you see is .25" thick.
Here you can compare my mounts to the one QT sells with their arms.
Rose Jointed Heavy Duty Trailing Arms - R1053 - Trailing Arms - Suspension - Range Rover Classic - Qt Services
The stock arms suck, period. The RoverTracks ones are better but the frame bushing is still the weak spot. On a truck with 3" lift plus AND long travel shocks the frame bushings will fail quickly.

Pro Wrench
Joined: Oct 2013
Posts: 1,512
Likes: 172
From: Central Minnesota
Cleaned all the grounds I could locate, still have a pulsing light syndrome, My next guess is the serpentine belt, then the alternator. Got the new radio installed, removed the aftermarket wiring and pioneer 600W amp from under the Pass seat. Radio works just fine!! no problems with the fuel pump so far...

Drifting
Joined: Oct 2013
Posts: 33
Likes: 0
Today I changed out my the gear oil in my t-case. I was down to a quart and a half that I turned into the local auto zone. I refilled with most of the 3 quarts of Valvoline 85-140 that I purchased. I used a fluid transfer hand pump from auto zone but the bottom hose kept coming out. Lost oil that way but not too much. Pulled out the hose to the t-case and oil was running out. So I think I did it right. Reaffixed the fill plug and then moved onto greasing my prop shafts with my lithium grease gun. Made an effort at tightening my v/c's. I really need a deep socket for the job. All I could find at sears was the short 3/8 inch drive 12 pt. lowes didn't have it. Have to check online. Topped off my tire pressure and most importantly got my truck inspected at the dmv and got my creds.

Rock Crawling
Joined: Apr 2013
Posts: 351
Likes: 9
From: NE-Illinois
Today I changed out my the gear oil in my t-case. I was down to a quart and a half that I turned into the local auto zone. I refilled with most of the 3 quarts of Valvoline 85-140 that I purchased. I used a fluid transfer hand pump from auto zone but the bottom hose kept coming out. Lost oil that way but not too much. Pulled out the hose to the t-case and oil was running out. So I think I did it right. Reaffixed the fill plug and then moved onto greasing my prop shafts with my lithium grease gun. Made an effort at tightening my v/c's. I really need a deep socket for the job. All I could find at sears was the short 3/8 inch drive 12 pt. lowes didn't have it. Have to check online. Topped off my tire pressure and most importantly got my truck inspected at the dmv and got my creds.


Overlanding
Joined: Jul 2013
Posts: 19
Likes: 0
From: Seattle, WA
Changed out the radiator with one from the j/y. A gamble to do but it worked out well and only 1/10 the cost of a new radiator and installation . Replaced and bleed the coolant. Still have to replace all the hoses. Intercooler lines have been sweating/leaking. I'm thinking about replacing those oil/trans cooler lines with AN fittings and braided steel hoses. More to do. More to come.

Rock Crawling
Joined: Nov 2012
Posts: 336
Likes: 6
From: Charleston SC.
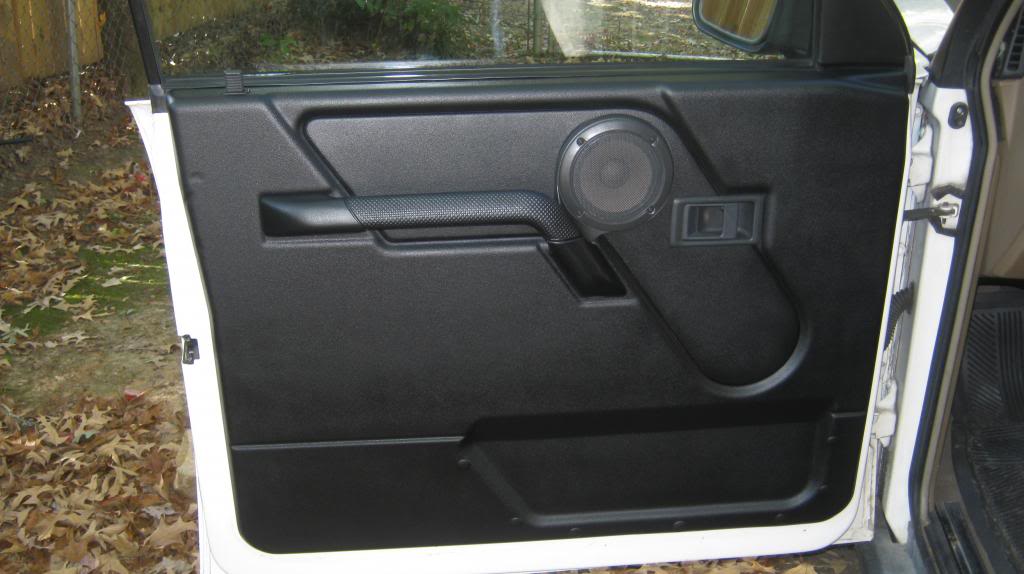
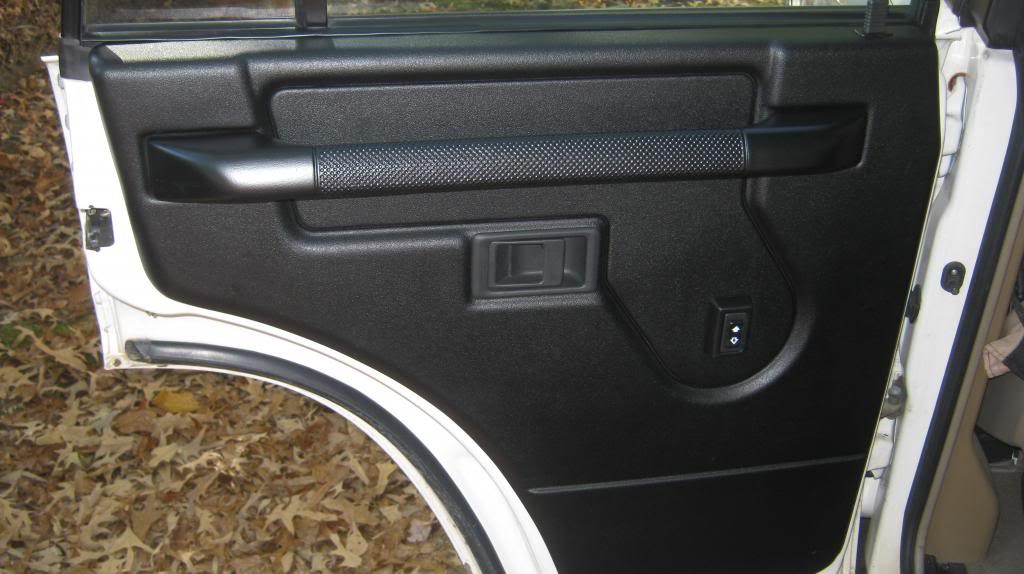
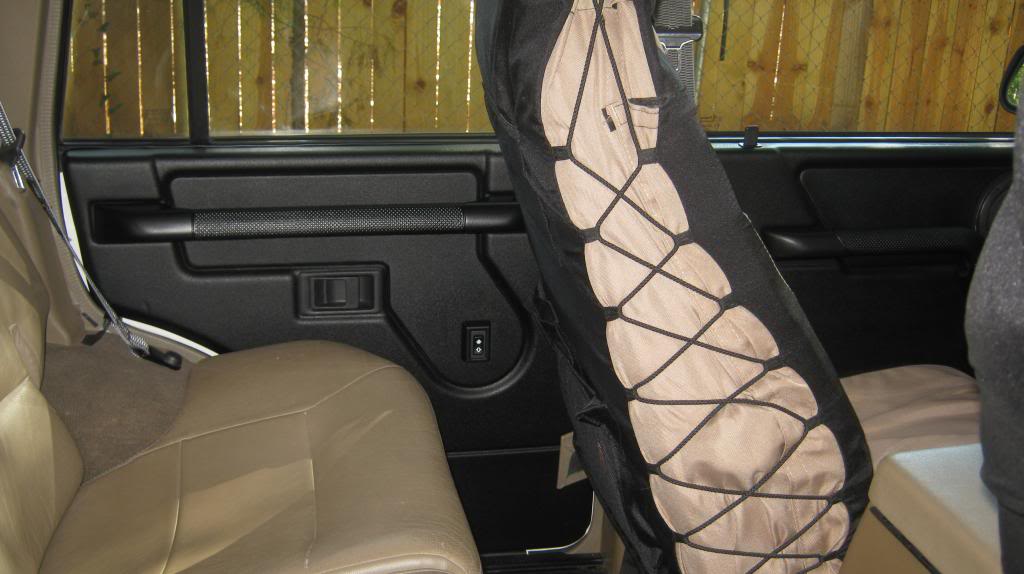
After bugging way too many people searching for door panels in top condition I decided to refurbish them. I used 5 coats of flat black plasti dip which worked well but left a very tacky finish that would be a lint magnet.I put a top coat of dupli color vinyl spray and it gave it the perfect finish. Only time will tell how well it holds up. On to the pics.........


Overlanding
Joined: Jul 2013
Posts: 19
Likes: 0
From: Seattle, WA
That looks really slick, Scope. Funny, I was thinking about doing the same thing yesterday. The top part of my driver side door panel has been cracked and chipped away. Since I plastidipped the spare tire (and it's held up really well), I was trying to think of other uses like the one you did. It looks super custom. Nice job.