When you click on links to various merchants on this site and make a purchase, this can result in this site earning a commission. Affiliate programs and affiliations include, but are not limited to, the eBay Partner Network.
I drew it down to 1/8 of a tank which is still 24lbs of fuel plus the tank itself which is maybe 30lbs of plastic. I don’t think I could’ve held the tank in place without the jig.
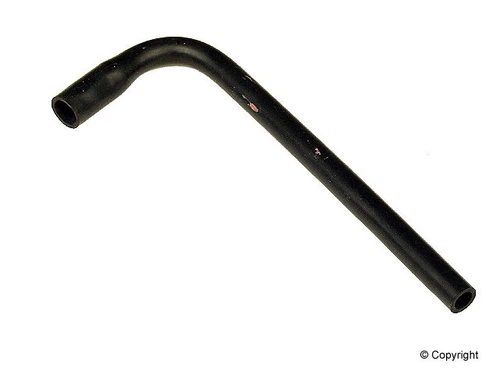
Had a slight variation in idle speed the other day - it persisted for a couple of days - opened the hood and looked around - all appeared to be good - but upon closer inspection noticed the crankcase breather hose had perished on the plenum connection obviously causing a small vacuum leak - it perished on the very end so I cut it off and reattached alleviating the vacuum leak and idle variation - have a new hose ordered for $9 - guess I could have used some hose I had but will give a parts house $9 for the proper part (that included shipping)
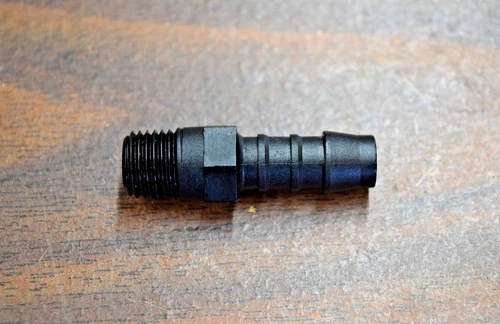
Ok went to change the hose and when I pulled the hose off on the valve cover the little barrel pulled out with the hose - my question is should I just pound it back in and lock tight it in or could I use the Bosch D2 PCV adapter ? not sure if the GEMs and Bosch valve covers are the same that this would screw into the valve cover ?
Let me know if you have an opinion
Last edited by disco96sd; Apr 28, 2026 at 11:43 AM.
Ordered rubber seat diaphragm for passenger seat as the original finally gave out
much more expensive than the one I got for driver seat years ago - in fact I think I got the seat foam and they tossed in the diaphragm for free
now just the diaphragm is $100 and that was the best deal I could find - some were pushing $200 - crazy
it is a quick job with cloth manual seats - just have to be careful of plastic clips that hold the fabric on chair frame as they become very brittle over the years
OK - seat done - takes about half hour now doing a manual seat again - original diaphragm broken down the middle as they all are - on new rubber diaphragms you get hooks for front and back rail that you will need to drill as the original only has side hooks - easy peazy - hook the sides first - then align the backs - mark - small pilot hole then larger hole to match side size holes and then hook - align the fronts and same steps - a t-hook tool really helps with stretching the hooks to fit in holes - 2 torq bolts accessed from the back seat on each side of the rail (push seat all the way forward for easier access)- two 9 or 10mm bolts - forget which on each side top of the seat rail (push seat all the way back to access) there is one torq bolt (same size as back ones) that holds the seat belt to seat frame (remove this first) - so seat belt torq bolt first - then move seat all the way forward and remove rear torq bolts second and then push seat all the way back and remove front 9/10mm bolts - swivel seat base toward door and take out - be careful removing plastic clips that hold fabric on seat frame - just use your hands and start on an end and keep pulling off the seat rail slowly - it will come off - do the fronts first rears second and long sides last as they are the hardest and most brittle so you want to take all the tension off first
I assume leather seats are the same but I don't know for sure
Ordered rubber seat diaphragm for passenger seat as the original finally gave out much more expensive than the one I got for driver seat years ago - in fact I think I got the seat foam and they tossed in the diaphragm for free now just the diaphragm is $100 and that was the best deal I could find - some were pushing $200 - crazy it is a quick job with cloth manual seats - just have to be careful of plastic clips that hold the fabric on chair frame as they become very brittle over the years
Last edited by disco96sd; May 19, 2026 at 04:42 PM.
I replaced the charcoal vapor canister with a "Standard Ignition Fuel Vapor Canister, part#CP1050". It is a direct replacement and was $65.00 from my local O'Reilly's Auto Parts store.
Exact fit. Hope this solves my refueling issues where the pump keeps clicking off. About a year ago, I replaced the vent valve with a GM #214-633 (12559015)
as well as the canister purge valve - #CVS125 and a new fuel pump. SOOOooooo, this "should" cover all the EVAP bases.
Had a slight variation in idle speed the other day - it persisted for a couple of days - opened the hood and looked around - all appeared to be good - but upon closer inspection noticed the crankcase breather hose had perished on the plenum connection obviously causing a small vacuum leak - it perished on the very end so I cut it off and reattached alleviating the vacuum leak and idle variation - have a new hose ordered for $9 - guess I could have used some hose I had but will give a parts house $9 for the proper part (that included shipping)
Ok went to change the hose and when I pulled the hose off on the valve cover the little barrel pulled out with the hose - my question is should I just pound it back in and lock tight it in or could I use the Bosch D2 PCV adapter ? not sure if the GEMs and Bosch valve covers are the same that this would screw into the valve cover ?
Let me know if you have an opinion
Pound the metal nipple back into the valve cover. Once the valve cover heats up and cools off it shouldn't simply pull out. If it does a little blue loctite won't hurt it.
I replaced the charcoal vapor canister with a "Standard Ignition Fuel Vapor Canister, part#CP1050". It is a direct replacement and was $65.00 from my local O'Reilly's Auto Parts store.
Exact fit. Hope this solves my refueling issues where the pump keeps clicking off. About a year ago, I replaced the vent valve with a GM #214-633 (12559015)
as well as the canister purge valve - #CVS125 and a new fuel pump. SOOOooooo, this "should" cover all the EVAP bases.
AEL = a PITA
My 97 XD 2.0 has AEL, and first it was the sensor on the fuel pump, replace fuel pump assembly, then fuel vapor smell up by the canister. Replaced both valves up there using the Mercedes Valve & the GM valve. Then slapped on the evap canister from an 03-04 D2 (nearly identical). Fuel vapor smell is gone, but I still get the occasional P0451 on the ultragauge as "pending". I simply just clear it. The last AEL D1 I had was also SUPER picky on AEL related fault codes. Non AEL is my preferred config!
I have been piddling with the Eco and all it's many little issues. AC drain drivers side had the nipple shoved up inside the drain tube which certainly helped it drain . Removed the nipple and cleaned the 10oz of black pond scum water/goo out. Newish PS line from the reservoir to the box had a seepy crimped end at the PS Box which you could easily rotate the hose on the metal line end.... Removed line, removed crimp, and installed a quality SS hose clamp. BINGO no more leak.... I don't know what is going on lately, but manufacturers seem to be having quality control issues with high pressure crimped fittings! This is not the first time a newer line has simply arrived with the crimped end free spinning on the metal end!! Back in 2023 I nearly blew up my 4spd auto due to a brand new line I installed as a precaution as the original was seepy. Got 1k into my trip and the line simply blew apart. Had I not caught it that 4spd would have been toast! The trail fix is still on that D1 to this day as I just don't trust the new stuff being made today.
I also found 3 OEM spare tire lug nuts with the dimpled caps in one of the Eco Challenges many spare parts totes. Removed the nasty lug nuts which were back there and installed the proper spare tire lug nuts.





 . Removed the nipple and cleaned the 10oz of black pond scum water/goo out. Newish PS line from the reservoir to the box had a seepy crimped end at the PS Box which you could easily rotate the hose on the metal line end.... Removed line, removed crimp, and installed a quality SS hose clamp. BINGO no more leak.... I don't know what is going on lately, but manufacturers seem to be having quality control issues with high pressure crimped fittings! This is not the first time a newer line has simply arrived with the crimped end free spinning on the metal end!! Back in 2023 I nearly blew up my 4spd auto due to a brand new line I installed as a precaution as the original was seepy. Got 1k into my trip and the line simply blew apart. Had I not caught it that 4spd would have been toast! The trail fix is still on that D1 to this day as I just don't trust the new stuff being made today.
