
Switch Repair (Window / seat Switches)


Thread Starter
|
Rock Crawling
Joined: Apr 2013
Posts: 351
Likes: 9
From: NE-Illinois
Well here's my first real write-up for the forums hope it helps.
Both these switches had issues, the window would go down, but not up. And the seat switch would move the seat forward, but not backwards.
With my recent trip to the boneyard being unsuccessful, and $$$ a bit tight I decided to dig into these and see if I could repair them vs ordering replacements... Since they were not working there wasn't much to lose.
General information:
These switches are pretty simple in operation.
There are only really 2 options for a switch not working, plastic damage(uncommon) and corrosion/heat damage(more likely)
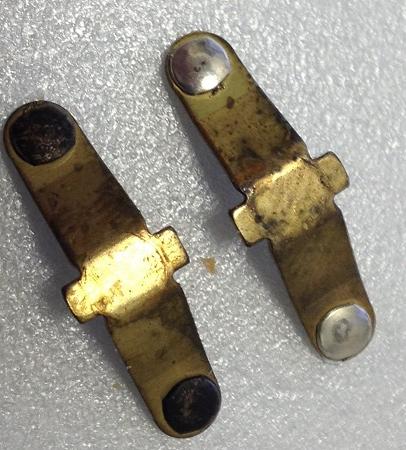
My issues were caused by corrosion on the tabs, and the pads they connect to.
For corrosion removal, you can use either a small screwdriver/really fine grit sandpaper (for the either) or rub on your jeans(tab ends) to clean them up and re-assemble. Some non-conductive grease could be used to help protect some of the ends.
Tabs:
Dirty & Cleaned:
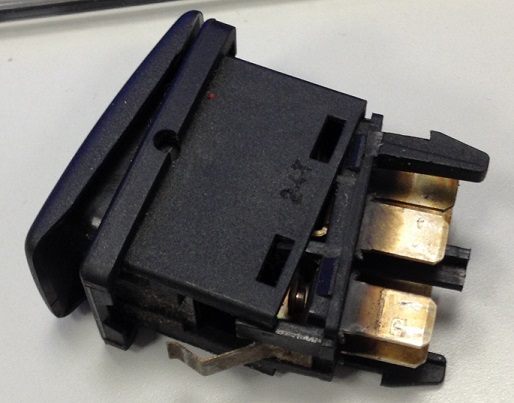
Window Switch:
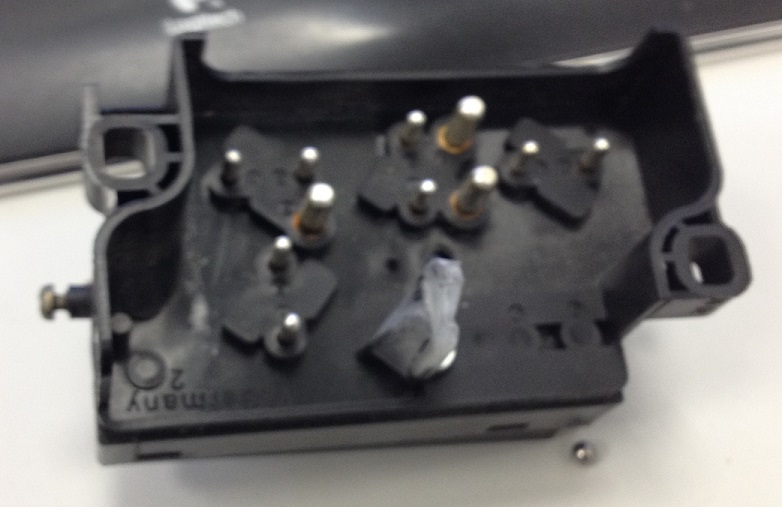
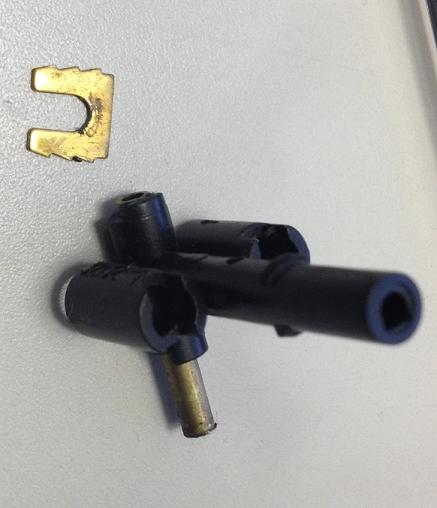
4 tabs to pop
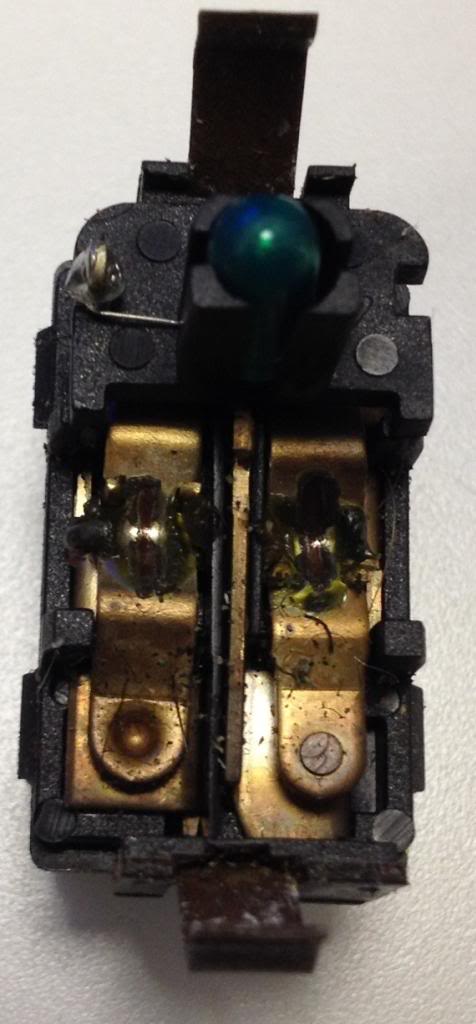
Internal layout
notice the tabs are opposites
Bulb for the window switch illumination, this should be able to be replaced with an LED/Resistor combo if you chose to.
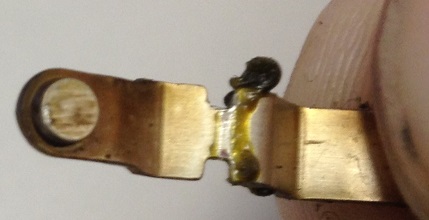
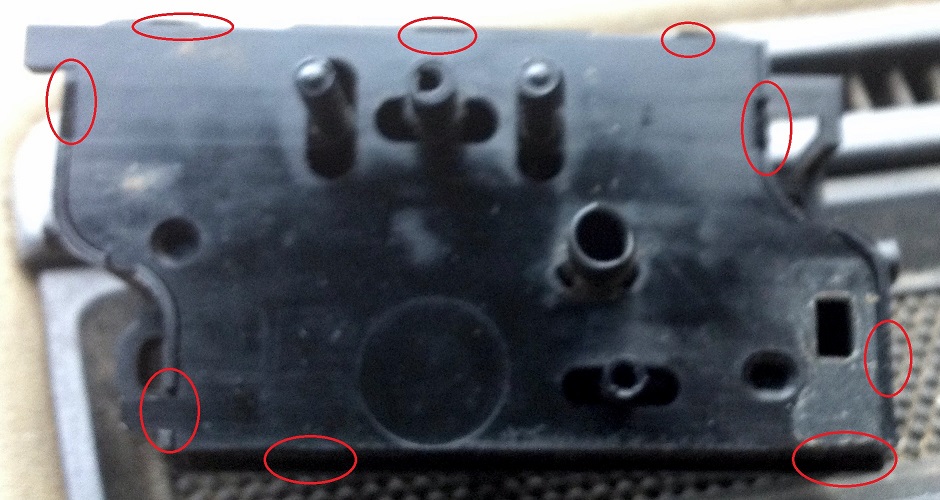
Pic of the undersides of the tabs:
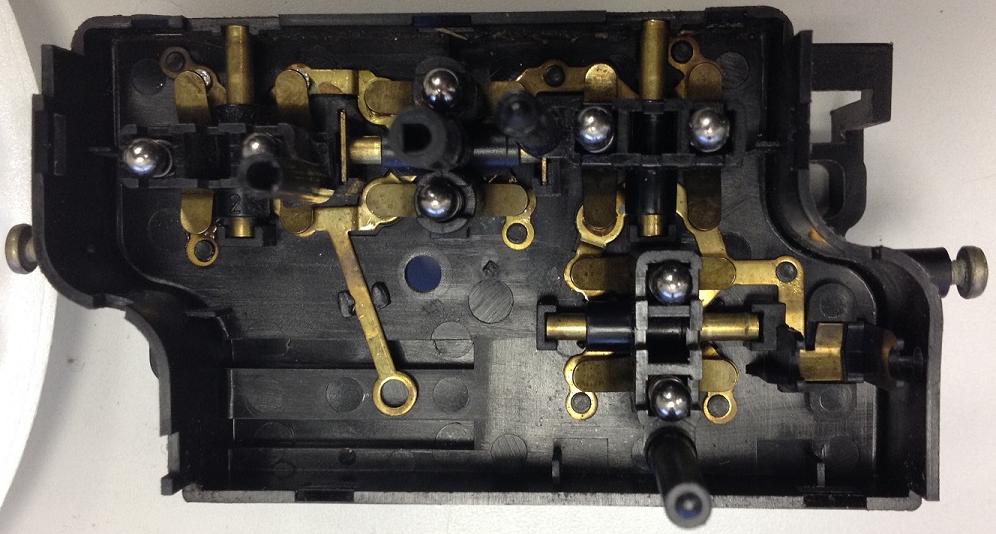
Seat Switch
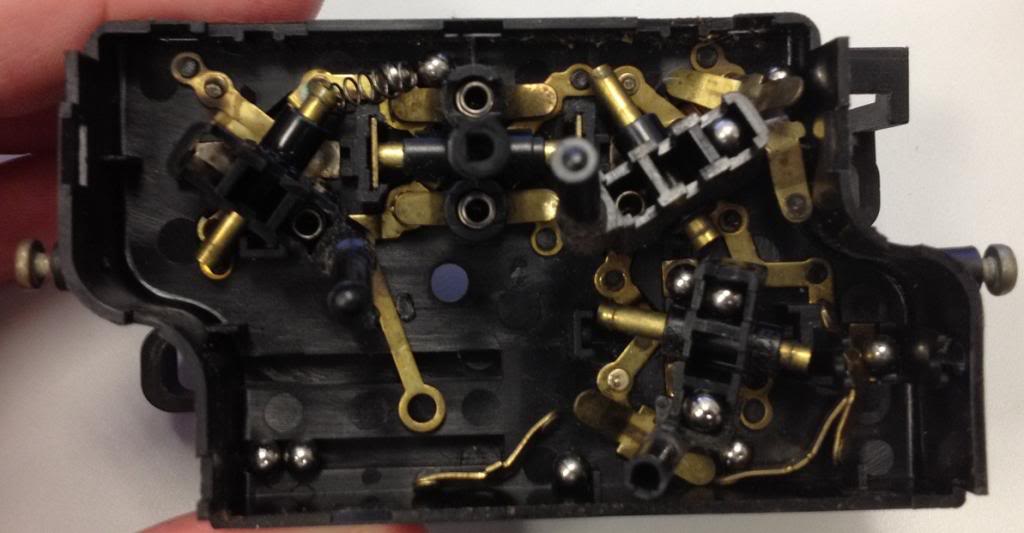
These are simple but have a lot of components. 8 springs, 16 ball bearings 4 individual switches in mine (room for more for other configurations....)
blurry underside:
pop tab locations:
messy inside:
Inside: cleaned up
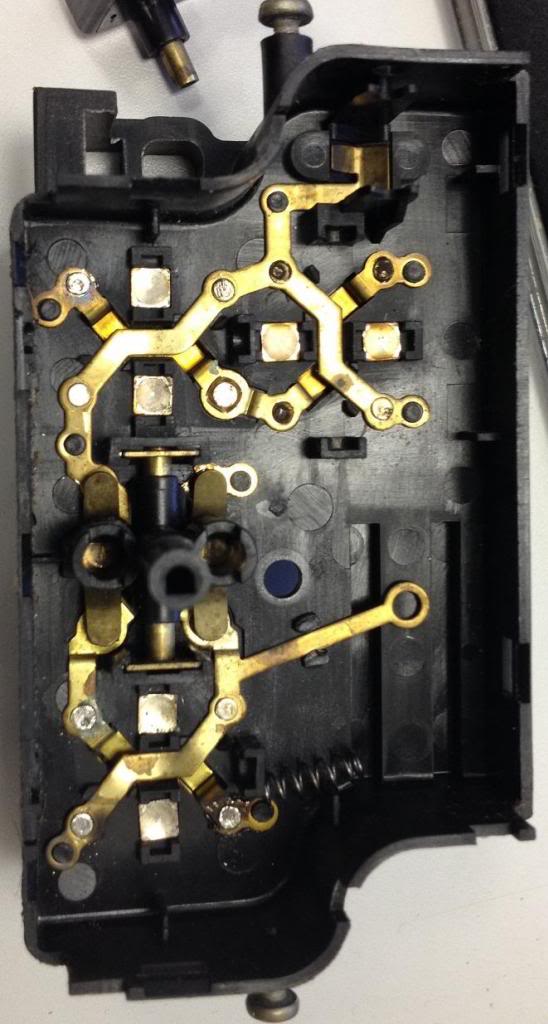
Mounting for the main slider (forward/back movement) located in the center.
The hook for the plastic should probably be spread apart some before re-assembly, I didn't do this and it seemed to remain loose afterwards.. hopefully it stays put lol
inside re-assembled (WRONG ORDER FOR THE SLIDERS!!!!) Be aware of this, the first time I re-assembled I had goofed the order of the plastic sliders. The proper order is:
2 like sliders go on either side of the main slider (mounted) are identical, make sure the side that has the extra plastic goes towards the outside (otherwise it will interfere with the operation of the switch.)
Also the slider with the offset end goes at the bottom of the switch, again you can use the cover to make sure the alignment is right.
A few notes for the re-assembly...
there are 2 ball bearings and a spring for each tube in the sliders (4 bearings and 2 springs per slider).
These are kind of a pain to deal with but fortunately the springs are flat topped and hold the bearings in place for re-assembly.
Get everyting in place like the last picture (just make sure the sliders are right lol) and then go SLOW when re-assembling the unit....
My instinct was to try and snap it in place quickly, but this proved to move the top bearings away from where they belonged, when I slowed down and tried to sneak each tab down a bit till I could snap it in place it proved to be quite easy.
After re-assembling, shake it ... If the bearings came loose the switch will rattle.
Now I need to get this fixed...........
Both these switches had issues, the window would go down, but not up. And the seat switch would move the seat forward, but not backwards.
With my recent trip to the boneyard being unsuccessful, and $$$ a bit tight I decided to dig into these and see if I could repair them vs ordering replacements... Since they were not working there wasn't much to lose.
General information:
These switches are pretty simple in operation.
There are only really 2 options for a switch not working, plastic damage(uncommon) and corrosion/heat damage(more likely)
My issues were caused by corrosion on the tabs, and the pads they connect to.
For corrosion removal, you can use either a small screwdriver/really fine grit sandpaper (for the either) or rub on your jeans(tab ends) to clean them up and re-assemble. Some non-conductive grease could be used to help protect some of the ends.
Tabs:
Dirty & Cleaned:

Window Switch:
4 tabs to pop

Internal layout
notice the tabs are opposites
Bulb for the window switch illumination, this should be able to be replaced with an LED/Resistor combo if you chose to.

Pic of the undersides of the tabs:

Seat Switch
These are simple but have a lot of components. 8 springs, 16 ball bearings 4 individual switches in mine (room for more for other configurations....)
blurry underside:

pop tab locations:

messy inside:

Inside: cleaned up

Mounting for the main slider (forward/back movement) located in the center.
The hook for the plastic should probably be spread apart some before re-assembly, I didn't do this and it seemed to remain loose afterwards.. hopefully it stays put lol

inside re-assembled (WRONG ORDER FOR THE SLIDERS!!!!) Be aware of this, the first time I re-assembled I had goofed the order of the plastic sliders. The proper order is:
2 like sliders go on either side of the main slider (mounted) are identical, make sure the side that has the extra plastic goes towards the outside (otherwise it will interfere with the operation of the switch.)
Also the slider with the offset end goes at the bottom of the switch, again you can use the cover to make sure the alignment is right.

A few notes for the re-assembly...
there are 2 ball bearings and a spring for each tube in the sliders (4 bearings and 2 springs per slider).
These are kind of a pain to deal with but fortunately the springs are flat topped and hold the bearings in place for re-assembly.
Get everyting in place like the last picture (just make sure the sliders are right lol) and then go SLOW when re-assembling the unit....
My instinct was to try and snap it in place quickly, but this proved to move the top bearings away from where they belonged, when I slowed down and tried to sneak each tab down a bit till I could snap it in place it proved to be quite easy.
After re-assembling, shake it ... If the bearings came loose the switch will rattle.
Now I need to get this fixed...........


Thread Starter
|
Rock Crawling
Joined: Apr 2013
Posts: 351
Likes: 9
From: NE-Illinois
I used a small flat-head screwdriver to just scrape the filth off the inside pads. The one I had available looks like a jewlers one but is about 2-3x the size. I also used my knife for a few that had pittings in them

TReK
Joined: Mar 2010
Posts: 2,778
Likes: 626
From: NYC
Best piece of advice I ever read about doing this job (and I have done it a couple of times) is to perform the work whilst the parts are inside a cookie sheet. That way when one or more of those little ball bearings or springs wants to run away from you, they will not run too far.

Camel Trophy
Joined: Nov 2009
Posts: 4,079
Likes: 227
From: IL
Best piece of advice I ever read about doing this job (and I have done it a couple of times) is to perform the work whilst the parts are inside a cookie sheet. That way when one or more of those little ball bearings or springs wants to run away from you, they will not run too far.

4wd Low
Joined: Jan 2018
Posts: 10
Likes: 0
Well here's my first real write-up for the forums hope it helps.
Both these switches had issues, the window would go down, but not up. And the seat switch would move the seat forward, but not backwards.
With my recent trip to the boneyard being unsuccessful, and $$$ a bit tight I decided to dig into these and see if I could repair them vs ordering replacements... Since they were not working there wasn't much to lose.
General information:
These switches are pretty simple in operation.
There are only really 2 options for a switch not working, plastic damage(uncommon) and corrosion/heat damage(more likely)
My issues were caused by corrosion on the tabs, and the pads they connect to.
For corrosion removal, you can use either a small screwdriver/really fine grit sandpaper (for the either) or rub on your jeans(tab ends) to clean them up and re-assemble. Some non-conductive grease could be used to help protect some of the ends.
Tabs:
Dirty & Cleaned:
Attachment 39566
Window Switch:
4 tabs to pop
Attachment 39567
Internal layout
notice the tabs are opposites
Bulb for the window switch illumination, this should be able to be replaced with an LED/Resistor combo if you chose to.
Attachment 39568
Pic of the undersides of the tabs:
Attachment 39569
Seat Switch
These are simple but have a lot of components. 8 springs, 16 ball bearings 4 individual switches in mine (room for more for other configurations....)
blurry underside:
Attachment 39570
pop tab locations:
Attachment 39571
messy inside:
Attachment 39572
Inside: cleaned up
Attachment 39573
Mounting for the main slider (forward/back movement) located in the center.
The hook for the plastic should probably be spread apart some before re-assembly, I didn't do this and it seemed to remain loose afterwards.. hopefully it stays put lol
Attachment 39574
inside re-assembled (WRONG ORDER FOR THE SLIDERS!!!!) Be aware of this, the first time I re-assembled I had goofed the order of the plastic sliders. The proper order is:
2 like sliders go on either side of the main slider (mounted) are identical, make sure the side that has the extra plastic goes towards the outside (otherwise it will interfere with the operation of the switch.)
Also the slider with the offset end goes at the bottom of the switch, again you can use the cover to make sure the alignment is right.
Attachment 39575
A few notes for the re-assembly...
there are 2 ball bearings and a spring for each tube in the sliders (4 bearings and 2 springs per slider).
These are kind of a pain to deal with but fortunately the springs are flat topped and hold the bearings in place for re-assembly.
Get everyting in place like the last picture (just make sure the sliders are right lol) and then go SLOW when re-assembling the unit....
My instinct was to try and snap it in place quickly, but this proved to move the top bearings away from where they belonged, when I slowed down and tried to sneak each tab down a bit till I could snap it in place it proved to be quite easy.
After re-assembling, shake it ... If the bearings came loose the switch will rattle.
Now I need to get this fixed...........
Attachment 39576

Rock Crawling
Joined: Jan 2017
Posts: 259
Likes: 39
They have 4 tabs, two on top two on bottom. Usually the bottom ones are broken off so it doesn't snap in and stay put.
You can get a replacement cover with the 4 tabs off eBay usually.
4wd Low
Joined: Jan 2018
Posts: 10
Likes: 0
Thank you. I had a feeling something was broken/missing

Thread
Thread Starter
Forum
Replies
Last Post
cosmiccharlie
Retired - Private For Sale/Trade Classifieds
2
Apr 18, 2013 08:29 PM
cosmiccharlie
Audio/Visual Electronics
5
Mar 29, 2013 09:34 AM
cosmiccharlie
Retired - Private For Sale/Trade Classifieds
2
Mar 25, 2013 09:26 PM

