When you click on links to various merchants on this site and make a purchase, this can result in this site earning a commission. Affiliate programs and affiliations include, but are not limited to, the eBay Partner Network.
I need help! My blower is out on all settings. I have power to fuse 7 but not at the brown and red connector on the back of interior panel at 0584. I cannot find the brown and pink wire on 0581. This is all I see on it:
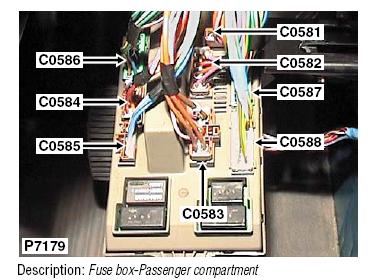
Picture 1. This is connector 0581. Apparently I need to find a Brown and Pink which is closest to the middle one here...Problem is I cannot find this wire in the engine bay fuse panel.
I do see a brown and pink wire in the engine bay panel Is the one I am looking for under fuse link #4? Am I most likely good to go? Just put an inline 30A fuse between Brown and Pink wire and Brown and Red? Is the Brown and Pink ONLY for the blower fan or will I be using a vampire tap type connection.?
2002 Disco II. My heater blower stopped working at all speeds and fuse 7 was dead on both sides of the fuse. I took the fuse block apart and found a bad soldier joint.
The 3 large spade connectors on one end of the board were carefully inspected and found to be well soldiered but no continuity from the middle spade (NK or BrowN/PinK wire input) to fuse 7. On close inspection, the soldier joint found right in the middle of the fuse side of the circuit board, exactly between the two rows of fuse sockets, was cracked. It had to be examined with a light and 7x magnifier but it was clearly not the smooth, perfect, Hershey's Kiss like all the other soldier joints. poking it with a test probe made the continuity test suddenly start working between the middle large spade and fuses 6 & 7 but any amp load would have made it fail again. The joint was really contaminated and burnt from arcing because it took a fair amount of heat and flux before I could get a dab of soldier to flow properly between the post and the surrounding circuit board trace. It was all back together and working perfectly in about one hour of work.
Pulling the fuse block out far enough was barely possible because of the short length of the wires. I had to remove the foam sound deadening block below the steering column and had to use a screw driver to help release the tabs in the center of each connector then carefully pry out each connector. I took a picture of the fuse and relay arrangement with my phone to aid in reinstalling the fuses and relays on the bench.
Last edited by Billj3cub; Feb 7, 2019 at 09:46 AM.
Reason: clarification
This is the full threads that helped me find my problem and solve it.
Good Luck!
Like some on this forum, I had an intermittent working blower that finally died. One of the fixes (for some) from past threads was to install a new fuse box. Somehow the connection through the fuseblock to fuses 6 & 7 fails. Fuse 6 (25 amp) is rear A\C blower, if equipped, and fuse 7 (30 amp) is the front A\C blower. Both of these were dead on mine as well.
I looked at the engine bay fuseblock, also. Fuselink 4 was good, however, the connector (on same fuseblock) it sends power to was dead at the Brown\w Pink wire. This wire goes to fuses 6 & 7 in the passenger fuseblock.
I ended up running a bypass wire to each fuse directly from fuselink 4 (cold side, next to side of fuseblock), with an individual blade fuse holder on each wire. I put a spade connector on the ends and tried plugging in to the cold side of slots 6 & 7. It still didn't work. This fuseblock was bad, also.
I pulled the fuseblock and attached directly to the wires out (cold side) on the back. For fuse 6 (rear blower) pull connector 585, first in line, brown with three wires. You want the Yellow\Green wire. Pull the white retainer clip and dig out this wire with a small screwdriver. It has a spade receptor, of which I attached my 25 amp bypass wire. Put clip back and replace connector. The next connector back is 584, pull it. It is also brown, but has five wires in it. You want the Brown\Red wire. Pull it out the same way. I connected it to the 30 amp bypass wire. Fix and replace the connector. Button everything up.
Success! I now have cold air blowing, front and back. Less than $20 for wire, individual fuseblocks, and connectors.
Attached Thumbnails
Attached Fileslink4.pdf (48.3 KB, 23 views)
It is usually a faulty interior fuse block, specifically at the blower fuse. Between the wire harness connector on the back and the fuse on the front, there is a break in the power supply through the block. You can replace the fuse block, or bypass the block altogether, like I did, and run a independent fused wire to the blower.
The resistor pack can go bad, however, if the max speed fan setting doesn't work, then it is not the resistor pack. Max fan speed bypasses the resistor pack. There is a different rated resistor for each slower fan speed.
Note: Both of my fuseblocks (interior and under the hood) were dead for the blower circuit, and I bypassed both. See the attached images in the linked thread. __________________
The drawing is of the engine bay fuseblock near the battery.
As for the interior fuseblock, check fuse 7 for power with a test light (with A/C on).
If you have power at the fuse, remove the nut at the top of the fuseblock, pull the top of fuse block down to reach the back. Pull connector 0584 (see photo), locate the brown with red wire. From the location of that wire in the connector determine which pin on the fuseblock that wire attaches to. Check that pin for power from fuse 7. If you don't have power then your interior fuseblock is bad (not sending power from fuse 7 to the rear connector). Buy a replacement fuseblock, or bypass it like I did (see below). If you have power on this pin, then either the voltage is less than the blower needs to run or there is a loose connection/cut wire.
If no power at the fuse, remove the nut at the top of the fuseblock, pull the top of fuse block down to reach the back. Pull connector 0581 (see photo), locate the brown with pink wire, test this wire through the connector with the test light (with A/C on). If you have power then your interior fuseblock is bad (not sending power to fuse 7 from the rear connector power supply).
Buy a replacement fuseblock, or bypass it like I did.The wires in the connector are locked in with a thin white plastic plug. Pull this plug out with needlenose pliers, take a small flat blade screwdriver and dig/pry the brown with pink wire out. It will already have a spade bit receptor attached.
Do the same for connector 0584, for the the brown with red wire (This wire is direct to the blower). Buy a 30 amp inline fuse, attach spade bit tips to both ends of the 30 amp inline fuse and plug into the 2 wires you dug out. The blower should work now.
If you don't have power at the brown with pink wire (connector 0581), then you need to check the engine bay fuseblock (see drawing in linked thread provided earlier). Power starts at fuselink 4 and exits the fuseblock at the connector shown through the said brown with pink wire.
thank you, our 99 pulled this on us this week. Since my boy is now driving, even more of a concern being defrost is inop and it is cold! Perfect fix, bypassed fuse block.
Bringing this one back from the dead! 2 days ago my blower fan started having reduced output then the next day it was completely inop. I wanted to pass along something I didn't see specifically that was relevant to my diagnosis/repair. After verifying power supply directly at the blower motor connector (C0056) w/ it disconnected and verifying blower motor operation w/ alternate power source. I checked voltages at fuse 8 on both sides (left side is fuse output/right side is fuse input), I found that w/ the blower motor disconnected there was voltage on both sides of the fuse or w/ the blower connected there was voltage @ initial key on but dropped to 0 volts after a few seconds. This is an indicator that the circuit in the fuse panel can't support the current/amperage due to internal damage. After removing pins C581-2 & C584-2 and putting a 30A fuse directly into the pins I verified restored operation of the blower motor. I finished up by installing a separate fuse holder, labeled it & removed fuse 8 from the fuse box.


 link4.pdf (48.3 KB, 23 views)
 fuseblock near the battery.