
HID bulbs


Three Wheeling
Joined: Oct 2009
Posts: 56
Likes: 0

Three Wheeling
Joined: Oct 2009
Posts: 56
Likes: 0
Clown,
From what some people say is the 03-04 headlights are what you need to do this right. However, I used my 03 and it is what was indicated that were deadly. I took the lights out before I could do the long range shot. If you want my writeup is identical for the 04 and is pretty inclusive for the steps.
I would love it to have someone else prove that these in 03+04 are no less safe than any other headlights. Keep us abreast of the progress.

Winching
Joined: Jun 2009
Posts: 733
Likes: 3
I don't have factory HIDs, do I?
it's still illegal to put a kit in 03-04 lamps, right?
Last edited by oysterhead; Dec 9, 2009 at 09:05 PM.
Three Wheeling
Joined: Oct 2009
Posts: 56
Likes: 0
No Oyster you dont. 03-04 have a focused beam halogen, which is what a HID bulb would in theory work fine in.

Three Wheeling
Joined: Oct 2009
Posts: 56
Likes: 0
Ok Clown, these procedures caused quite a ruckus on another forum. I was going to PM them to you but its too big (too many words). Realize I took these lights out after I was told they were unsafe by several people (sight unseen). Use at your own discretion.
Good luck:
Total time: 2 hours. Significantly less if you follow my procedures. 1.5 of that time is me figuring out how to install the things with limited instructions from the manufacturer.
The kit I purchased was from DDM Tuning (Click to go there) It is the 35 Watt Raptor Kit.
H7 - High beam and Low beam
H11 - Fog Lights
I purchased 3 kits 1 for Drivers side, 1 for Passenger side and 1 for foglights
First thing they recommend is to disconnect the battery. Being that you may have radio+code issues after doing that, I elected to live on the edge.
Rule #1 Dont ever turn the lights on while you are doing this procedure. Be patient take your time and if you have to remove and replace the lights before turning back on.
Rule #2 Be VERY careful not to touch the bulbs in either the originals or the HID bulbs.
All of these procedures are on an 03 Discovery your vehicle may and can be different.
Ok lets start:
1. Open the hood + get a good shop light or do it outside
2. Remove the grill. There are 3 "screws" across the top and 2 pegs that hold it in the bottom. The "screws" are plastic and are inserted into the holders across the top.I had to put a thin straight driver under the head and push up as I turned the phillips head on top. The whole thing is plastic so be careful removing. Then just lift up and it should come out.
3. Drivers side: No reason to start here just felt it was the best place to start. Face the headlight assembly. On the top where it attaches you will find 2 Torx head bolts. These are male so you can use a small socket to remove them. These are your headlight adjustment bolts. Go ahead and take them off. On the left side of this assembly you will find a philips head screw behind a grey/black panel. Open the panel and remove the screw. Retain all of the bits you took off.
3a. Gently remove the assembly from the body. There are guide pins on the right side that helps lock it into the fender.
3b. Remove the plug that is in the back of the assembly. It should come apart easily.
3c. Now the whole assembly is free take it over to your bench.
4. Passengers side: Identical to the drivers side. Take the assembly out and place it on the bench. You cannot put the wrong headlight in the wrong spot so dont be worried about mixing them up.
5. Installation of HID Bulbs and Ballast. This is identical for both sides.
5a. The kit I purchased required NO wiring other than plugging in the appropriate wires in the right recepticals.
5b. Remove the (Lower) High Beam and (Upper)Low Beam (I know it sounds backwards) grey covering. It has a 1/4 turn key built into it with a rubber o-ring around the inside. You will be drilling into these.
5c. Remove the retaining spring holding in the original halogen bulbs, take them out and place them in a safe place.
5d. Notice the 90 degree angled connector that was plugged into the bulb. You will be putting in 2 bladed wires into this plug.
5e.Put the HID bulbs into High Beam and Low Beam. Lock them into place with the retaining spring
5f.Drill the grey covers that you took off. The hole should be about 1/2 inch across to be sure the plugs can get through.
5g. Break the crappy clear bottom cap of the HID bulb kit. Its too small to slide off and it is not needed. Also break off the black adapter ring that we wont be using either.
5h.Pull all wires through grey cap.
5i.Slide rubber grommet up the wires and pull it through the grey cap.
5j. For High Beam (lower) Orange is + Black is - put the bladed supplied connectors into the 90 degree plug that you took off the original.
5k. For Low Beam (upper) Grey is + Brown is - (I know this is weird) put the bladed connectors into the 90 degree plug that you took off.
5l. Put the grey connector on (leave the 90 degree plug behind the bulbs, it affords the most room).
5m. Pull the wires a little to take up the slack from inside. Dont go nuts because you may pull them off the plugs.
5n. Connect the ballast to the wires. There are 3 plugs and you cannot plug them in wrong. 1 male 1 female 1 dual plug.
5o. Take the assembly back to the truck and connect the land rover light harness to it. For testing purposes just place the assembly into position.
5p. Turn the headlights on and verify that both Low beams and high beams are on. If they are not then there is a very good chance you have the bladed connections in the wrong slot in the 90 degree connector.
5q. Find a good place for the ballast. I put the drivers side ones on the air filter box with the supplied double sided tape (make sure its clean). I just changed my filter so I probably wont have to move them anytime soon. On the passenger side I placed both in the space on the left of the inner fender well. This will take some creativity on your part. Make sure its not in a place that can get overly wet.
6. Reassembly:
6a. Once you have verified that all of the lights work, then reattach in the reverse of how you took it off.
6b. With lights on use a place on the wall to aim the headlights. Make sure that they are not too high because these are significantly brighter than originals.
7. Fog Lights: Much easier, requires no drilling.
7a. Lay on the floor or use lift. From under the truck reach up on either side and remove the original fog light bulbs. Install the new ones in the bumper and lock them into place.
7b. Take the supplied plug and connect it to the Land Rover fog light plug.
7c. Connect the ballast.
7d. Turn on to verify its all ok
7e. Stuff the ballast in the perfectly sized space between the bumper and the fascia. On my truck there is a place that is exactly the right size and it was very snug to put into the space. I could barely pull it out again so I believe its there to stay.
You should be done.
I recommend the 6000k temp bulbs. They look very white with a very small tinge of blue. Basically it looks OEM, whereas 8k-12k (blue to violet) looks more aftermarket, but beauty is in eye of the beholder. If your head lights are off even a bit too high people will flash you. They are beautifully bright and stylish. I can image in the winter how much better they will work in bad snowfall we get here in the rust belt.
I will post photos soon. I didnt take a before picture but you can imagine how it looks because your all driving the same way.:drive:
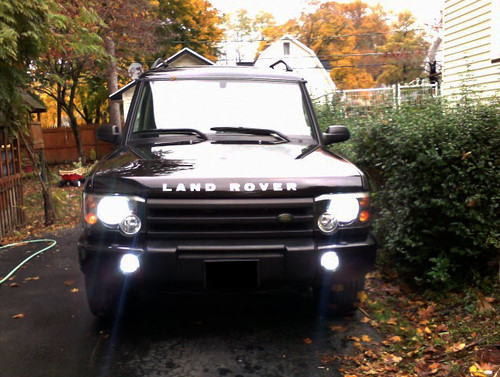
Daytime shot looking at the truck-
Low beams & fog lights:
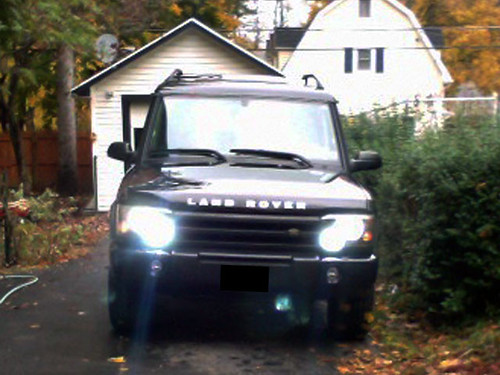
High beams:
Good luck:
Total time: 2 hours. Significantly less if you follow my procedures. 1.5 of that time is me figuring out how to install the things with limited instructions from the manufacturer.
The kit I purchased was from DDM Tuning (Click to go there) It is the 35 Watt Raptor Kit.
H7 - High beam and Low beam
H11 - Fog Lights
I purchased 3 kits 1 for Drivers side, 1 for Passenger side and 1 for foglights
First thing they recommend is to disconnect the battery. Being that you may have radio+code issues after doing that, I elected to live on the edge.
Rule #1 Dont ever turn the lights on while you are doing this procedure. Be patient take your time and if you have to remove and replace the lights before turning back on.
Rule #2 Be VERY careful not to touch the bulbs in either the originals or the HID bulbs.
All of these procedures are on an 03 Discovery your vehicle may and can be different.
Ok lets start:
1. Open the hood + get a good shop light or do it outside
2. Remove the grill. There are 3 "screws" across the top and 2 pegs that hold it in the bottom. The "screws" are plastic and are inserted into the holders across the top.I had to put a thin straight driver under the head and push up as I turned the phillips head on top. The whole thing is plastic so be careful removing. Then just lift up and it should come out.
3. Drivers side: No reason to start here just felt it was the best place to start. Face the headlight assembly. On the top where it attaches you will find 2 Torx head bolts. These are male so you can use a small socket to remove them. These are your headlight adjustment bolts. Go ahead and take them off. On the left side of this assembly you will find a philips head screw behind a grey/black panel. Open the panel and remove the screw. Retain all of the bits you took off.
3a. Gently remove the assembly from the body. There are guide pins on the right side that helps lock it into the fender.
3b. Remove the plug that is in the back of the assembly. It should come apart easily.
3c. Now the whole assembly is free take it over to your bench.
4. Passengers side: Identical to the drivers side. Take the assembly out and place it on the bench. You cannot put the wrong headlight in the wrong spot so dont be worried about mixing them up.
5. Installation of HID Bulbs and Ballast. This is identical for both sides.
5a. The kit I purchased required NO wiring other than plugging in the appropriate wires in the right recepticals.
5b. Remove the (Lower) High Beam and (Upper)Low Beam (I know it sounds backwards) grey covering. It has a 1/4 turn key built into it with a rubber o-ring around the inside. You will be drilling into these.
5c. Remove the retaining spring holding in the original halogen bulbs, take them out and place them in a safe place.
5d. Notice the 90 degree angled connector that was plugged into the bulb. You will be putting in 2 bladed wires into this plug.
5e.Put the HID bulbs into High Beam and Low Beam. Lock them into place with the retaining spring
5f.Drill the grey covers that you took off. The hole should be about 1/2 inch across to be sure the plugs can get through.
5g. Break the crappy clear bottom cap of the HID bulb kit. Its too small to slide off and it is not needed. Also break off the black adapter ring that we wont be using either.
5h.Pull all wires through grey cap.
5i.Slide rubber grommet up the wires and pull it through the grey cap.
5j. For High Beam (lower) Orange is + Black is - put the bladed supplied connectors into the 90 degree plug that you took off the original.
5k. For Low Beam (upper) Grey is + Brown is - (I know this is weird) put the bladed connectors into the 90 degree plug that you took off.
5l. Put the grey connector on (leave the 90 degree plug behind the bulbs, it affords the most room).
5m. Pull the wires a little to take up the slack from inside. Dont go nuts because you may pull them off the plugs.
5n. Connect the ballast to the wires. There are 3 plugs and you cannot plug them in wrong. 1 male 1 female 1 dual plug.
5o. Take the assembly back to the truck and connect the land rover light harness to it. For testing purposes just place the assembly into position.
5p. Turn the headlights on and verify that both Low beams and high beams are on. If they are not then there is a very good chance you have the bladed connections in the wrong slot in the 90 degree connector.
5q. Find a good place for the ballast. I put the drivers side ones on the air filter box with the supplied double sided tape (make sure its clean). I just changed my filter so I probably wont have to move them anytime soon. On the passenger side I placed both in the space on the left of the inner fender well. This will take some creativity on your part. Make sure its not in a place that can get overly wet.
6. Reassembly:
6a. Once you have verified that all of the lights work, then reattach in the reverse of how you took it off.
6b. With lights on use a place on the wall to aim the headlights. Make sure that they are not too high because these are significantly brighter than originals.
7. Fog Lights: Much easier, requires no drilling.
7a. Lay on the floor or use lift. From under the truck reach up on either side and remove the original fog light bulbs. Install the new ones in the bumper and lock them into place.
7b. Take the supplied plug and connect it to the Land Rover fog light plug.
7c. Connect the ballast.
7d. Turn on to verify its all ok
7e. Stuff the ballast in the perfectly sized space between the bumper and the fascia. On my truck there is a place that is exactly the right size and it was very snug to put into the space. I could barely pull it out again so I believe its there to stay.
You should be done.
I recommend the 6000k temp bulbs. They look very white with a very small tinge of blue. Basically it looks OEM, whereas 8k-12k (blue to violet) looks more aftermarket, but beauty is in eye of the beholder. If your head lights are off even a bit too high people will flash you. They are beautifully bright and stylish. I can image in the winter how much better they will work in bad snowfall we get here in the rust belt.
I will post photos soon. I didnt take a before picture but you can imagine how it looks because your all driving the same way.:drive:
Daytime shot looking at the truck-
Low beams & fog lights:
High beams:

Thread
Thread Starter
Forum
Replies
Last Post