
Replace Wires Without Removing IM


Drifting
Joined: Nov 2012
Posts: 40
Likes: 1
I was removing all the bits and bobs around the IM to remove it to change the wires. I was almost to the point of taking out the IM when I thought I should double check to see if there was a more straight forward way of removing the wires and found this thread.
Pretty straight forward instructions. I didn't need make a special tool, managed to get the wires off. I did however found a use for an old Yoga mat. I rolled it up and placed it over the area above the grill area so I could rest my knees on top of it to lean over the engine and peer into the back of the engine, back isn't what it used to be, hence the unused yoga mat.
I got the wires in. put everything back I started to take apart from the IM. It started right up and it purrs like a kitten.
Incidentally I just bought this Disco II which had been sitting in a yard for the past two years. But that is another story.
Thanks for this thread.

Overlanding
Joined: Sep 2012
Posts: 15
Likes: 3
had to remove my im to change mine just couldnt get to them and feel like it was done right. it was a pretty hefty job and i took a video showing and explaining everything i did and how long it took me without any research into the issue. i posted the video to help anybody who is considering doing this so they can see all the work i did to take the coil pack out to get the wires changed. check it out

Winching
Joined: May 2012
Posts: 676
Likes: 37
From: Wylie, TX
I'm still not really seeing the big deal with the intake removal. I was careless with plug wires and over the last 2 years changed the wires twice due to burning and the coils twice due to aftermarkets failing. The first time was slow but the last three times were a piece of cake. There's hardly anything to remove: the air intake from the filter cover on up comes off in one piece.
Two throttle cables screw off. 2 bolts on either side for exhaust tube brackets. A couple vacuum tubes unsnap. SAI tube slips out.
Replaced my coils this morning. 2 hours working slow and had everything taken off and back on.
Life is really easy with the hood off. 4 bolts for that.
Anyway, just 2 cents.
notes about the video:
the exhaust recirc tubes on each side don't need to come off. Just pull them back. They bend.
Use an antenna magnet to put bolts in hard to reach places.
Last edited by jamieb; Sep 10, 2016 at 10:59 PM.

3rd Gear
Joined: Nov 2016
Posts: 3
Likes: 1
I don't understand why this is such an ordeal for people. I had a stumble and CEL come on, code cylinder 1 misfire and "multiple misfires"
Pulling wires, #1 just looked crusty, service history said they were last changed 8 years ago. #4 the wire broke off the crimp connector.
Read that people were insisting magnecor 8mm wires and +4 bosch platinums. My truck came from an **** retentive, "spare no expense" original owner that was always serviced by a rover specialist, and it had STI 7mm wires and NGK platinums. And it has always been unbelievably reliable for me. So I knew there were alternatives.
A set of Kingsborne 8mm wires comes in at $40 shipped in my choice of color. I asked for two inches extra on the wires in the online order notes, and they gladly obliged at no cost (I suggest you do this, the left bank of plugs are a little tight and 2 inches more wire gives you better routing options for reliability.)
Spark Plug Wires for Discovery and Range Rover
From hood up to hood down, including setup and cleanup, and fabricating a bent long screwcriver took exactly one hour. I've never changed wires on the disco before and have fairly big hands. half of that time was in changing the plugs.
You don't need to remove anything except unclip the wiring loom from the top of the firewall. The plug wires come off easier if you twist them with your fingers a bit, wiggle them, and most will pop off by hand with no issues at all. The tougher ones are the two inner bottom ones, and the screwdriver makes short work of them. Everything except the nastiest, crustiest plug wires will come off with fingertip force.
The easiest way is to remove all the plug wires at once and then just refer to the first google image diagram of "discovery 2 spark plug wire diagram" and slot them all back on, bottom wires first.
As for plugs, they require no removal of anything, just a plug socket, a 3/8 wobbly, and a 6 inch extension.
absolutely make a flathead screwdriver bent about 8 inches up from the blade. just heat it with a blowtorch and apply pressure. I used an old tekton I had that I paid $2.99 for in the clearance bin at the auto store. Bend about 45 degrees. It's a mandatory tool that costs about as much as a spark plug, so don't try and "cheap" out. I'd assume the $2 option on amazon or a similar harbor freight flathead would work fine too.
This really is just a fiddly job that takes no more time than changing the wires on a rear distributor dodge 318, in that you have to sit inside the engine bay to get at it. But I'm 6'3 and not small, and apart from having slightly sore fingertips, went in expecting a nightmare and came out wondering why this is such a big deal.
Personally, if I were to remove the coil, however, I'd remove the intake mani. If you're going that deep for maintenance, you may as well just do a moderate servicing and change your valve cover and manifold gaskets.
I followed your tutorial and everything worked well except that I put the #4 wire on the #3 spot by mistake. I couldn't get it off cause the new ones have a barb that locks in. So I just swapped the #3 and #4 wires since they are of similar length. Was afraid I'd break the new wire if I pulled or pried any more.

2nd Gear
Joined: Oct 2017
Posts: 2
Likes: 0
Anyone near nyc or upstate ny that can help change my spark plugs wires on a 2000 Disco 2? My shop wants 4 hours of labor. I have new wires and plugs already just need help and I can pay reasonably.


Overlanding
Joined: Feb 2018
Posts: 22
Likes: 0
From: Phoenix, AZ
I took the liberty of updating the image/diagram someone posted in this thread (I don't know who created it) for two reasons:
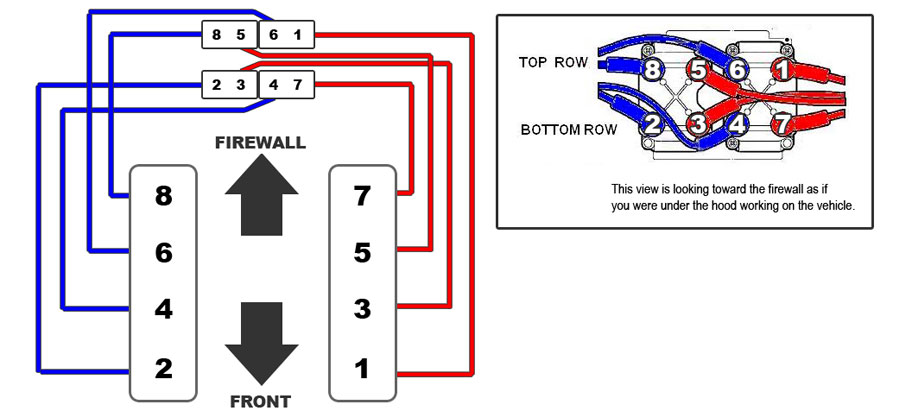
I hope this is of some use.
-Anthony
- The closeup of the coil was as if seen "through" the firewall. That's not how we'd see it if under the hood, so I reversed it and made the numbers more obvious.
- The top/bottom rows, on the diagram on the left, were reversed (top was on bottom and vice versa) - as pointed out by another member in this thread - so I corrected that layout.
I hope this is of some use.
-Anthony


Drifting
Joined: Mar 2011
Posts: 41
Likes: 0
Thanks for this tutorial followed it pretty much to the letter. First time at this and it took me about 2 hours to get the wires in place and routed. A few notes from the trenches.
0.5) Get a ramp and put in in front of the bumper to enable you to step up lay on top of the engine. Also, you will need a seat cushion or similar to comfortably lay on the engine.
1). Screwdriver is critical for popping wires off coil pack, get the right length and bend according to pic at beginning of thread. Disconnect battery of course!
2). The SAI tube WILL come out. It is essential to keep trying as you have to bend the 2 coolant tubes on the left side down to wiggle the 2 headed snake of a SAI tube around, above and then out.
3). Just pull out the top row of leads from the coil pack once you can see them and PRINT OUT the wiring diagram provided above.
4). The bent screwdriver was fairly useless on putting back the wires and seating them on the coil packs properly. I used a 16 construction pry bar / nail puller flat end and wedged it down between the Firewall and the semi-seated wire on the proper terminal and then seated by twisting the bar on its axis between the two to seat all the way. Confirm that the boot of the plug is all the way seated (touching) the coil pack.
5). I had a tough time getting the SAI tube back in by the prescribed method of pushing it all the way to the right and then left under the coolant tubes, really tough. I was able to (not so simply) feed the left side of the SAI tubes under the coolant tubes on the left and then push down the right side between the right side valve cover and the firewall! Makes me wonder if I could have taken it out this way as well.
Lastly, what kind of sadist came up with this location for wires/coil pack I mean the firewall has some space bloody hell!