
Terrafirma Install Report


Thread Starter
|
Drifting
Joined: Sep 2011
Posts: 31
Likes: 1
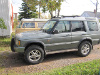
I just installed the Terrafirma Medium Duty 2" lift on a 1999 D2 this weekend and wanted to give my first impressions on the install and the ride. The rear was also converted from Air to Coils.
For the rear install and air to coil conversion I followed these excellent instructions:
TD5 Disco coil conversion - LR4x4 - The Land Rover Forum
Things to note on the rear. A M10 x 1.5 tap was definitely needed to clean the threads for the coil seats. Also, I needed to place a washer between the coil seat and mount as there was a gap there. I'd say the coil seats would be better designed if they sat flat both on the mount perch and axle. I added some nylon thread locks to the M10 bolts that hold the coil seat down. In addition I used coil compressors that were free for 48 hours from my local auto parts store. PB Blaster worked great and a long breaker bar.
For the front install I used the Lucky8 video on YouTube found here:
Lucky8 3in Terrafirma lift install - YouTube
The video is great and just some notes on my experience. It looks easy in the vid; and the process is quite straightforward. But for the amateur working in the driveway on jackstands, it's a little bit more of a challenge. The front shocks and housing did not just slide right out; they took a bit of playing and jiggling to get past everything. No spring compressors were used on the front; with the bottle jack they went right in. For the install of the new damper I bolted down the lower damper bolts first as this made it much easier to line those threads up and then finished with the single bolt on the upper.
The install took me a good 8 or 9 hours by myself. Things took time. Getting it high up on jack stands was a slow process as that's a heavy vehicle and I was cautious. Also, I had to make various runs for tools like the tap kit and washers. One of my front wheels was almost fused on super tight and it took a heavy hammer and a bit of time to get it off. My body is sore after that day! I'm 47, mechanically inclined, but normally don't work on vehicles.
On to the results .... Well the ride is better than it was. Seems those were the original dampers and coils and they were shot. I've been on a short test drive, and the system is smooth and almost feels soft. I was expecting it to be stiffer. I went off road up and down a small dirt hill and track and it was very smooth! I read that the OME is a bit stiffer and I don't know, but I may actually prefer that. I have a bull bar on the front and the vehicle looks level and about 2 inches higher. I don't have any before or after measurements. It seems the rear could be a little higher or the front just a tad lower. I will take some pics later. Still has the stock tires on 18" wheels.
Last edited by jayzoid; Oct 10, 2011 at 10:39 AM.

Three Wheeling
Joined: Oct 2011
Posts: 97
Likes: 0
Great to hear. I keep obsessively checking UPS since my TF is on it's way. I like your review though as you pointed out done of the concerns I have. I'm having new tires put on when tge kit gets here so I'm going to let them just do it all. If I had the 9 hours I would love to do it, but im lucky to get 2 before my wife finds something she needs done lol.

Super Moderator
Joined: Aug 2008
Posts: 1,174
Likes: 106
From: Middle of Caribbean
Im doing the medium duty kit too. I have winch bumper, greg davis rear bumper, rock sliders and winch. I dont want heavy because I drive alone and without anything other than my recovery gear and tools. If I was in the states and could travel more expeditionary style or camping with more gear, i would prob go heavy duty..

josh i have the HD setup. i removed my rear seat and mostly drive alone. it was a rough ride... until i cut the sway bars out. that helped 10000%. they restricted the lift on the springs and made the ride horrible.
Drifting
Joined: Aug 2011
Posts: 30
Likes: 0
I just got my TF 3" kit in this week. How much of a PITA is this to do with jackstands and a floor jack vrs shop lift?
I'm debating if I should get this done by my mechanic but it looks pretty easy in the video.
Where would be the best place to place the jackstands (I only have two) so that I can use the D2 Bottle jack to prop open the space
I'm debating if I should get this done by my mechanic but it looks pretty easy in the video.
Where would be the best place to place the jackstands (I only have two) so that I can use the D2 Bottle jack to prop open the space
Thread Starter
|
Drifting
Joined: Sep 2011
Posts: 31
Likes: 1
Well if you like working on things and have the time. Do it yourself. It's satisfying to work on your own. I used a 3 ton floor jack and 2 jack stands. The manual says the jack points are on the radius arms where there is a little notch. I used those points front and rear. I put the stands on the frame. It's not that bad. Just a little intense lifting all that weight. I went really slow dropping it on the stands as this is where you want to be careful and make sure the stands don't move too much and stay in the proper position. Spring compressors come in handy on the rear.
Drifting
Joined: Aug 2011
Posts: 30
Likes: 0
I'm going to save some extra $$$ and do it myself... I just have to time it so that my chores are done and I get the OK from the better 1/2 so that the whole thing doesn't end up costing me mucho's $$$ in a divorse.
I spent all my Brownie points (i.e. car wrenching hours) restoring my 79 vw van this spring... the damn thing went from a weekend project to a full blown rust killing expedition that lasted 3 months
Thanks for your advise on the jack points "jayzoid"
I spent all my Brownie points (i.e. car wrenching hours) restoring my 79 vw van this spring... the damn thing went from a weekend project to a full blown rust killing expedition that lasted 3 months
Thanks for your advise on the jack points "jayzoid"
TReK
Joined: Nov 2009
Posts: 2,433
Likes: 5
From: Woodway, WA
Lift install on a DII is definitely an easy DIY project. There are a few short write ups and tips from past installs on the forum so do some searches. Recruit a buddy if you can and you can shave an hour or 3 off the job. I had NEVER done anything like this and it took me about 6.5 hours alone. I remember using....
-2 Jack stands
-speed wrench set (aka ratcheting wrenches)
-factory bottle jack
-floor jack
-breaker bar & sockets
I didn't use spring compressors, so I had to get creative with jacking up the rear.
-2 Jack stands
-speed wrench set (aka ratcheting wrenches)
-factory bottle jack
-floor jack
-breaker bar & sockets
I didn't use spring compressors, so I had to get creative with jacking up the rear.
Drifting
Joined: Aug 2011
Posts: 30
Likes: 0
just finished installing my 3" TF lift & steering damper this morning. Took me approx. 5 hours alone and that is with no problems (i.e. stuck wheels, seized nuts)
I approached it one corner at a time and had the most trouble with the front passenger spring. As mentioned in the Lucky8 video, my propshaft was binding up against the crossmember so I really had to yank on the spring to get it out. Going in was a bit tricky and the plate on the bottom of the spring kept on moving around when I was trying to wedge the spring in. A little tip that hepled me get the spring in was to secure the plate with the screws for the shock... by doing this I could tap the spring in without movement in the plate.
Going to test out my ride now... looks freekishly tall with my 29" tire on it, can't wait to pop on my Grabbers

Thread
Thread Starter
Forum
Replies
Last Post
TRIARII
Discovery II
21
Oct 14, 2013 11:18 AM
wheelgarage
Discovery I
25
May 10, 2012 11:39 PM
FordCrusherGT
General Range Rover Discussion - Archived
1
Jan 27, 2007 08:09 PM