What did you do with your DII today?


Drifting
Joined: Sep 2012
Posts: 32
Likes: 2
From: Western Colorado
Thanks for the info!


Mudding
Joined: Nov 2011
Posts: 168
Likes: 0
From: Eugene, OR
So, there I was...sitting behind the nice lady at the self storage gate, waiting while she repeatedly entered her code...While I'm looking at something inside,
I notice out of the corner of my eye,...she's backing up...CRUNCH...I've got a D2, so, I'm NOT replacing the stock bumper. I currently fab'ing a rear bumper outta some 5" 6061 T6 channel, I got 25ft of it...enough to do the front, too...how timely...
The radiator has leaked slowly for awhile...it ain't so slow anymore...RL Parts has a new one for $349, they say it's OEM...anyone ever get a radiator from them? Or have a link for a quality/OEM radiator?...At a decent price>?... I'd appreciate any links, leads &/or 411.
Thanks


Recovery Vehicle
Joined: Sep 2009
Posts: 1,135
Likes: 14
From: Roanoke Valley, VA
Replaced the bearings in both idler pulleys. After new water pump and belt tensioner last year, I had bought the 6203 2RS bearing (smaller pulley) & 6403 2RS bearing (larger pulley) to replace in these pulleys from http://www.bearingsdirect.com, and finally got back around to doing that. I had bought US made SKF bearings that others had recommended, but I found out that I inverted a few digits on the smaller bearing and got the 6302 in error when I ordered them last year when I meant to get the 6203. So, I found out it was not going to fit the hole, just a little too big and ended up at Adv Auto to see what they had. They stock National Bearings and use only the 203 part of the standard part # 6203 that most other manuf. seem to use.. They also do not use the 2RS to tell you 2 sided Rubber Sealed. They use an FF designation and are actually Federal Mogul parts, but are made in China. I was in a pinch, so had to go with it for $10. Snap ring pliers needed to remove snap-ring on the back of the bearing in the larger pulley, no snap-ring on the smaller one. Used a couple large sockets in the bench vise to press the old bearings out and new in, and used the sockets with the hammer when I could no longer use the vise on the bearings for removal as extended beyond the pulley edges and hit the vise jaws.
I had to do a little re-education on removing the fan, but not bad at all. FYI, 17mm bolt head on the belt tensioner pulley (#1) to pull it clockwise towards the driver's side to relieve the tension, and 15mm on the bolt heads for the two idler pulleys (#9 & #5) that need to go counter clockwise to loosen.

32mm nut on the fan nut counter clockwise to loosen (#7), and I used the Northern Tool fan clutch tool for $16 that is for Ford/Chevy, and has no wrench sizes on the packaging. But the longer handled one is 32mm and the other shorter one with just the wrench head to be used with a breaking bar is 36mm. Part# 9094133
Performance Tool Fan Clutch Wrench Set — Ford Models, Model# W80585 | Specialty Tools| Northern Tool + Equipment
I also used a piece of pipe that I carry as a wrench handle extender/persuader and tapped it a little flat and then tapped a 10mm open-end/box-end flat wrench into the pipe handle extender to hold one of the bolt heads on the fan clutch pulley, so I could use the 32mm fan clutch wrench and a tap from a 5 lb. baby sledge hammer on the fan clutch wrench counter clockwise to get it loose. It took a little work to get both wrenches on the respective bolt/nut heads just right, so I could work with them and get the wrenches in behind the fan blades. Once the nut broke loose and a couple turns on the fan nut, I did not have to hold the 10mm on the pulley bolt head any longer. Picture of wrenches below.
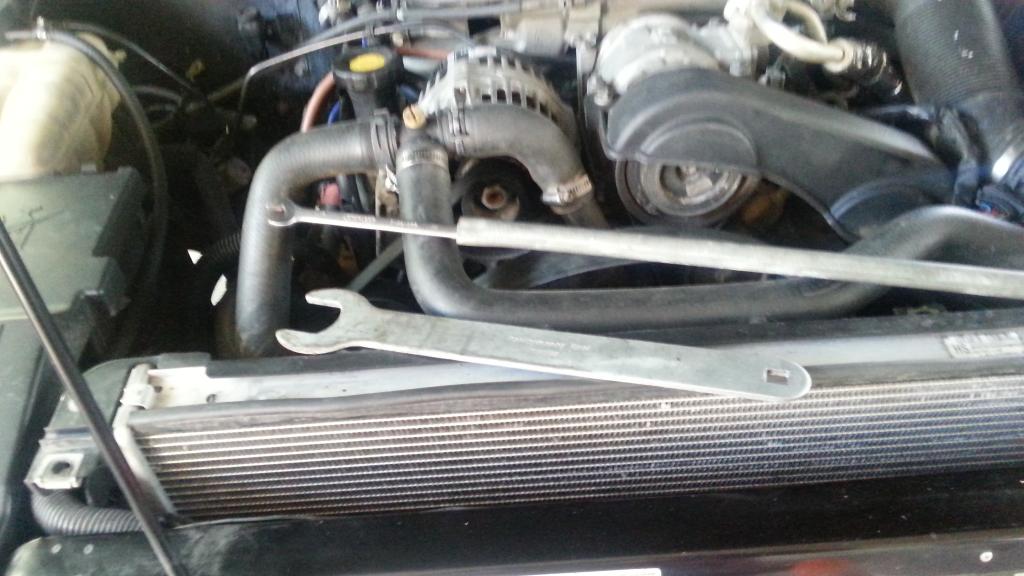
I had used a long breaking bar before to move the belt tensioner to relieve pressure, but I had a serp. belt tool I had purchased at some point and it worked well. It is basically a flat long bar with 3/8 socket head on the end and comes with some sockets and some crows feet open-end wrenches that you can use on the 3/8" head as well. Makes it a little easier to get in the tight spots in behind the fan belt and gives you the long handle you need to get leverage to move the belt tensioner in this case. You can get this tool at Northern Tool, Advance Auto, and I am sure other auto parts stores. Only $16 at Northern Tool however. Part# 9094032
Performance Tool Serpentine Belt Tool, Model# W84010 | Specialty Tools| Northern Tool + Equipment
Last edited by Rover_Hokie; May 18, 2014 at 11:52 PM.

Boot blacked my fender flares and door handles. I had ordered it years ago and figured I would use it. Worked pretty well. I had a couple runs from putting it on too thick, but aside from that it looks good. We'll see how long it lasts.
The tube to my air intake between the fender and the airbox disintegrated when I removed it, so I wrapped it in Duct tape. Not the prettiest, but it will do.
Next weekend is fluids, service the driveshafts, and deep clean the leather seats.
The tube to my air intake between the fender and the airbox disintegrated when I removed it, so I wrapped it in Duct tape. Not the prettiest, but it will do.
Next weekend is fluids, service the driveshafts, and deep clean the leather seats.

Winching
Joined: Jan 2014
Posts: 741
Likes: 55
From: South Flatistan
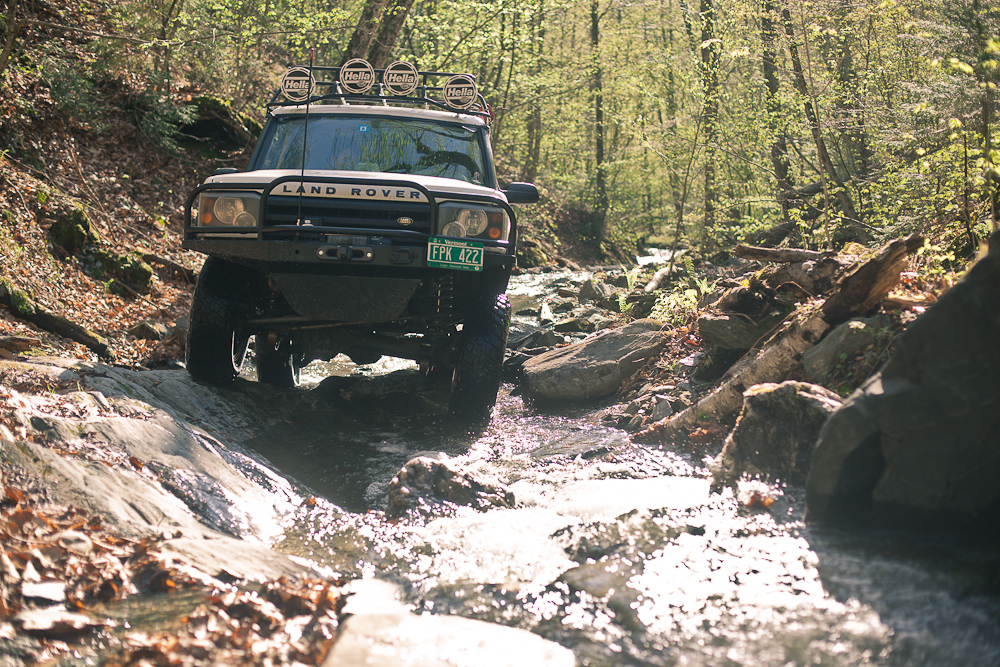
as usual Zack- great photography. but I have to say, calling that trickle a river is a bit 'generous' of you.
in other news...
discovered a coolant leak from "the engine compartment area/vicinity" this am. grudgingly looking forward to chasing it down.
in other news...
discovered a coolant leak from "the engine compartment area/vicinity" this am. grudgingly looking forward to chasing it down.