

LR3 coilspring conversion and 2" LIFT with Todco Suspension


Thread Starter
|
4wd Low
Joined: Nov 2007
Posts: 10
Likes: 0
From:
hi guys , its been a while since i been on the site but i wanted to post my recent (today) conversion .
I know some frown upon the coil conversion , but in my case i think its was my best option .
i rarely offroad anymore so the very little loss of articulation (if at all ?) is a non issue to me . i do however travel long distances and the possibility of having my 06 with 136,000 miles drop on the bumbstops leaving me stranded on larger tire is something im not interested in dealing with , nor the headache of ever chasing my deteriorating air suspension .
last month i woke up to a rear bag dumped on the frame . after driving it for a week i blew the pump (again) i did rebuild the pump to get me around (another story ) which was the second rebuild i did on this pump . then i was throwing codes and the truck was fully lowering while driving so i decided to throw in the towel .
First i called British Atlantic about the coilover kit .
LR3 Coil Spring Conversion Kit | Land Rover Discovery 3 Suspension Kits
i was told there was no lift option and they could not obviously comment on the use of aftermarket spacer .
Next I called Todco Suspension and asked about his spacer kit
LR3 - Discovery III Suspension lift kits
Todd was AWESOME , he talked to me about everything i had questions about . his spacers , aftermarket springs, prices , opinions
he gave me a quote on what he could get me but then asked if he could make some calls and call me back . I got a call back about 30 minutes later and he said that i could get the coilover kit WITH 2" lift old man emu springs !!!! im not sure why the britishatlantic salesman told me i had no options when this kit in fact did come from britishatlantic .
anyway . after bothering Tod for a day he reassured me that i would get a full coilover kit with EAS flash and OME 2" lift springs . and i wouldnt even need his offered spacers .
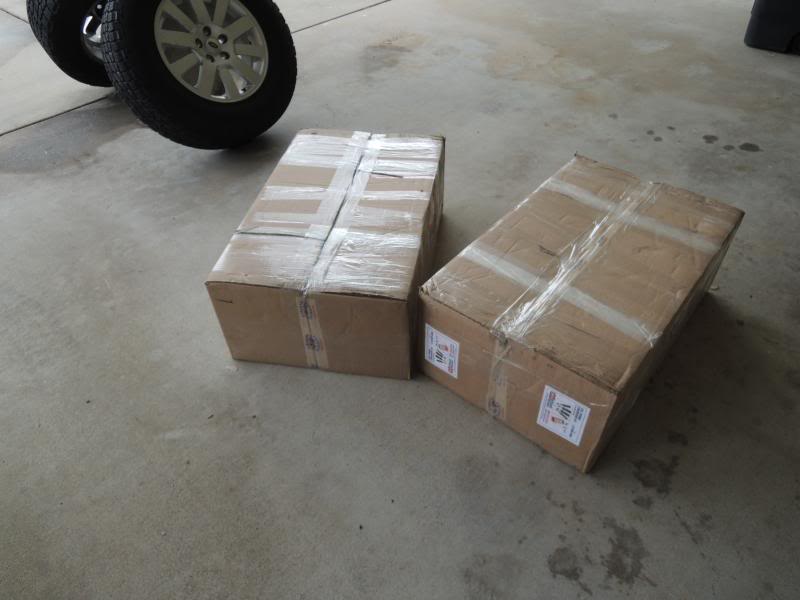
So here we go ! a few days later i get 2 big boxes delivered and i went to work
im not doing a full install tech article as it has been done in full detail elsewhere. not to mention its a strait forward removal and install with the directions provided .
but i did want to show some pics of what i got , a tip or 2 for install and the final product .\
length on the rear spring from center of lower eye to end of spring was 21" on the rear

and 24" rear
sorry im not to precise on my measurement but these springs are supposedly a 2" lift
as for the install i went very quick about 5 hours total for me and my crap tool selection .
removal is trickier with the bleed down of the airbags and removal of the rear brake calipers for clearance .
one obvious note that when installing the new springs, the lower arms needed to be held down for clearance of the (longer ?? ) new springs .
you can see how it sits without any help
and heres my hillbilly ratchet strap solution .
by the way , the jackstand that strap is connected to is not the main load bearing jackstand , which probably wouldnt have matter since i only needed a few pounds of pull to get it down
heres a rear installed
a few tools that were lifesavers were , a 15mm ratchet wrench for the upper mount bolts . a plastic hammer for knocking a few things around and bumping things in and out of place .
also the ratchet strap do-hicky worked well for me . ymmv
actual tools needed were, 21mm wrench and 24mm socket for bottom mount bolts
15mm wrench for upper (ratchet wrench was almost needed , id hate to try without it )
also needed a smaller 15mm socket for the 1 upper mount bolt on each of the front sides
12mm to loosen the air fittings for bleeding the system (i dont have a diag computer)
for the EAS reflash , the directions were clear and easy , after locating the ecu your only cutting and stripping 4 wires under the steering wheel for a in-line filter ( no red warning light ) and plug and play for simple reflash (red light warning all the time )
heres the results ..... with no warning lights !
im stoked about the whole deal ! i saved around $400 than planned by calling Todco , instead of buying everything separate or going the spacer route.
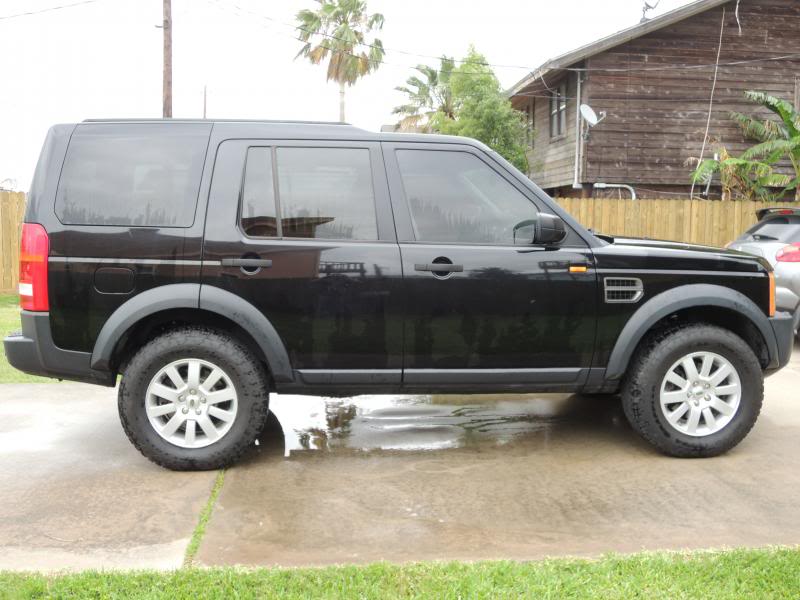
It rides great !!! perhaps a little less refined and a slight more roll when fast cornering BUT a lot less clunky when crusing down a bumpy dirt road or trail .
im very happy , and its a nice feeling knowing i wont ever find my truck slammed on the frame waiting for a tow .
so long story short there is a coilspring conversion and 2" lift kit avail. for your LR3
i cant tell you a link to the kit with the ome springs nor did i actually get a part number from
atlantic british but if your interested Todco will get you fixed up .
Land Rover Suspension Lift Kits
perhaps one day when the truck isnt driven as often i might get a 1" spacer from him and go back to my duratracs for the hell of it but im certain that my 285 65 would still fit , for now i ride these 275 terra graplers .....
hope you like , i know i do
I know some frown upon the coil conversion , but in my case i think its was my best option .
i rarely offroad anymore so the very little loss of articulation (if at all ?) is a non issue to me . i do however travel long distances and the possibility of having my 06 with 136,000 miles drop on the bumbstops leaving me stranded on larger tire is something im not interested in dealing with , nor the headache of ever chasing my deteriorating air suspension .
last month i woke up to a rear bag dumped on the frame . after driving it for a week i blew the pump (again) i did rebuild the pump to get me around (another story ) which was the second rebuild i did on this pump . then i was throwing codes and the truck was fully lowering while driving so i decided to throw in the towel .
First i called British Atlantic about the coilover kit .
LR3 Coil Spring Conversion Kit | Land Rover Discovery 3 Suspension Kits
i was told there was no lift option and they could not obviously comment on the use of aftermarket spacer .
Next I called Todco Suspension and asked about his spacer kit
LR3 - Discovery III Suspension lift kits
Todd was AWESOME , he talked to me about everything i had questions about . his spacers , aftermarket springs, prices , opinions
he gave me a quote on what he could get me but then asked if he could make some calls and call me back . I got a call back about 30 minutes later and he said that i could get the coilover kit WITH 2" lift old man emu springs !!!! im not sure why the britishatlantic salesman told me i had no options when this kit in fact did come from britishatlantic .
anyway . after bothering Tod for a day he reassured me that i would get a full coilover kit with EAS flash and OME 2" lift springs . and i wouldnt even need his offered spacers .
So here we go ! a few days later i get 2 big boxes delivered and i went to work

im not doing a full install tech article as it has been done in full detail elsewhere. not to mention its a strait forward removal and install with the directions provided .
but i did want to show some pics of what i got , a tip or 2 for install and the final product .\


length on the rear spring from center of lower eye to end of spring was 21" on the rear

and 24" rear


sorry im not to precise on my measurement but these springs are supposedly a 2" lift

as for the install i went very quick about 5 hours total for me and my crap tool selection .
removal is trickier with the bleed down of the airbags and removal of the rear brake calipers for clearance .
one obvious note that when installing the new springs, the lower arms needed to be held down for clearance of the (longer ?? ) new springs .
you can see how it sits without any help

and heres my hillbilly ratchet strap solution .

by the way , the jackstand that strap is connected to is not the main load bearing jackstand , which probably wouldnt have matter since i only needed a few pounds of pull to get it down
heres a rear installed

a few tools that were lifesavers were , a 15mm ratchet wrench for the upper mount bolts . a plastic hammer for knocking a few things around and bumping things in and out of place .
also the ratchet strap do-hicky worked well for me . ymmv
actual tools needed were, 21mm wrench and 24mm socket for bottom mount bolts
15mm wrench for upper (ratchet wrench was almost needed , id hate to try without it )
also needed a smaller 15mm socket for the 1 upper mount bolt on each of the front sides
12mm to loosen the air fittings for bleeding the system (i dont have a diag computer)
for the EAS reflash , the directions were clear and easy , after locating the ecu your only cutting and stripping 4 wires under the steering wheel for a in-line filter ( no red warning light ) and plug and play for simple reflash (red light warning all the time )
heres the results ..... with no warning lights !
im stoked about the whole deal ! i saved around $400 than planned by calling Todco , instead of buying everything separate or going the spacer route.
It rides great !!! perhaps a little less refined and a slight more roll when fast cornering BUT a lot less clunky when crusing down a bumpy dirt road or trail .
im very happy , and its a nice feeling knowing i wont ever find my truck slammed on the frame waiting for a tow .


so long story short there is a coilspring conversion and 2" lift kit avail. for your LR3
i cant tell you a link to the kit with the ome springs nor did i actually get a part number from
atlantic british but if your interested Todco will get you fixed up .
Land Rover Suspension Lift Kits
perhaps one day when the truck isnt driven as often i might get a 1" spacer from him and go back to my duratracs for the hell of it but im certain that my 285 65 would still fit , for now i ride these 275 terra graplers .....
hope you like , i know i do

6th Gear
Joined: Jan 2021
Posts: 6
Likes: 0
From: Expat in kuwait
hi guys , its been a while since i been on the site but i wanted to post my recent (today) conversion .
I know some frown upon the coil conversion , but in my case i think its was my best option .
i rarely offroad anymore so the very little loss of articulation (if at all ?) is a non issue to me . i do however travel long distances and the possibility of having my 06 with 136,000 miles drop on the bumbstops leaving me stranded on larger tire is something im not interested in dealing with , nor the headache of ever chasing my deteriorating air suspension .
last month i woke up to a rear bag dumped on the frame . after driving it for a week i blew the pump (again) i did rebuild the pump to get me around (another story ) which was the second rebuild i did on this pump . then i was throwing codes and the truck was fully lowering while driving so i decided to throw in the towel .
First i called British Atlantic about the coilover kit .
LR3 Coil Spring Conversion Kit | Land Rover Discovery 3 Suspension Kits
i was told there was no lift option and they could not obviously comment on the use of aftermarket spacer .
Next I called Todco Suspension and asked about his spacer kit
LR3 - Discovery III Suspension lift kits
Todd was AWESOME , he talked to me about everything i had questions about . his spacers , aftermarket springs, prices , opinions
he gave me a quote on what he could get me but then asked if he could make some calls and call me back . I got a call back about 30 minutes later and he said that i could get the coilover kit WITH 2" lift old man emu springs !!!! im not sure why the britishatlantic salesman told me i had no options when this kit in fact did come from britishatlantic .
anyway . after bothering Tod for a day he reassured me that i would get a full coilover kit with EAS flash and OME 2" lift springs . and i wouldnt even need his offered spacers .
So here we go ! a few days later i get 2 big boxes delivered and i went to work
Attachment 40787
im not doing a full install tech article as it has been done in full detail elsewhere. not to mention its a strait forward removal and install with the directions provided .
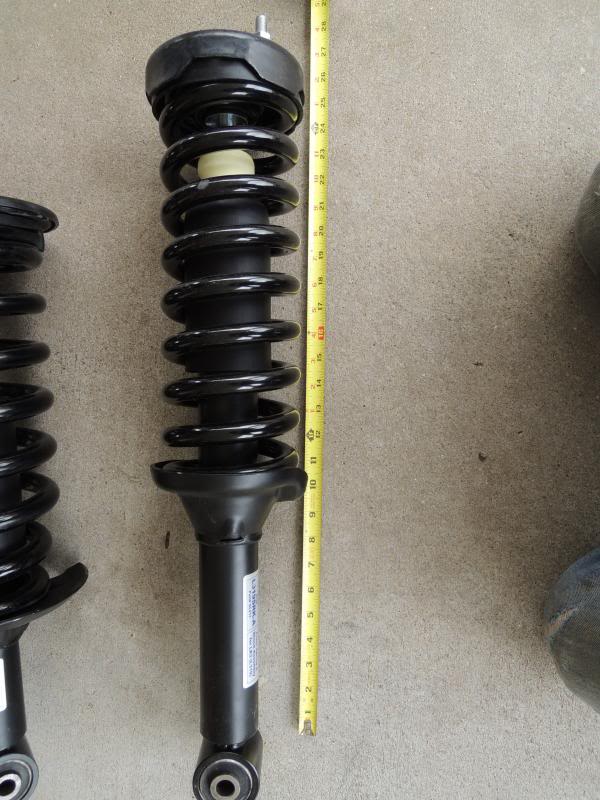
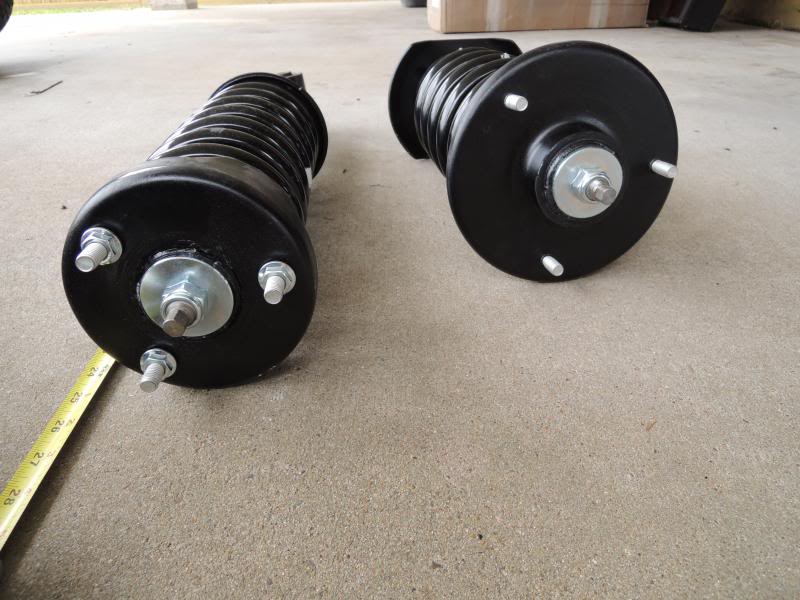
but i did want to show some pics of what i got , a tip or 2 for install and the final product .\
Attachment 40788
Attachment 40789
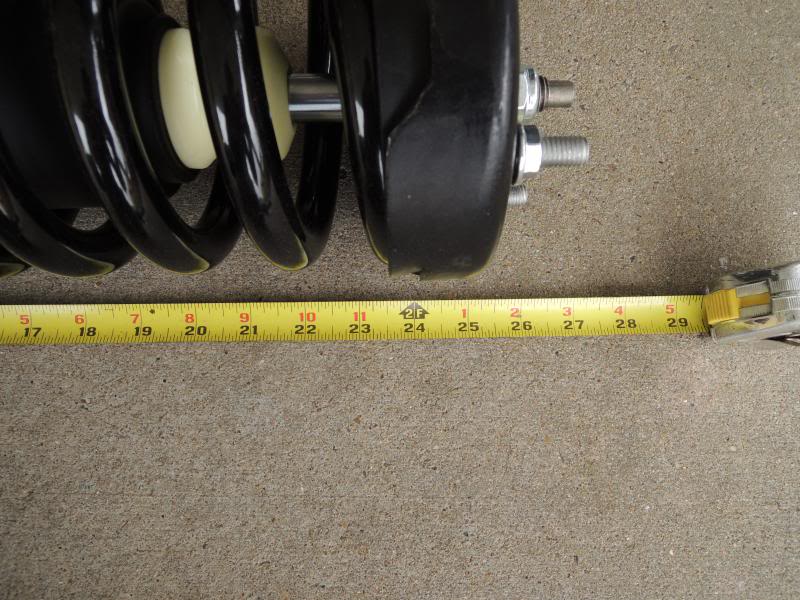
length on the rear spring from center of lower eye to end of spring was 21" on the rear
Attachment 40790
and 24" rear
Attachment 40791
Attachment 40792
sorry im not to precise on my measurement but these springs are supposedly a 2" lift
Attachment 40793
as for the install i went very quick about 5 hours total for me and my crap tool selection .
removal is trickier with the bleed down of the airbags and removal of the rear brake calipers for clearance .
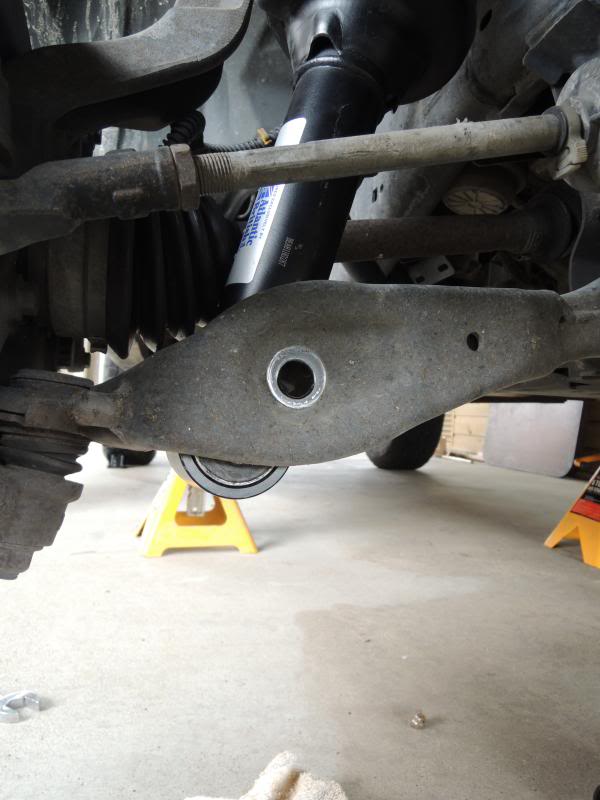
one obvious note that when installing the new springs, the lower arms needed to be held down for clearance of the (longer ?? ) new springs .
you can see how it sits without any help
Attachment 40794
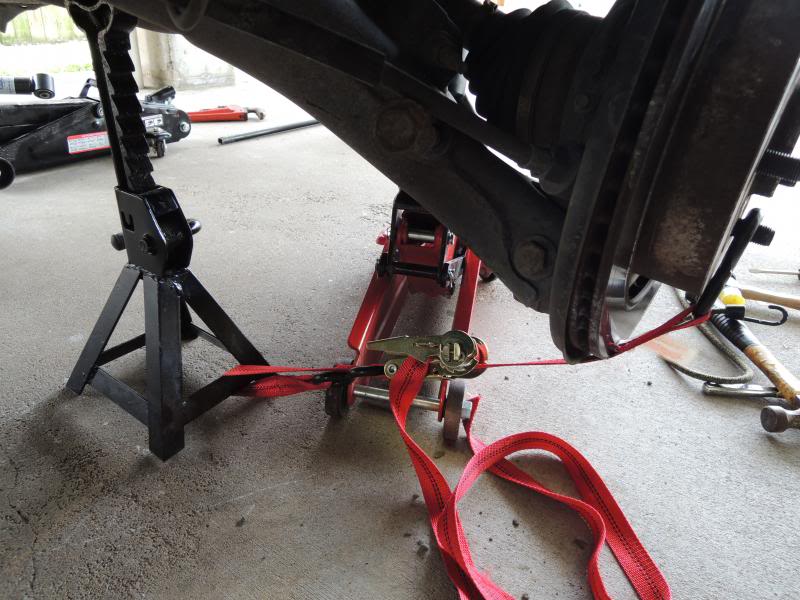
and heres my hillbilly ratchet strap solution .
Attachment 40795
by the way , the jackstand that strap is connected to is not the main load bearing jackstand , which probably wouldnt have matter since i only needed a few pounds of pull to get it down
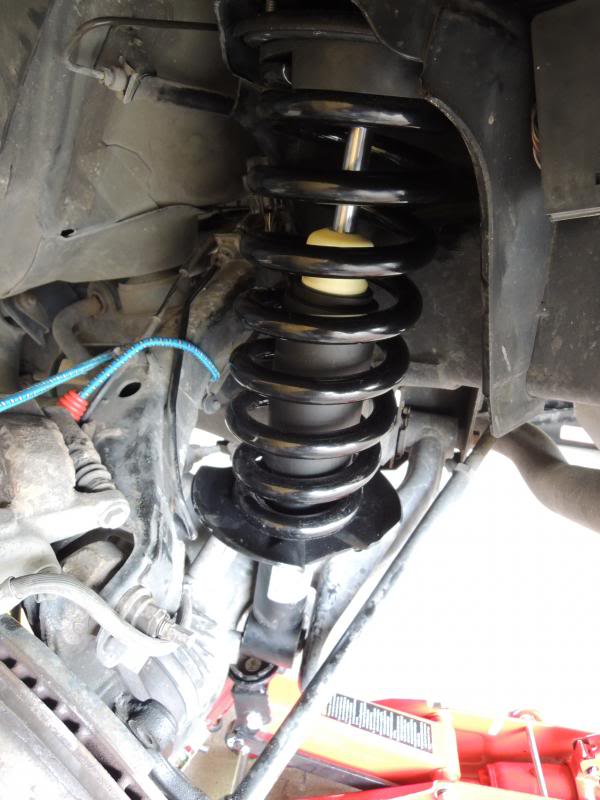
heres a rear installed
Attachment 40796
a few tools that were lifesavers were , a 15mm ratchet wrench for the upper mount bolts . a plastic hammer for knocking a few things around and bumping things in and out of place .
also the ratchet strap do-hicky worked well for me . ymmv
actual tools needed were, 21mm wrench and 24mm socket for bottom mount bolts
15mm wrench for upper (ratchet wrench was almost needed , id hate to try without it )
also needed a smaller 15mm socket for the 1 upper mount bolt on each of the front sides
12mm to loosen the air fittings for bleeding the system (i dont have a diag computer)
for the EAS reflash , the directions were clear and easy , after locating the ecu your only cutting and stripping 4 wires under the steering wheel for a in-line filter ( no red warning light ) and plug and play for simple reflash (red light warning all the time )
heres the results ..... with no warning lights !
im stoked about the whole deal ! i saved around $400 than planned by calling Todco , instead of buying everything separate or going the spacer route.
It rides great !!! perhaps a little less refined and a slight more roll when fast cornering BUT a lot less clunky when crusing down a bumpy dirt road or trail .
im very happy , and its a nice feeling knowing i wont ever find my truck slammed on the frame waiting for a tow .
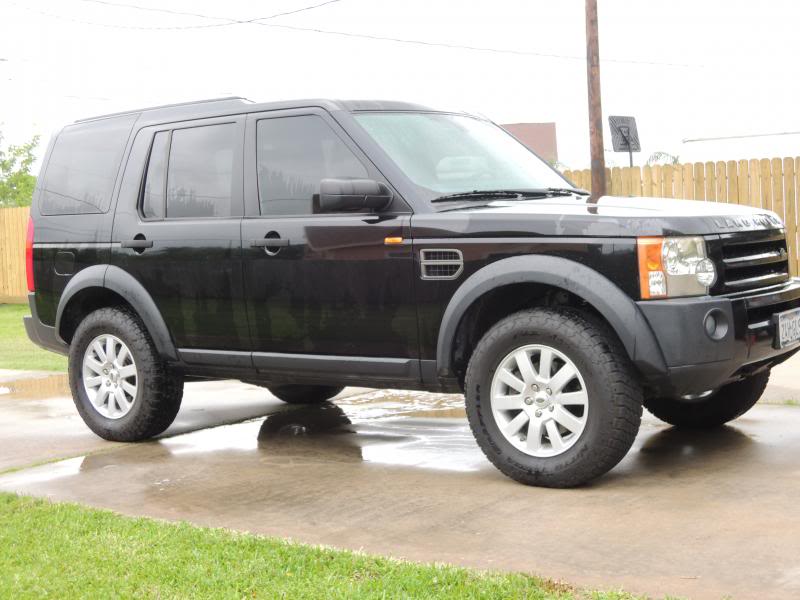
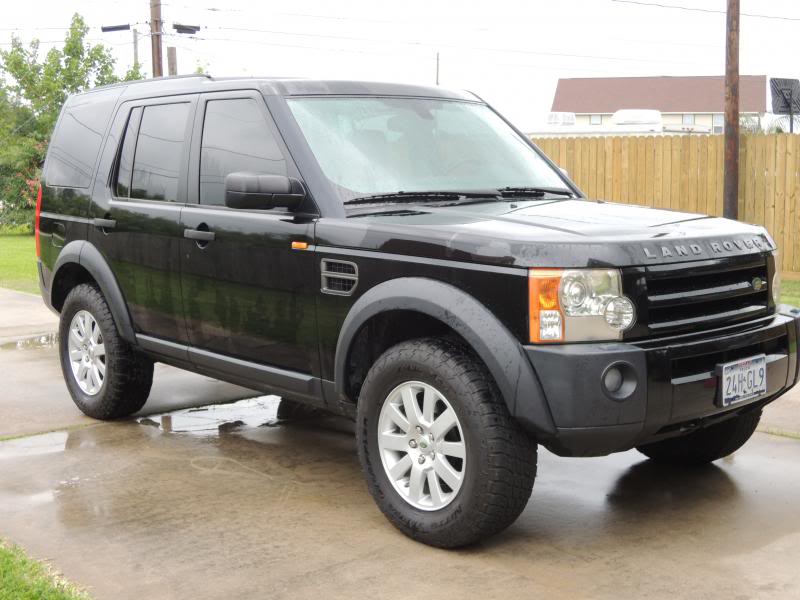
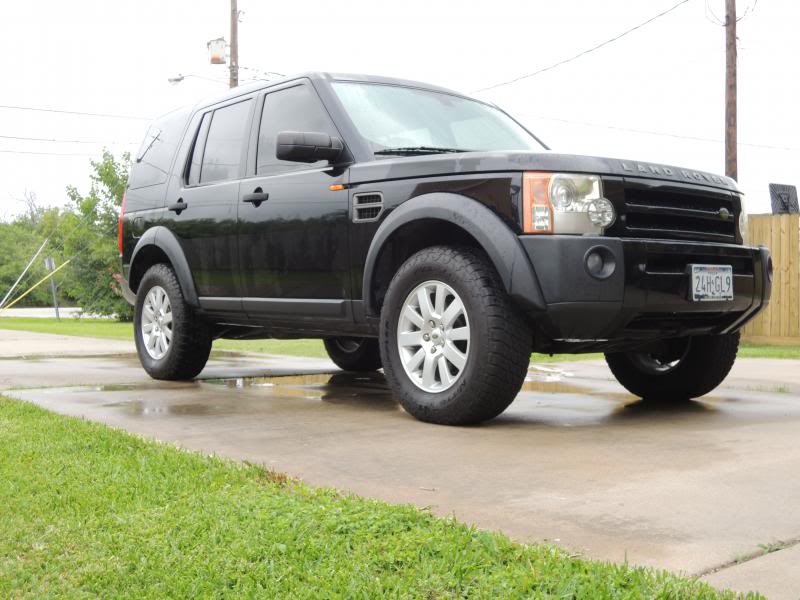
Attachment 40797
Attachment 40798
Attachment 40799
Attachment 40800
so long story short there is a coilspring conversion and 2" lift kit avail. for your LR3
i cant tell you a link to the kit with the ome springs nor did i actually get a part number from
atlantic british but if your interested Todco will get you fixed up .
Land Rover Suspension Lift Kits
perhaps one day when the truck isnt driven as often i might get a 1" spacer from him and go back to my duratracs for the hell of it but im certain that my 285 65 would still fit , for now i ride these 275 terra graplers .....
hope you like , i know i do
I know some frown upon the coil conversion , but in my case i think its was my best option .
i rarely offroad anymore so the very little loss of articulation (if at all ?) is a non issue to me . i do however travel long distances and the possibility of having my 06 with 136,000 miles drop on the bumbstops leaving me stranded on larger tire is something im not interested in dealing with , nor the headache of ever chasing my deteriorating air suspension .
last month i woke up to a rear bag dumped on the frame . after driving it for a week i blew the pump (again) i did rebuild the pump to get me around (another story ) which was the second rebuild i did on this pump . then i was throwing codes and the truck was fully lowering while driving so i decided to throw in the towel .
First i called British Atlantic about the coilover kit .
LR3 Coil Spring Conversion Kit | Land Rover Discovery 3 Suspension Kits
i was told there was no lift option and they could not obviously comment on the use of aftermarket spacer .
Next I called Todco Suspension and asked about his spacer kit
LR3 - Discovery III Suspension lift kits
Todd was AWESOME , he talked to me about everything i had questions about . his spacers , aftermarket springs, prices , opinions
he gave me a quote on what he could get me but then asked if he could make some calls and call me back . I got a call back about 30 minutes later and he said that i could get the coilover kit WITH 2" lift old man emu springs !!!! im not sure why the britishatlantic salesman told me i had no options when this kit in fact did come from britishatlantic .
anyway . after bothering Tod for a day he reassured me that i would get a full coilover kit with EAS flash and OME 2" lift springs . and i wouldnt even need his offered spacers .
So here we go ! a few days later i get 2 big boxes delivered and i went to work
Attachment 40787
im not doing a full install tech article as it has been done in full detail elsewhere. not to mention its a strait forward removal and install with the directions provided .
but i did want to show some pics of what i got , a tip or 2 for install and the final product .\
Attachment 40788
Attachment 40789
length on the rear spring from center of lower eye to end of spring was 21" on the rear
Attachment 40790
and 24" rear
Attachment 40791
Attachment 40792
sorry im not to precise on my measurement but these springs are supposedly a 2" lift
Attachment 40793
as for the install i went very quick about 5 hours total for me and my crap tool selection .
removal is trickier with the bleed down of the airbags and removal of the rear brake calipers for clearance .
one obvious note that when installing the new springs, the lower arms needed to be held down for clearance of the (longer ?? ) new springs .
you can see how it sits without any help
Attachment 40794
and heres my hillbilly ratchet strap solution .
Attachment 40795
by the way , the jackstand that strap is connected to is not the main load bearing jackstand , which probably wouldnt have matter since i only needed a few pounds of pull to get it down
heres a rear installed
Attachment 40796
a few tools that were lifesavers were , a 15mm ratchet wrench for the upper mount bolts . a plastic hammer for knocking a few things around and bumping things in and out of place .
also the ratchet strap do-hicky worked well for me . ymmv
actual tools needed were, 21mm wrench and 24mm socket for bottom mount bolts
15mm wrench for upper (ratchet wrench was almost needed , id hate to try without it )
also needed a smaller 15mm socket for the 1 upper mount bolt on each of the front sides
12mm to loosen the air fittings for bleeding the system (i dont have a diag computer)
for the EAS reflash , the directions were clear and easy , after locating the ecu your only cutting and stripping 4 wires under the steering wheel for a in-line filter ( no red warning light ) and plug and play for simple reflash (red light warning all the time )
heres the results ..... with no warning lights !
im stoked about the whole deal ! i saved around $400 than planned by calling Todco , instead of buying everything separate or going the spacer route.
It rides great !!! perhaps a little less refined and a slight more roll when fast cornering BUT a lot less clunky when crusing down a bumpy dirt road or trail .
im very happy , and its a nice feeling knowing i wont ever find my truck slammed on the frame waiting for a tow .
Attachment 40797
Attachment 40798
Attachment 40799
Attachment 40800
so long story short there is a coilspring conversion and 2" lift kit avail. for your LR3
i cant tell you a link to the kit with the ome springs nor did i actually get a part number from
atlantic british but if your interested Todco will get you fixed up .
Land Rover Suspension Lift Kits
perhaps one day when the truck isnt driven as often i might get a 1" spacer from him and go back to my duratracs for the hell of it but im certain that my 285 65 would still fit , for now i ride these 275 terra graplers .....
hope you like , i know i do
Sir, does todd selling only the reflash box?im on coil right now. I checked the link you posted but i cant find ecu reflash box for sale.

Thread
Thread Starter
Forum
Replies
Last Post
XxRoverAllOverxX
Discovery II
6
Dec 14, 2010 05:07 PM