

Oil Change notes/pics (2006 LR3, 4.0L V6)


Thread Starter
|
Rock Crawling
Joined: Mar 2012
Posts: 269
Likes: 4
From: Northwest Indiana
Changed the oil today on the 3. Took some pics with the phone, so they're not the best but I hope help.
Oil: Castrol 5w30 conventional (factory recommended)
Filter: Motorcraft FL-820S (forum recommended, Rovin4Life I think it was)
Time: 1 hour (couldn't get the filter off)
Skill Level: Easy
Discussion
1. Oil - went with the factory recommended Castrol 5w30. There was a sale at Advanced Auto Parts today so I got a 5.1quart/4.8L jug for $19.99 plus 1 quart (980mL) for ~$4. Factory volume specs for a change/refill is 5.7L. There's plenty of debate over which oil to use, synthetic vs. conventional, etc. I figure the factory recommendations are just as good as anything and anything better is for peace of mind/more demanding use conditions/personal preference/etc. May go to a better/synthetic oil in the future but for now and for the price, Castrol it is.
2. Filter - There was also a sale on the PureOne Puralator filers (2 for $10), but they were out of my filter. They had Mobil and K&N available, but the 4.0L was/is a Ford engine. I think it was Rovin4Life who said just get the Motorcraft filter for the 4.0L since the engine is tried and true, being used in Ford Mustangs, F-150's and Explorers, and it is virtually bullet proof. But due to the difficulty of getting off the old filter (more on that later) I would seriously consider the K&N with it's 1-inch nut on the bottom.
3. Time - it took about an hour due to the fact that the old filter wouldn't budge. Also, there's hardly any room to get a oil filter wrench in there and I broke mine trying. I borrowed a pliers-type filter wrench from my neighbor which did the tick making 1/4-inch turns until loose. If I hadn't run into the tough old filter, it should only take 20-30 minutes for the change.
4. Skill Level - extremely easy. All you need is a jack, two jack stands, a ratchet, a 13mm socket for the skid plate/underside engine cover bolts and drain plug, oil filter wrench and catch pan.
Some pics:
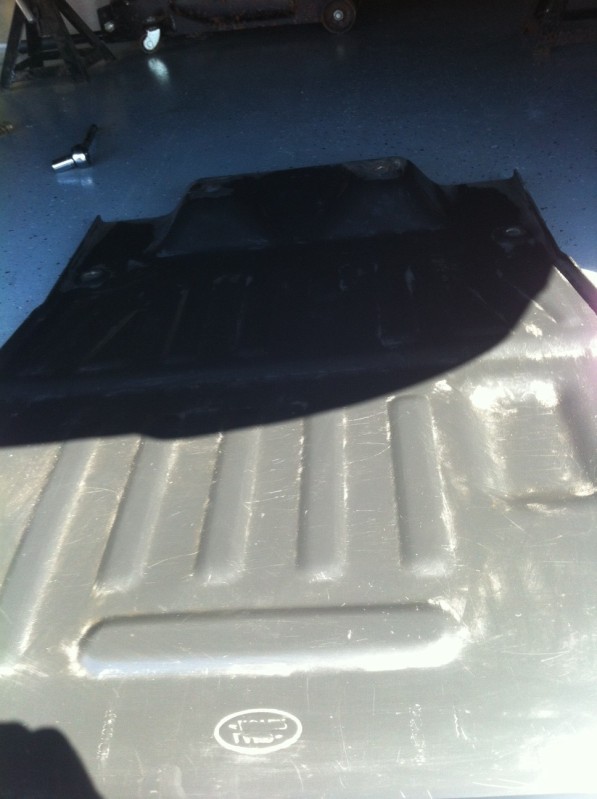
skid plate after removal; cleaned off the gunk
Old filter versus new. The Motorcraft was about a 1/4 inch shorter (though this pic angle exaggerates the difference)

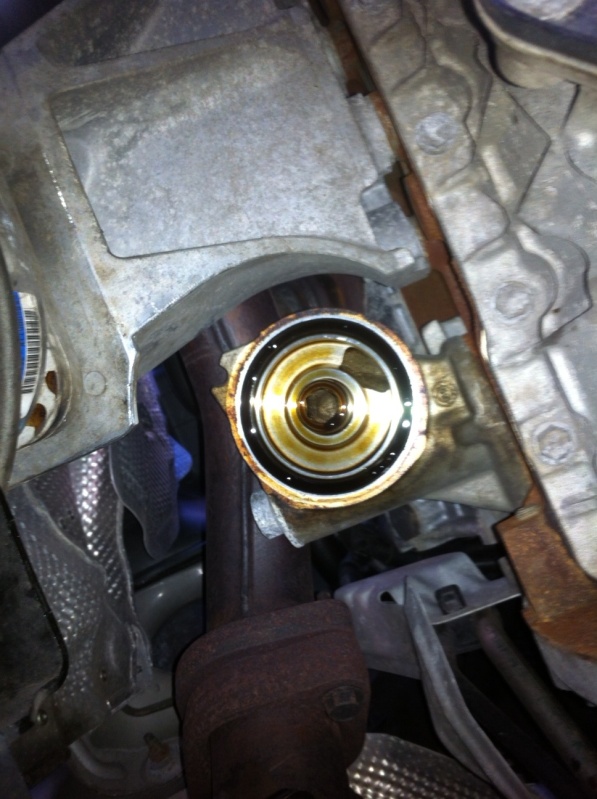
Make sure the old filter's seal/gasket comes off too; mine remained after removal
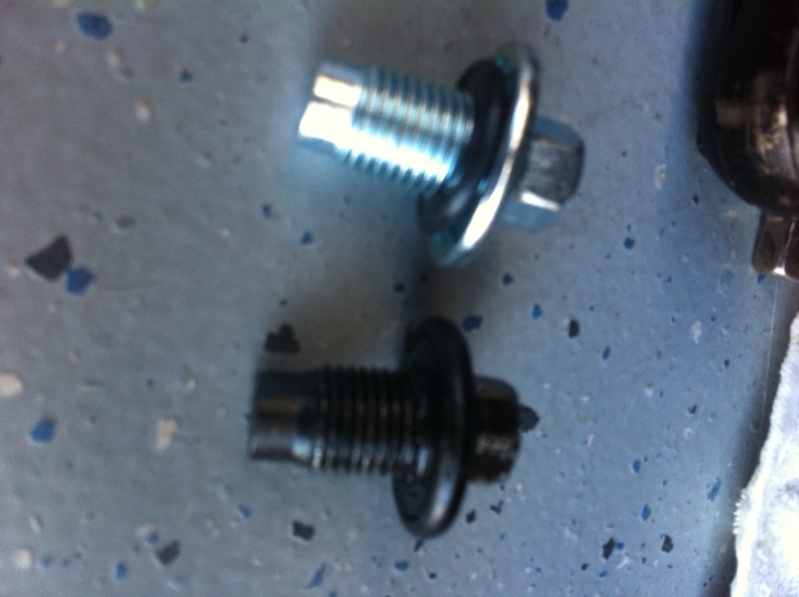
I bought a new drain plug entirely instead of just the seal. $4 at AAP
Steps:
1. Vehicle on flat, level surface
2. Position jack underneath engine skidplate recess, underneath the crossmember. Jack it up.
3. Put jack stands under the frame rails just aft of the front wheels, where the rails straighten out for their run alon the length of the body. Release hydraulic jack pressure.
4. Remove engine skid plate. 10, 13mm bolts. I started with just my ratchet, but some were pretty tight so to save time and effort I spun them off with my air-wrench.
5. Position catch pan and remove drain plug. Due to the angle of the drain, you'll get some oil spash so a big peice of cardboard helps with clean up. I was in the garage, over a sealed floor so I just wiped it up.
6. Remove the old oil filter. This can be a bitch if someone over-tightens it. There's not much room to get a standard filter wrench in, so you have to get creative. My wrench broke so I used the plier-style wrench which has some aggressive teeth cut into the plier face to give you grip. As you can see from the photo, I really had to clamp down hard. Be sure to check to make sure you got the old filer seal too (mine stayed on the engine).
7. Replace the drain plug with a new seal. I just opted for a new drain plug/seal altogether.
8. Fill the new filter with oil and rub some on the new seal. Put new filter in place (being careful not to over tighten.
9. Fill the engine with ~5.7L oil
10. Replace skid plate
11. Jack up front end and remove jack stands.
12. Lower vehicle and start it up.
13. Check oil level when it's up to temp.
That's it.
Some other notes: Saves a ton over a dealer oil change, plus lets you inspect the underside of the engine/vehicle. Don't over tighten the filter or leave the old seal/gasket on the engine! Clean off the skidplate once you have it off. When putting the skidplate back on, start at the front of the vehcile and work your way back with the bolts, finger tightening everything first, then securing.
Not much more than that; a really easy job.
Oil: Castrol 5w30 conventional (factory recommended)
Filter: Motorcraft FL-820S (forum recommended, Rovin4Life I think it was)
Time: 1 hour (couldn't get the filter off)
Skill Level: Easy
Discussion
1. Oil - went with the factory recommended Castrol 5w30. There was a sale at Advanced Auto Parts today so I got a 5.1quart/4.8L jug for $19.99 plus 1 quart (980mL) for ~$4. Factory volume specs for a change/refill is 5.7L. There's plenty of debate over which oil to use, synthetic vs. conventional, etc. I figure the factory recommendations are just as good as anything and anything better is for peace of mind/more demanding use conditions/personal preference/etc. May go to a better/synthetic oil in the future but for now and for the price, Castrol it is.
2. Filter - There was also a sale on the PureOne Puralator filers (2 for $10), but they were out of my filter. They had Mobil and K&N available, but the 4.0L was/is a Ford engine. I think it was Rovin4Life who said just get the Motorcraft filter for the 4.0L since the engine is tried and true, being used in Ford Mustangs, F-150's and Explorers, and it is virtually bullet proof. But due to the difficulty of getting off the old filter (more on that later) I would seriously consider the K&N with it's 1-inch nut on the bottom.
3. Time - it took about an hour due to the fact that the old filter wouldn't budge. Also, there's hardly any room to get a oil filter wrench in there and I broke mine trying. I borrowed a pliers-type filter wrench from my neighbor which did the tick making 1/4-inch turns until loose. If I hadn't run into the tough old filter, it should only take 20-30 minutes for the change.
4. Skill Level - extremely easy. All you need is a jack, two jack stands, a ratchet, a 13mm socket for the skid plate/underside engine cover bolts and drain plug, oil filter wrench and catch pan.
Some pics:
skid plate after removal; cleaned off the gunk
Old filter versus new. The Motorcraft was about a 1/4 inch shorter (though this pic angle exaggerates the difference)
Make sure the old filter's seal/gasket comes off too; mine remained after removal
I bought a new drain plug entirely instead of just the seal. $4 at AAP
Steps:
1. Vehicle on flat, level surface
2. Position jack underneath engine skidplate recess, underneath the crossmember. Jack it up.
3. Put jack stands under the frame rails just aft of the front wheels, where the rails straighten out for their run alon the length of the body. Release hydraulic jack pressure.
4. Remove engine skid plate. 10, 13mm bolts. I started with just my ratchet, but some were pretty tight so to save time and effort I spun them off with my air-wrench.
5. Position catch pan and remove drain plug. Due to the angle of the drain, you'll get some oil spash so a big peice of cardboard helps with clean up. I was in the garage, over a sealed floor so I just wiped it up.
6. Remove the old oil filter. This can be a bitch if someone over-tightens it. There's not much room to get a standard filter wrench in, so you have to get creative. My wrench broke so I used the plier-style wrench which has some aggressive teeth cut into the plier face to give you grip. As you can see from the photo, I really had to clamp down hard. Be sure to check to make sure you got the old filer seal too (mine stayed on the engine).
7. Replace the drain plug with a new seal. I just opted for a new drain plug/seal altogether.
8. Fill the new filter with oil and rub some on the new seal. Put new filter in place (being careful not to over tighten.
9. Fill the engine with ~5.7L oil
10. Replace skid plate
11. Jack up front end and remove jack stands.
12. Lower vehicle and start it up.
13. Check oil level when it's up to temp.
That's it.
Some other notes: Saves a ton over a dealer oil change, plus lets you inspect the underside of the engine/vehicle. Don't over tighten the filter or leave the old seal/gasket on the engine! Clean off the skidplate once you have it off. When putting the skidplate back on, start at the front of the vehcile and work your way back with the bolts, finger tightening everything first, then securing.
Not much more than that; a really easy job.
Last edited by ghengis86; Sep 30, 2012 at 10:41 AM.
Thread Starter
|
Rock Crawling
Joined: Mar 2012
Posts: 269
Likes: 4
From: Northwest Indiana
Air Filter Change
Filter: Purolator A35632
Time: 5 minutes
Skill Level: Mouth Breather
Discussion
1. Filter - Get the Purolator A35632. Available at Advanced Auto Parts and AutoZone. Made by Mann in Germany. Exact fit and excellent filter
2. Time - Can you turn a Phillips head screwdriver? Then this will take you 5 minutes or less.
3. Skill Level - So easy, a caveman could do it. Seriously, don't pay the dealer for something so simple.
Some pics:
Open your hood. Look to your left; this is the air box.
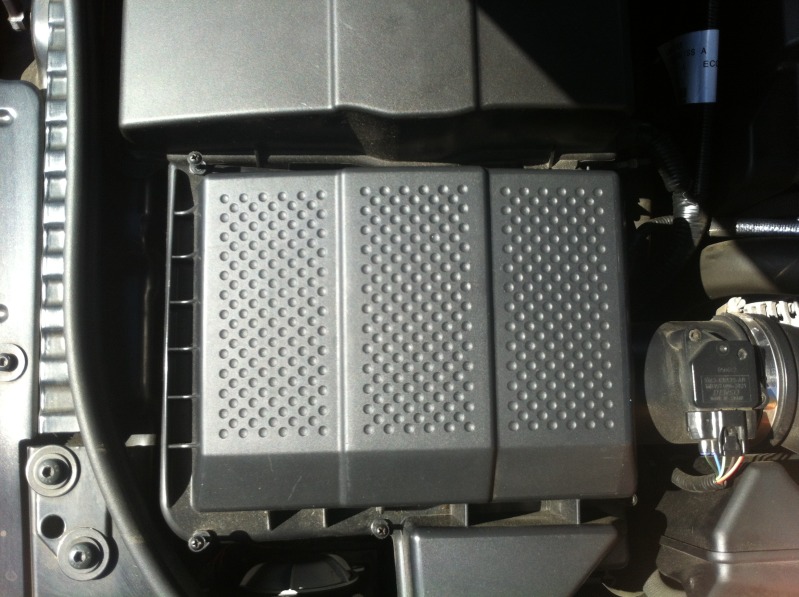
There are six screws. Loosen them all. Pull up the air box lid. It won't come off completely b/c of the intake tube, but enough slide the filter in and out.
Pull out the old filter; replace with new filter with same orientation. Note the "MANN FILTER" stamp on the Purolator.

Replace air box lid and fasten the air box lid screws.
That's it. You're done.
Filter: Purolator A35632
Time: 5 minutes
Skill Level: Mouth Breather
Discussion
1. Filter - Get the Purolator A35632. Available at Advanced Auto Parts and AutoZone. Made by Mann in Germany. Exact fit and excellent filter
2. Time - Can you turn a Phillips head screwdriver? Then this will take you 5 minutes or less.
3. Skill Level - So easy, a caveman could do it. Seriously, don't pay the dealer for something so simple.
Some pics:
Open your hood. Look to your left; this is the air box.
There are six screws. Loosen them all. Pull up the air box lid. It won't come off completely b/c of the intake tube, but enough slide the filter in and out.
Pull out the old filter; replace with new filter with same orientation. Note the "MANN FILTER" stamp on the Purolator.
Replace air box lid and fasten the air box lid screws.
That's it. You're done.
Last edited by ghengis86; Sep 30, 2012 at 09:54 AM.
Thread Starter
|
Rock Crawling
Joined: Mar 2012
Posts: 269
Likes: 4
From: Northwest Indiana
Cabin Air Filter Change
Filter: Mann CUK2747 (filter w/ activated charcoal)
Time: Five minutes
Skill Level: If you can direct your browser to landroverforums.com, you're in luck
Discussion
1. Filter - Go to Amazon or eBay and get the Mann filter w/ activated charcoal. bputah.com and roverparts.com are both good sources too.
2. Time - 5 minutes. If you can hold a roach, you can do this.
3. Skill level - see #2. You're in.
Some pics:
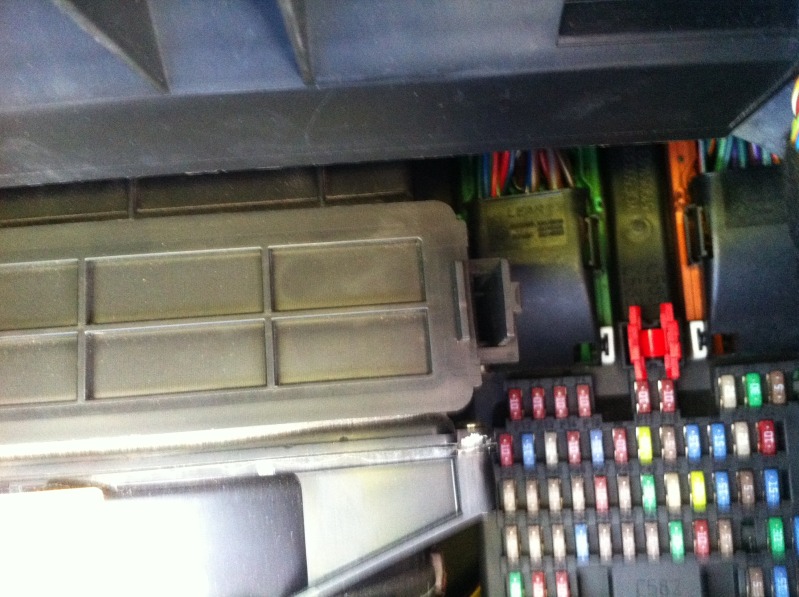
Open your glove box. There are retention tabs on either side that look like this:
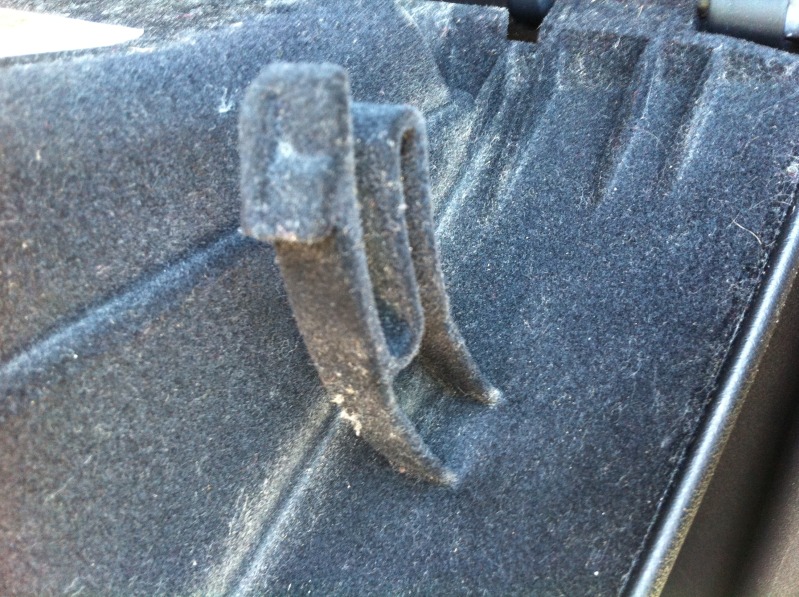
Squeeze them together and let the glove box fall even farther. It should look like this:
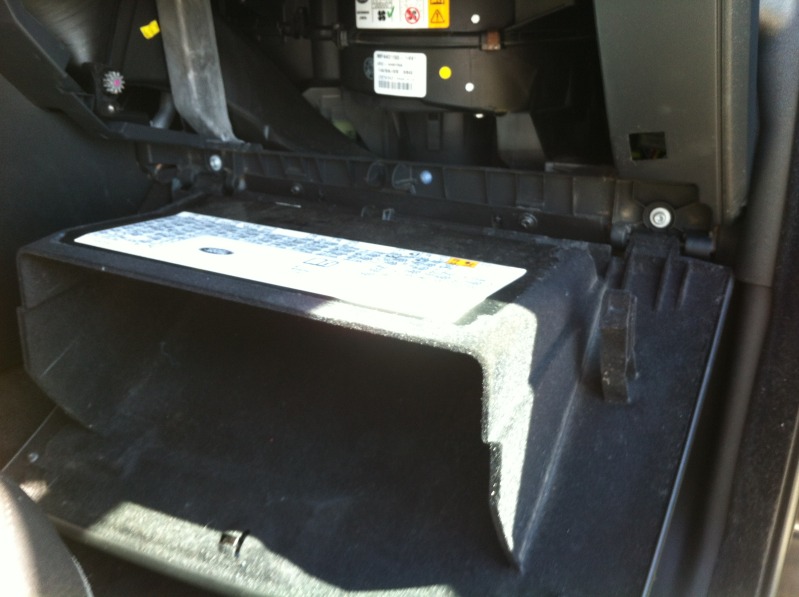
Locate cabin air filter cover behind the glove box.
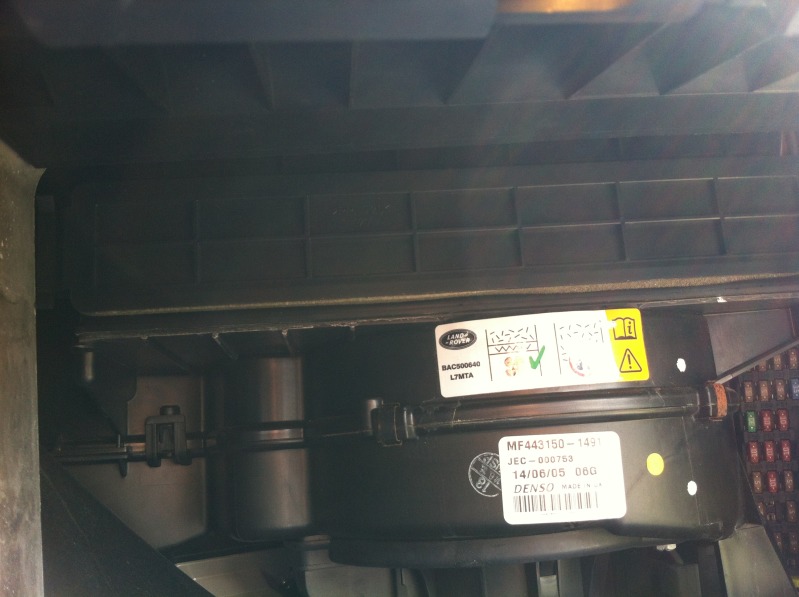
Pull on the tab on the right hand side (shown below) and remove the cover
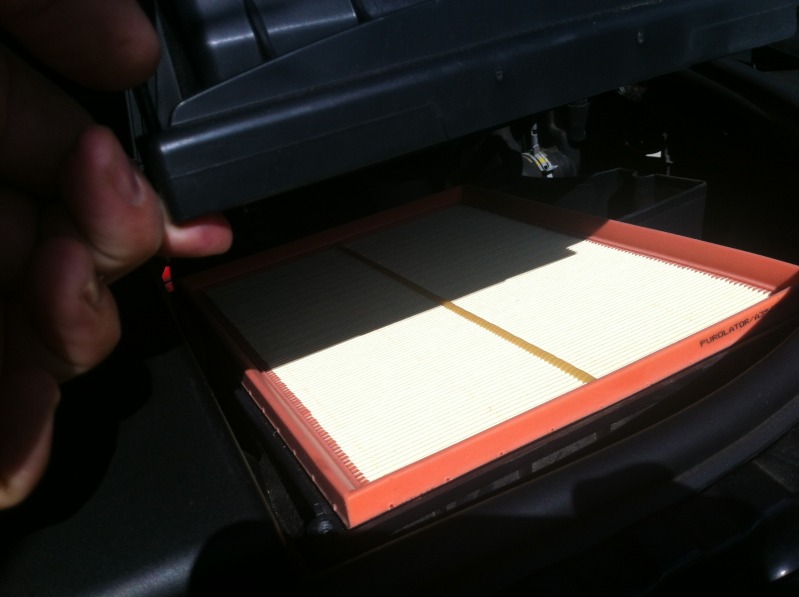
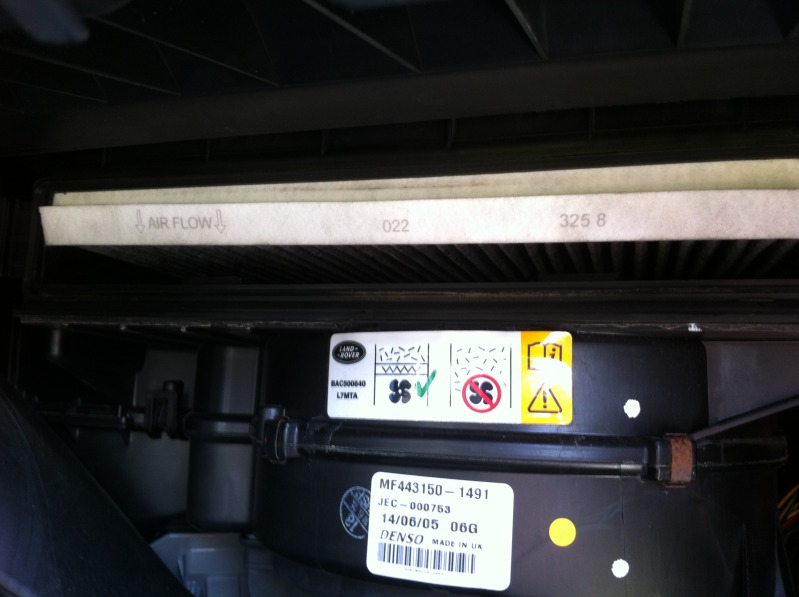
You should see this, the old filter. Note how it is located in the top of the opening and the 'air flow' indicators. This is important upon installlation.
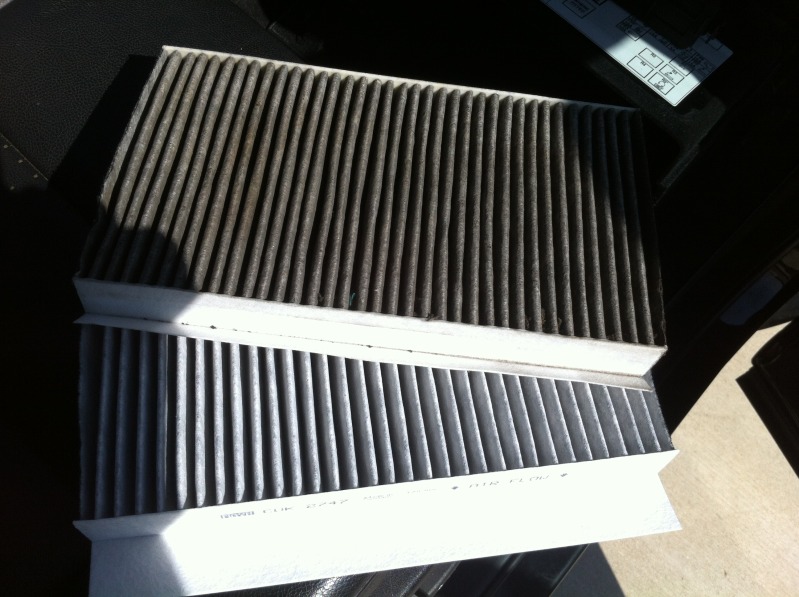
Pull out the old filter and replace with the new
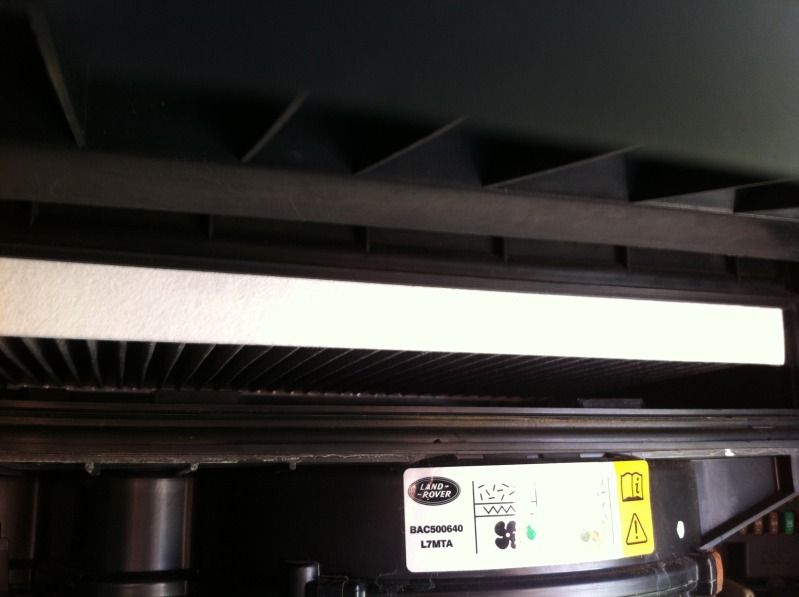
Be sure you snap the new filter up (vertically) in the recess. The cabin air filter cover has inclined plane tabs
that help slide the filter up upon instalation. There's sort of a 'snap' when it fits right
Again, save yourself the money and do this yourself. It's the same thing the Land Rover Dealership will do during scheduled maintenance. roverparts also has a video posted to their site. And MANN includes instructions with their filter, specific to LR3 and RR.
Filter: Mann CUK2747 (filter w/ activated charcoal)
Time: Five minutes
Skill Level: If you can direct your browser to landroverforums.com, you're in luck
Discussion
1. Filter - Go to Amazon or eBay and get the Mann filter w/ activated charcoal. bputah.com and roverparts.com are both good sources too.
2. Time - 5 minutes. If you can hold a roach, you can do this.
3. Skill level - see #2. You're in.
Some pics:
Open your glove box. There are retention tabs on either side that look like this:
Squeeze them together and let the glove box fall even farther. It should look like this:
Locate cabin air filter cover behind the glove box.
Pull on the tab on the right hand side (shown below) and remove the cover
You should see this, the old filter. Note how it is located in the top of the opening and the 'air flow' indicators. This is important upon installlation.
Pull out the old filter and replace with the new
Be sure you snap the new filter up (vertically) in the recess. The cabin air filter cover has inclined plane tabs
that help slide the filter up upon instalation. There's sort of a 'snap' when it fits right
Again, save yourself the money and do this yourself. It's the same thing the Land Rover Dealership will do during scheduled maintenance. roverparts also has a video posted to their site. And MANN includes instructions with their filter, specific to LR3 and RR.
Last edited by ghengis86; Sep 30, 2012 at 09:52 AM.
Thread Starter
|
Rock Crawling
Joined: Mar 2012
Posts: 269
Likes: 4
From: Northwest Indiana
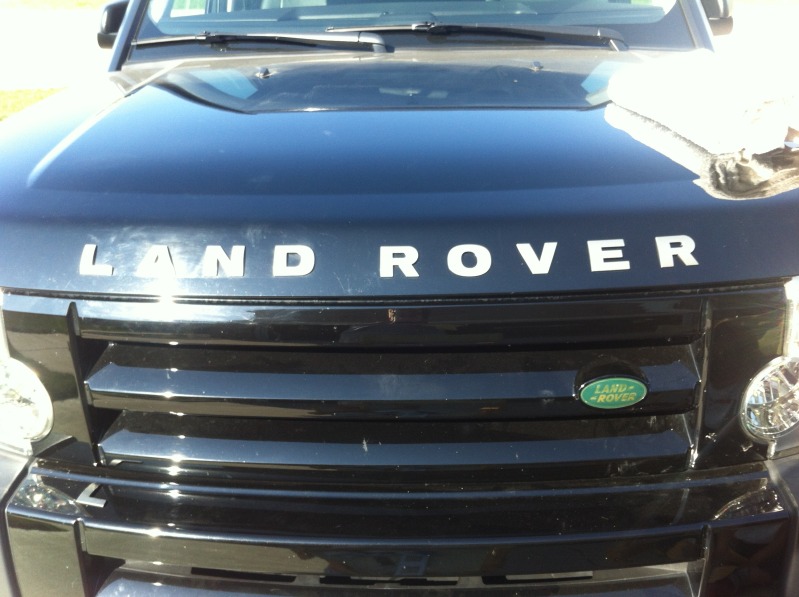
The "LAND ROVER" decals/emblems were faded, worn and ugly. Picked up a new set from bputah.com. Roverparts.com is also a good source. I saw some on e-bay/amazon too, all for about the same price.
Body Decal(s): Your choice
Land Range Rover LR3 LR4 Genuine OEM Factory Hood Tailgate Decal
Decal " Rover " Brunel Metallic (Genuine Part # DAB500080LQV) - Land Rover trim\decals from Atlantic British
Decal Hood " Land " Brunel Metallic (Genuine Part # DAB500050LQV) - Land Rover trim\decals from Atlantic British
Time: 1-2 hours
Skill Level: Easy
Discussion: Get some unwaxed dental floss and your wife's/gf's/sister's hair dryer. Also, some rubbing alcohol (isopropyl) and some Goo Gone (orange oil/citrus oil/d-limonene) and rags. Some painter's tape might help too (see pics).
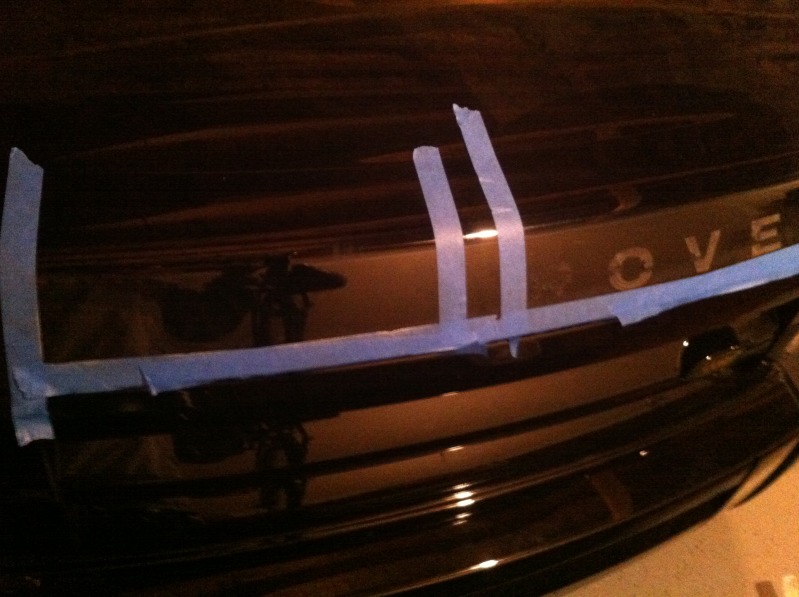
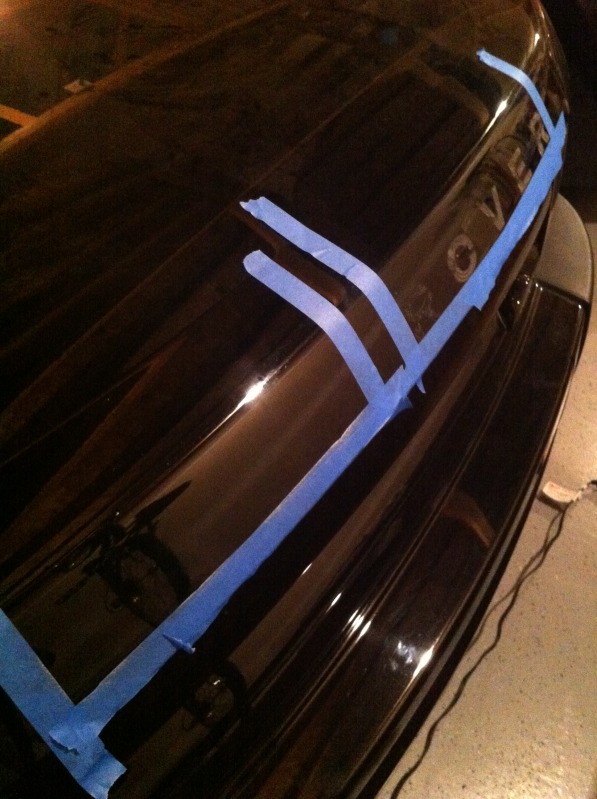
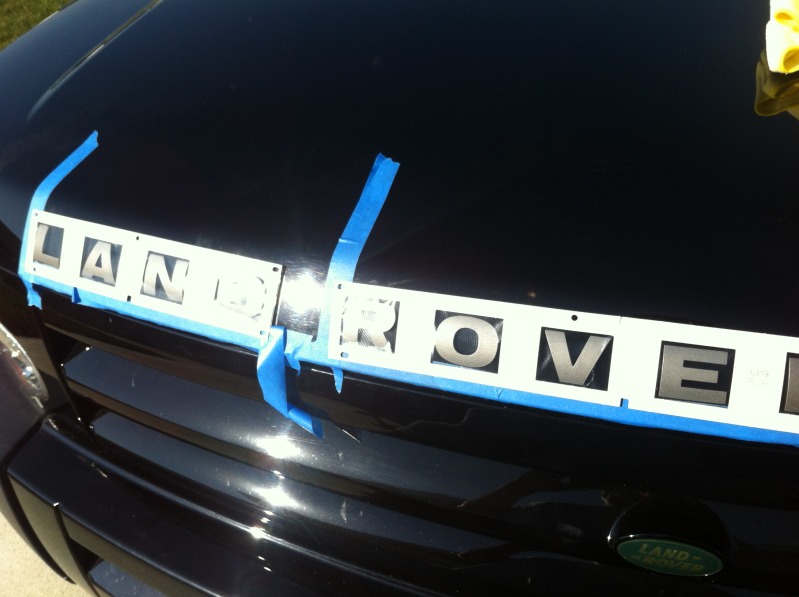
I ran some painters tape below the letters and on the edges where they begin and end to help with alignment of the new letters. Not entirely necessary, but it helps.
Pull out a foot or two of floss and run it under the letters. Work it back and forth in a sawing motion while pulling upwards (in the plane of the surface)
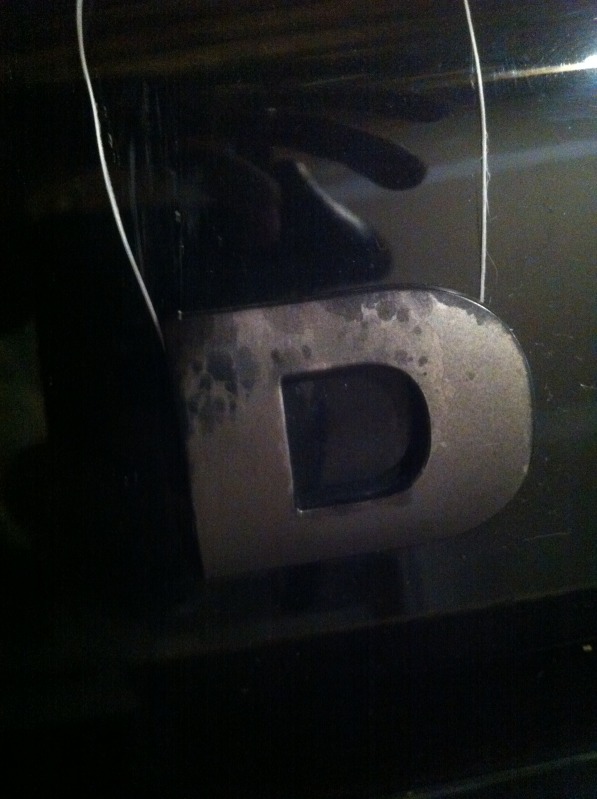
After you've removed the letters, there will be some foam backing and adhesive remaining.

Use the hair dryer to heat up the adhesive and peel it off. I just used my fingernails to pull off the adhesive in little bits. A plastic putty knife might work just as well. Just get the big chunks; there will be some adhesive remaining. Saturate the corner of a cloth rag with IPA or Goo Gone and rub it onto the lingering adhesive. I found the Goo Gone type products to work best (look for d-limonene on the bottle; I work in lab and have access to the pure stuff so I made my own). Wipe down the surface with IPA or Windex-type product to remove the last bits of adhesive and residue.
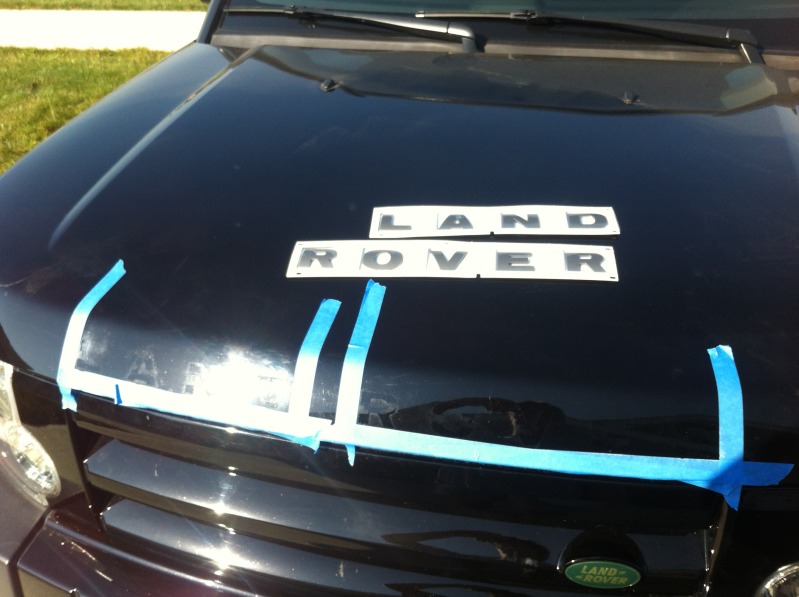
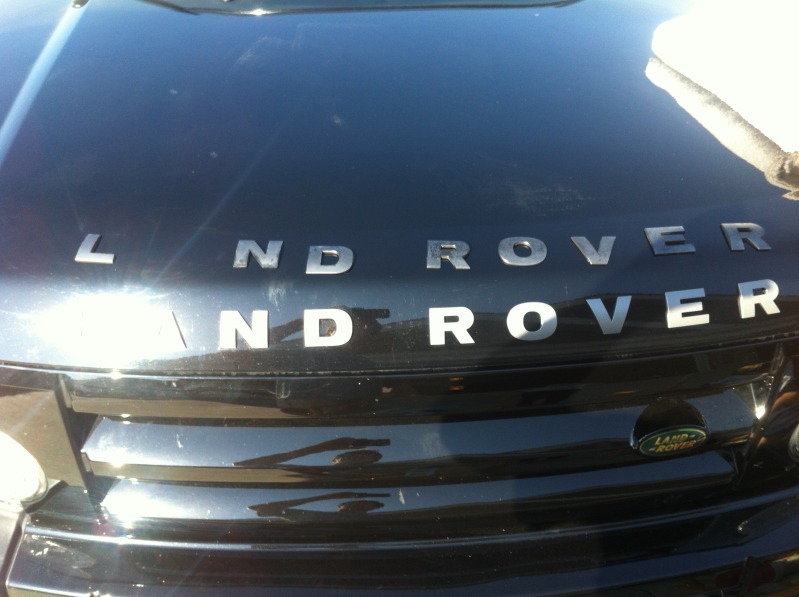
Peel off the backing on the decals. They are stuck to a clear plastic piece from the front with the correct spacing and rake (to compensate for the radius and angle of the hood). Align them with the tape or the previous marks and put them down. Be careful b/c once they're down, it's tough to reposition. These aren't like the vinyl decals for Disco's so don't use soap and water!
press down on each individual letter and rub over it a few times with your finger. remove the plastic cover sheet and painter's tape (if you use it).
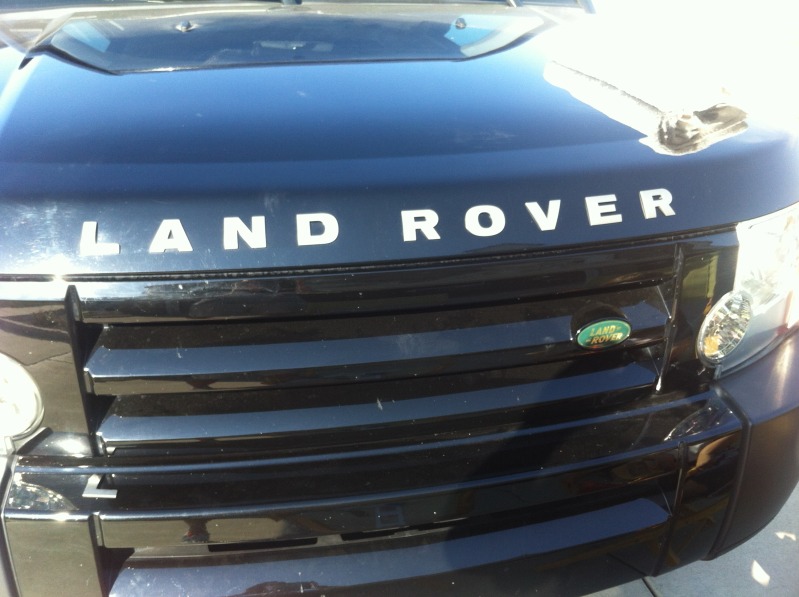
You're done! Looks much better than the old worn out letters.
Tips: I was off on the alignment of "LAND" ever so slightly. It's not really noticeable to the untrained eye, but since I did it, I can see it everytime I look at it. Look close on the pic and you can see that the "D" in land is about 1/16th of an inch higher than the "R" in rover. I'm not stressing over it, but just an FYI to be a little more careful than I was when placing the letters
Body Decal(s): Your choice
Land Range Rover LR3 LR4 Genuine OEM Factory Hood Tailgate Decal
Decal " Rover " Brunel Metallic (Genuine Part # DAB500080LQV) - Land Rover trim\decals from Atlantic British
Decal Hood " Land " Brunel Metallic (Genuine Part # DAB500050LQV) - Land Rover trim\decals from Atlantic British
Time: 1-2 hours
Skill Level: Easy
Discussion: Get some unwaxed dental floss and your wife's/gf's/sister's hair dryer. Also, some rubbing alcohol (isopropyl) and some Goo Gone (orange oil/citrus oil/d-limonene) and rags. Some painter's tape might help too (see pics).
I ran some painters tape below the letters and on the edges where they begin and end to help with alignment of the new letters. Not entirely necessary, but it helps.
Pull out a foot or two of floss and run it under the letters. Work it back and forth in a sawing motion while pulling upwards (in the plane of the surface)
After you've removed the letters, there will be some foam backing and adhesive remaining.
Use the hair dryer to heat up the adhesive and peel it off. I just used my fingernails to pull off the adhesive in little bits. A plastic putty knife might work just as well. Just get the big chunks; there will be some adhesive remaining. Saturate the corner of a cloth rag with IPA or Goo Gone and rub it onto the lingering adhesive. I found the Goo Gone type products to work best (look for d-limonene on the bottle; I work in lab and have access to the pure stuff so I made my own). Wipe down the surface with IPA or Windex-type product to remove the last bits of adhesive and residue.
Peel off the backing on the decals. They are stuck to a clear plastic piece from the front with the correct spacing and rake (to compensate for the radius and angle of the hood). Align them with the tape or the previous marks and put them down. Be careful b/c once they're down, it's tough to reposition. These aren't like the vinyl decals for Disco's so don't use soap and water!
press down on each individual letter and rub over it a few times with your finger. remove the plastic cover sheet and painter's tape (if you use it).
You're done! Looks much better than the old worn out letters.
Tips: I was off on the alignment of "LAND" ever so slightly. It's not really noticeable to the untrained eye, but since I did it, I can see it everytime I look at it. Look close on the pic and you can see that the "D" in land is about 1/16th of an inch higher than the "R" in rover. I'm not stressing over it, but just an FYI to be a little more careful than I was when placing the letters
Last edited by ghengis86; Sep 30, 2012 at 11:18 AM.
Thread Starter
|
Rock Crawling
Joined: Mar 2012
Posts: 269
Likes: 4
From: Northwest Indiana
Since I didn't know what shape the front diff was in I decided to replace the fluid. CarFax said the differential was replaced at 25.5K, so I'm guessing it had gone the past 56k with no service.
Diff fluid: Couldn't find factory recommended Castrol SAF-XO 75w90. I went with Mobil 1 75w90 synthetic. It meets API GL-5 specifications, which is also what the Castrol fluid was rated. Since it's an open diff, I bet you could use any good quality 75w90 (or even heavier) and still be fine.
Time: 30 minutes
Skill Level: easy
Discussion: I didn't think about it until I saw it mentioned elsewhere, but if you turn the wheels to the right, you'll have better access to the front diff drain plug. My wheels where pointing straight and it wasn't too bad; plenty of space.
Jack up and support the vehicle on jack stands. Drop the skid plate. Locate the front diff drain fill plug through the right front wheel well. Clean it off and the area around it.
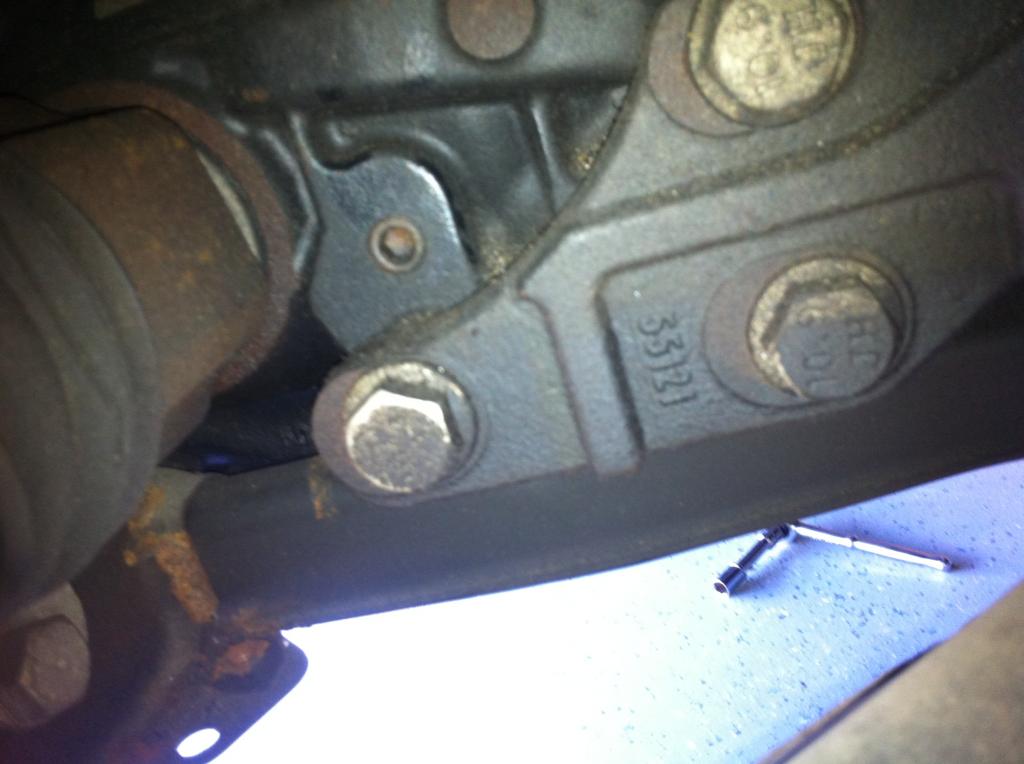

Remove the fill plug; I believe it was an 8mm hex
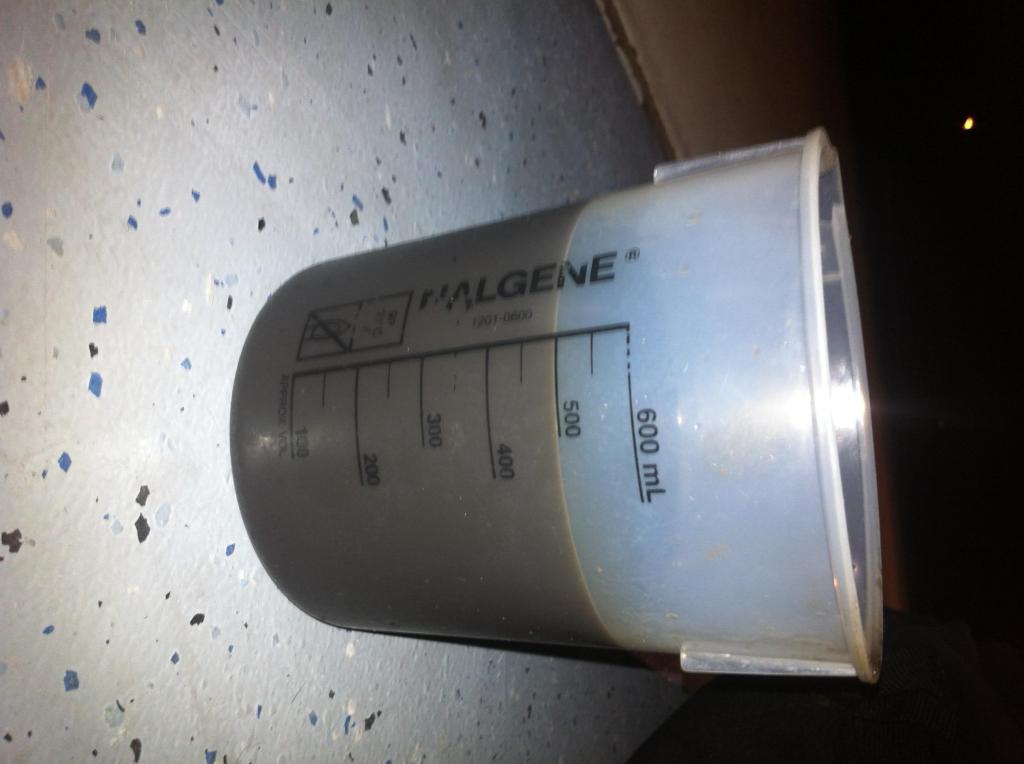
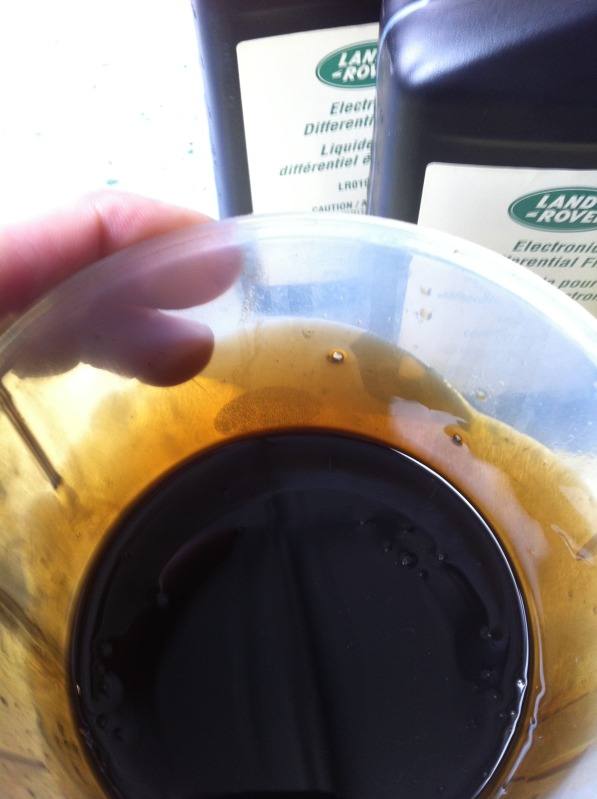
Position a drain pan underneath the drain plug. I put a plastic beaker underneath to measure how much came out. Remove the drain plug; I believe it was a 14mm hex.
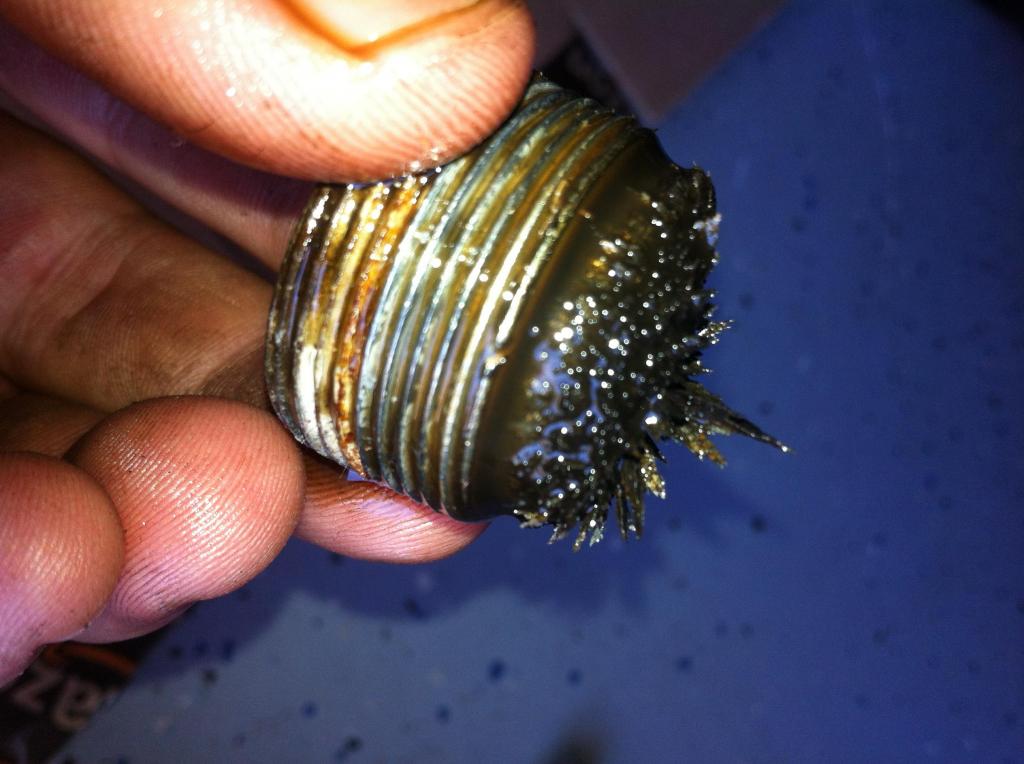
The drain plug has a strong magnet on it to catch fine particulates of metal. Mine had a little bit of on the magnet, but they were fine like graphite and no big chunks or shavings.
The fluid was brown and dirty. Definitely needed to be changed. I only got 500mLs; specification for refill is 0.61L/610mLs. I let it drain for a good ten minutes. I don't know if it was truly low, or if raising the front only prevented the last 100mLs from draining out the plug due to the incline.
After cleaning the drain plug, the diff around the plug and replacing the plug, refill the front diff. Most bottles will have graduations on the bottle so you know how much you added. The spec. is for 0.61L. The manual says fill to volume specified but I've read on here that most dealers fill to the drain plug and over filling won't cause problems. I ended up putting about 650mLs into the diff since my last squeeze of the bottle was a little too long (I just put the tip into the fill plug hole and squeezed once or twice, removed the bottle and checked the level, then put it in and another couple squeezes till the desired level).
Clean off the fill plug and replace.
Torque specs for the hex plugs (from manual):
filler plug - 25lb/ft
drain plug - 40lb/ft
I think LR switched to different plug styles which have different torque specs for the later models.
Replace the skid plates and remove jacks; you're done.
Notes: I didn't hear any noise from the diff before the drain and fill or after. On the next oil change I'm going to do the front diff again since it the fluid was so dirty; it can't hurt, I'll already have the skid plate down and the fluid isn't expensive. I should have planned on doing this when I did my oil change so I didn't have to jack up the vehicle and drop the skid plate.
Diff fluid: Couldn't find factory recommended Castrol SAF-XO 75w90. I went with Mobil 1 75w90 synthetic. It meets API GL-5 specifications, which is also what the Castrol fluid was rated. Since it's an open diff, I bet you could use any good quality 75w90 (or even heavier) and still be fine.
Time: 30 minutes
Skill Level: easy
Discussion: I didn't think about it until I saw it mentioned elsewhere, but if you turn the wheels to the right, you'll have better access to the front diff drain plug. My wheels where pointing straight and it wasn't too bad; plenty of space.
Jack up and support the vehicle on jack stands. Drop the skid plate. Locate the front diff drain fill plug through the right front wheel well. Clean it off and the area around it.
Remove the fill plug; I believe it was an 8mm hex
Position a drain pan underneath the drain plug. I put a plastic beaker underneath to measure how much came out. Remove the drain plug; I believe it was a 14mm hex.
The drain plug has a strong magnet on it to catch fine particulates of metal. Mine had a little bit of on the magnet, but they were fine like graphite and no big chunks or shavings.
The fluid was brown and dirty. Definitely needed to be changed. I only got 500mLs; specification for refill is 0.61L/610mLs. I let it drain for a good ten minutes. I don't know if it was truly low, or if raising the front only prevented the last 100mLs from draining out the plug due to the incline.
After cleaning the drain plug, the diff around the plug and replacing the plug, refill the front diff. Most bottles will have graduations on the bottle so you know how much you added. The spec. is for 0.61L. The manual says fill to volume specified but I've read on here that most dealers fill to the drain plug and over filling won't cause problems. I ended up putting about 650mLs into the diff since my last squeeze of the bottle was a little too long (I just put the tip into the fill plug hole and squeezed once or twice, removed the bottle and checked the level, then put it in and another couple squeezes till the desired level).
Clean off the fill plug and replace.
Torque specs for the hex plugs (from manual):
filler plug - 25lb/ft
drain plug - 40lb/ft
I think LR switched to different plug styles which have different torque specs for the later models.
Replace the skid plates and remove jacks; you're done.
Notes: I didn't hear any noise from the diff before the drain and fill or after. On the next oil change I'm going to do the front diff again since it the fluid was so dirty; it can't hurt, I'll already have the skid plate down and the fluid isn't expensive. I should have planned on doing this when I did my oil change so I didn't have to jack up the vehicle and drop the skid plate.
Thread Starter
|
Rock Crawling
Joined: Mar 2012
Posts: 269
Likes: 4
From: Northwest Indiana
Thanks to member bbyer for the info found here:
https://landroverforums.com/forum/lr...nt-part-53176/
My LR3 still had the factory breather so I thought I'd better do the recommended update. I believe the problem was due to the breather not breathing, which caused pressure to build in the front diff and lead to leaking and blown seals (or didn't allow moisture to escape and lead to premature oxidation of the internals?). Either way, bbyer's write up and pics were great.
Part: LR019450 (zeroes, not Oh's) I couldn't find this anywhere from any US online parts suppliers. There were a couple UK based suppliers that had it but the price, shipping and time wasn't worth it. I called up my local dealer and they had it in stock; ~$27 + tax. not too bad.
Time: 5-10 mintues
Skill Level: extremely easy
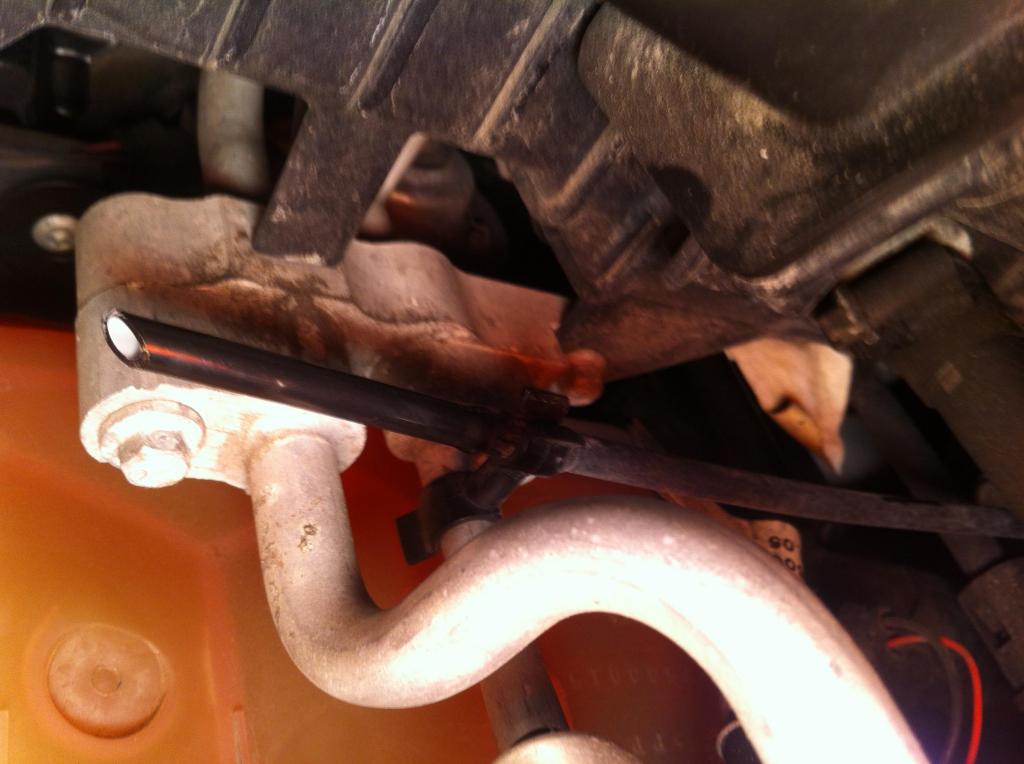
Discussion: The breather tube is next to the drive side radiator post and coolant bottle.
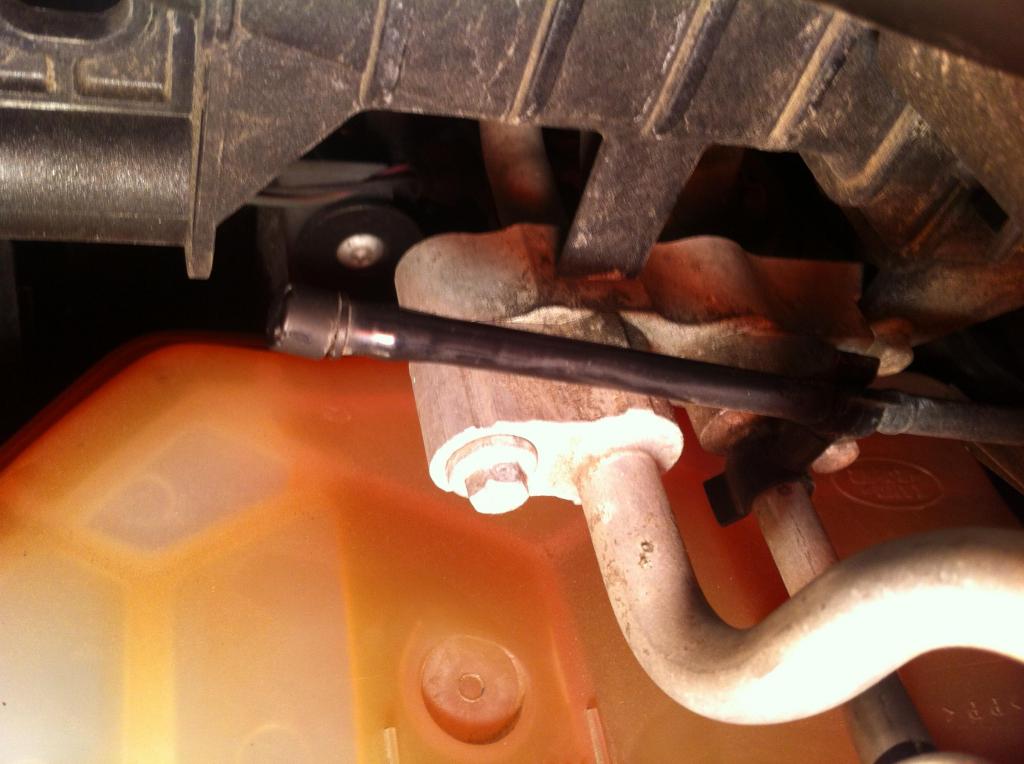
There's a little clip that holds the tube vertical. I pulled the clip off so I could move the tube rearward (towards the firewall) where there's more room to cut it. TSB tells you to cut it 20mm from the top, at an angle. Make sure the long part of the cut is towards the radiator. Otherwise, it would block the airflow through the 90 degree angle of the breather.
Here's all you need.
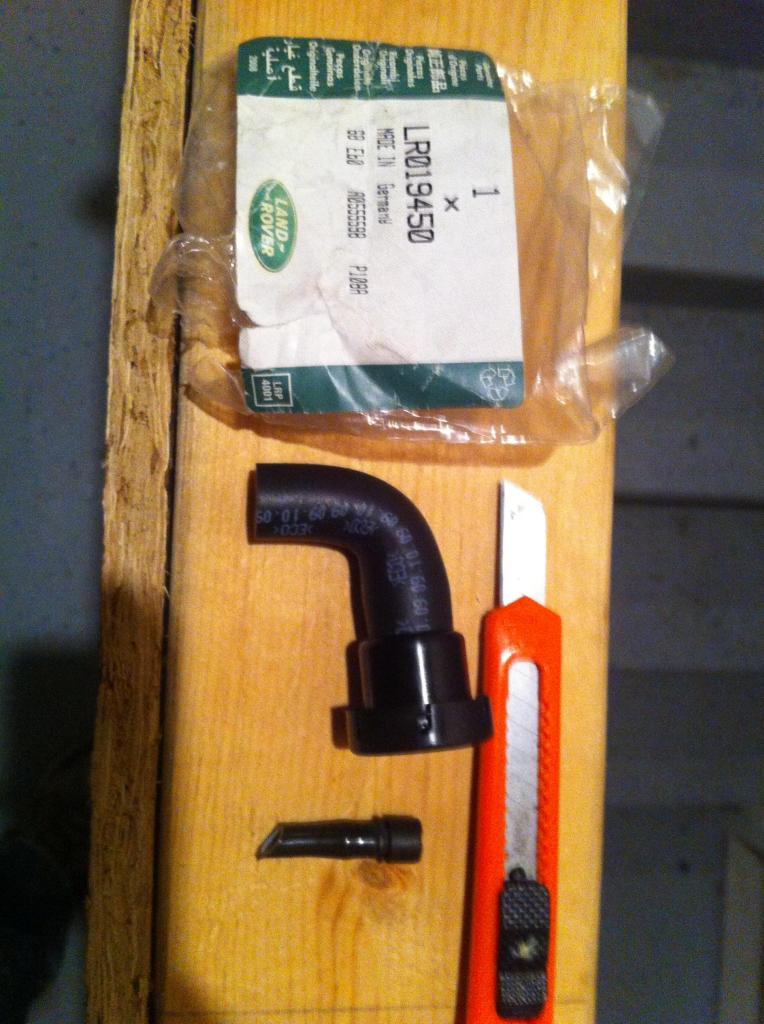
slide the breather back on to the tube, positioning the cap towards the firewall.


Done.
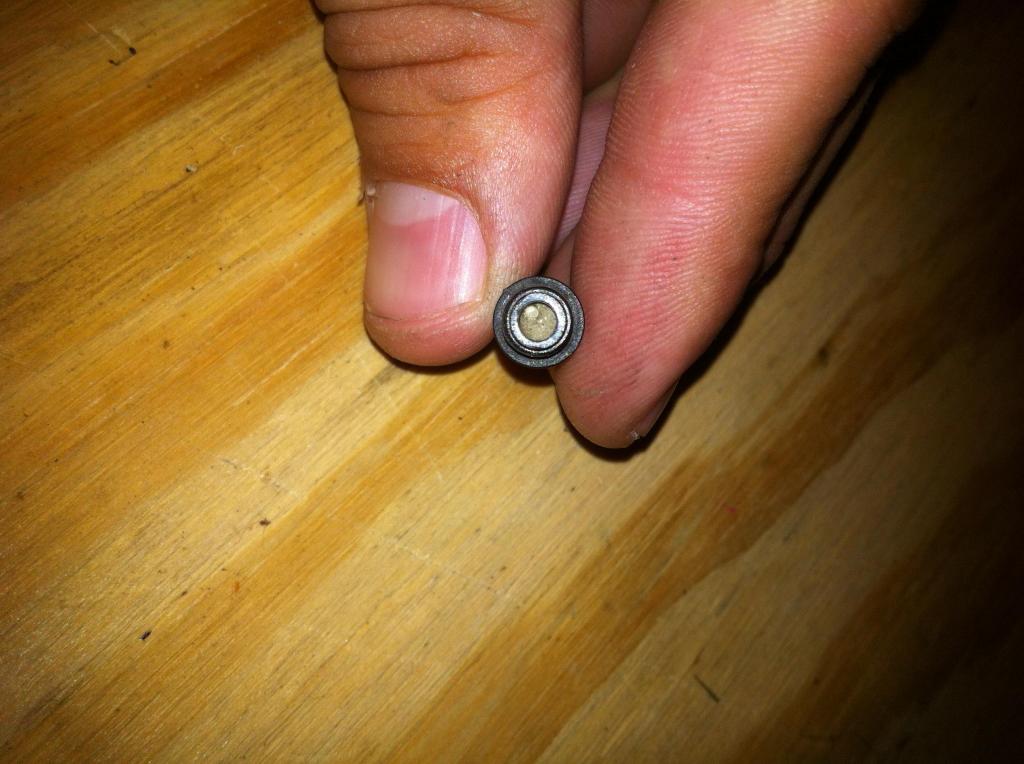
Notes: Very easy job. Took longer to write up than to acutally do. I could blow through the old cap very slightly. Here's a pic after I pulled the dust shield off.
https://landroverforums.com/forum/lr...nt-part-53176/
My LR3 still had the factory breather so I thought I'd better do the recommended update. I believe the problem was due to the breather not breathing, which caused pressure to build in the front diff and lead to leaking and blown seals (or didn't allow moisture to escape and lead to premature oxidation of the internals?). Either way, bbyer's write up and pics were great.
Part: LR019450 (zeroes, not Oh's) I couldn't find this anywhere from any US online parts suppliers. There were a couple UK based suppliers that had it but the price, shipping and time wasn't worth it. I called up my local dealer and they had it in stock; ~$27 + tax. not too bad.
Time: 5-10 mintues
Skill Level: extremely easy
Discussion: The breather tube is next to the drive side radiator post and coolant bottle.
There's a little clip that holds the tube vertical. I pulled the clip off so I could move the tube rearward (towards the firewall) where there's more room to cut it. TSB tells you to cut it 20mm from the top, at an angle. Make sure the long part of the cut is towards the radiator. Otherwise, it would block the airflow through the 90 degree angle of the breather.
Here's all you need.
slide the breather back on to the tube, positioning the cap towards the firewall.
Done.
Notes: Very easy job. Took longer to write up than to acutally do. I could blow through the old cap very slightly. Here's a pic after I pulled the dust shield off.
Thread Starter
|
Rock Crawling
Joined: Mar 2012
Posts: 269
Likes: 4
From: Northwest Indiana
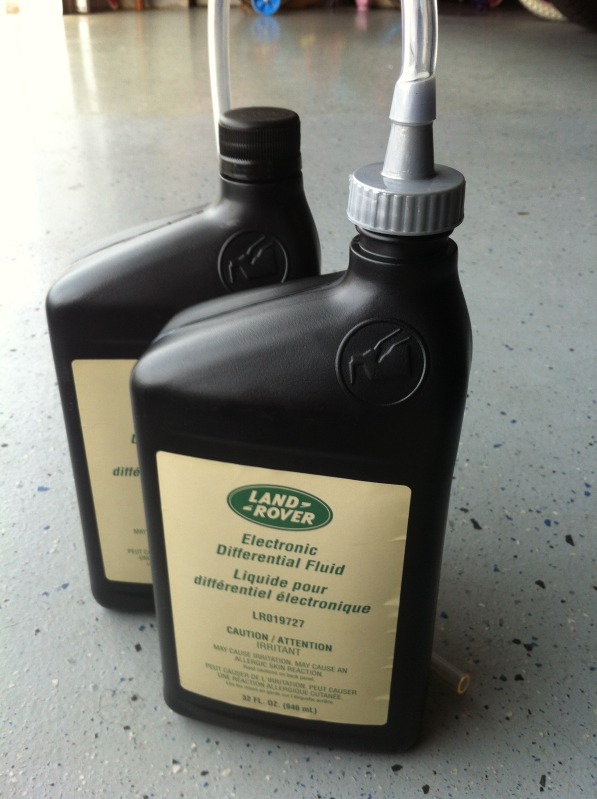
Didn't know when/if the rear diff fluid has been changed, so I went ahead and did it today. I have the electronic locking rear diff and I couldn't find the LR recommended Castrol SAF Carbon mod plus. I was going to use BG but had to get the fonrt diff breather from the dealer, so I got the LR spec'd fluid there too. ~$45/quart! Yikes. I think I'll go with BG Ultra Guard next time!
Parts: LR electronic rear diff fulid (LR019727). 8mm hex for the filler plug; standard 3/8ths drive ratchet for the drain plug.
Time: 45 minutes (squeezing the bottles took forever)
Skill Level: Easy
I've got the electronic locking diff (Wohoo!).
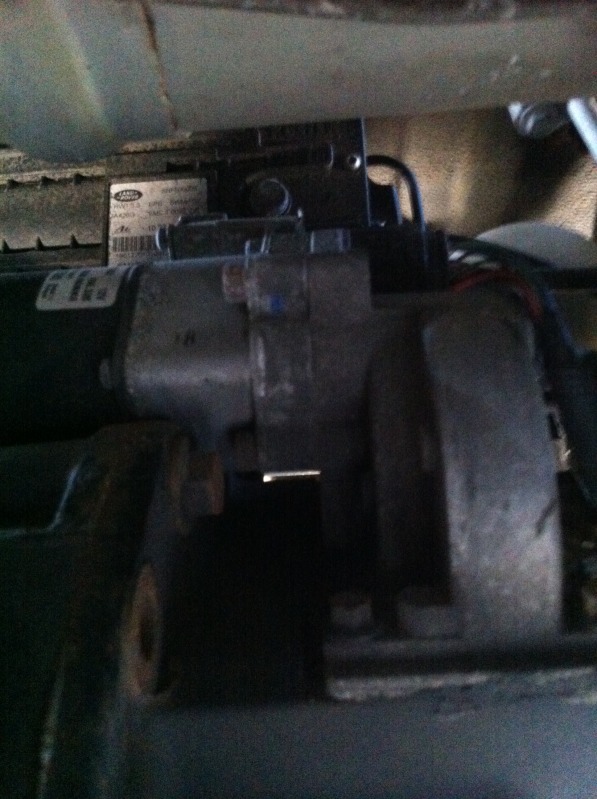
So I got the LR fluid for it. There's no room to put a bottle to fill up the diff, so I took the fill top from the mobil 1 bottle screws on to the quart bottles. I also had some tubing laying around that fit the top so I used this to fill the diff.
Jack up the back of the truck putting the jack-pad on the frame crossmember between the rear diff and spare tire. It's pretty tight, but worked fine. Put jack stands under the frame rails, making sure not to put them near anything important. I put mine where the two sections of frame rails are welded together, right before the bend aft.
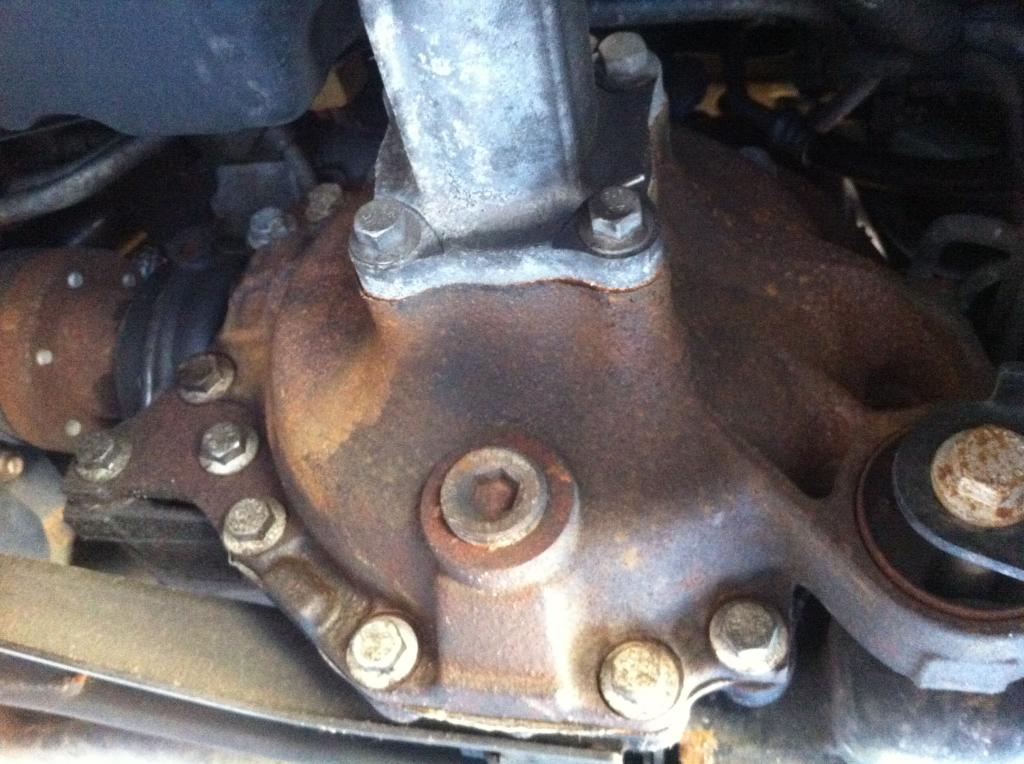
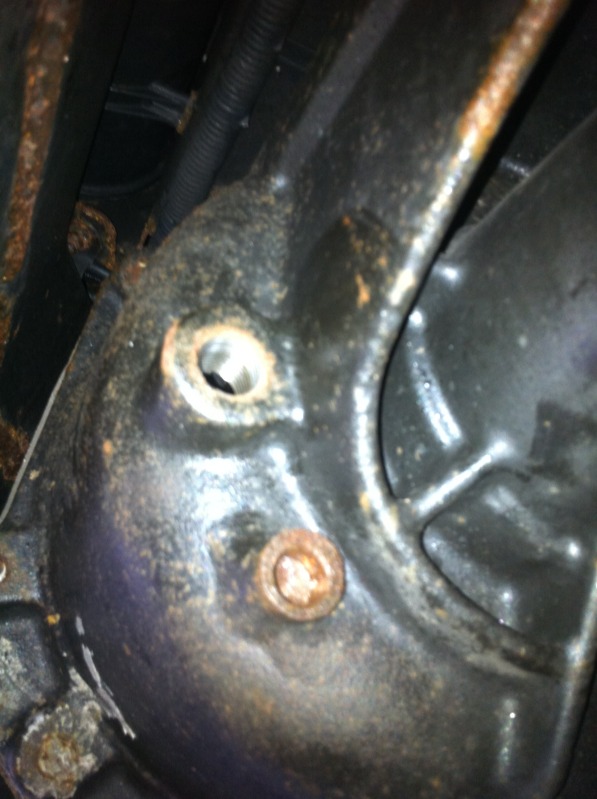
Remove the filler plug first. This is an 8mm hex. Plug is removed in the pic below:
Position a drain pan under the drain plug and remove the drain plug with a standard 3/8ths ratchet.
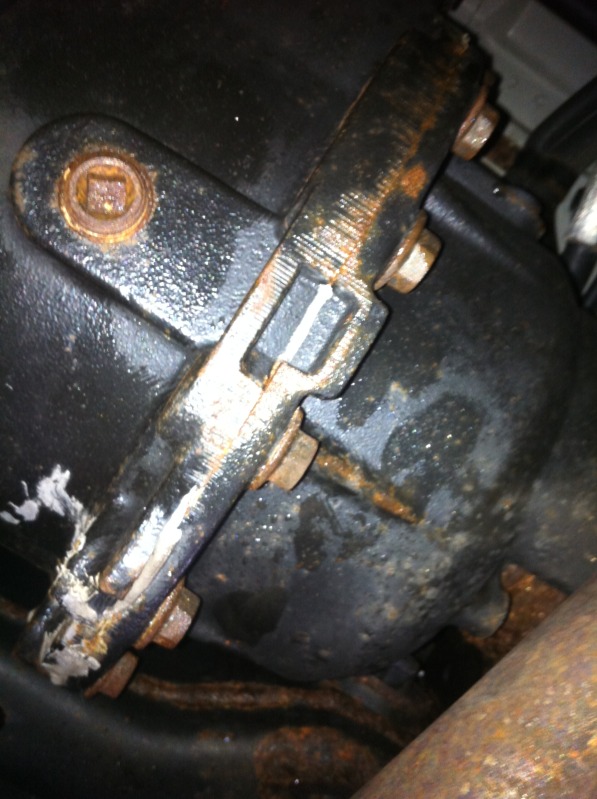
THe drain plug has a magnet; inspect what's attached to make sure there aren't any large bits of metal. Mine had the standard silt-like particles. No chunks and no shavings.

I caught some of the fluid in a plastic beaker to take a look at it. Looked cleaner than the front but still dirty. It was still clear, which is a good sign (looking at it up the sides of the beaker)
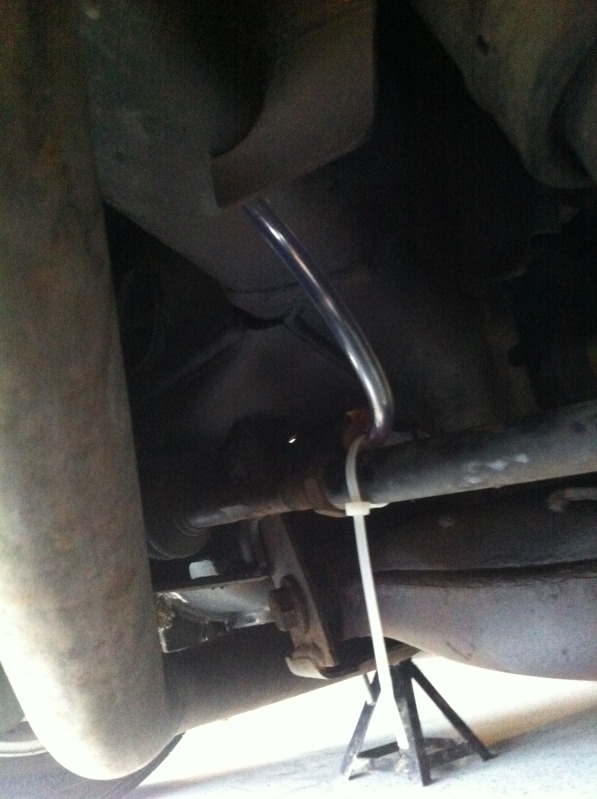
Let it drain for a while to get the most fluid out. Clean off the drain plug and replace it.Now for your forearm workout! I fed the plastic tubing into the fill plug
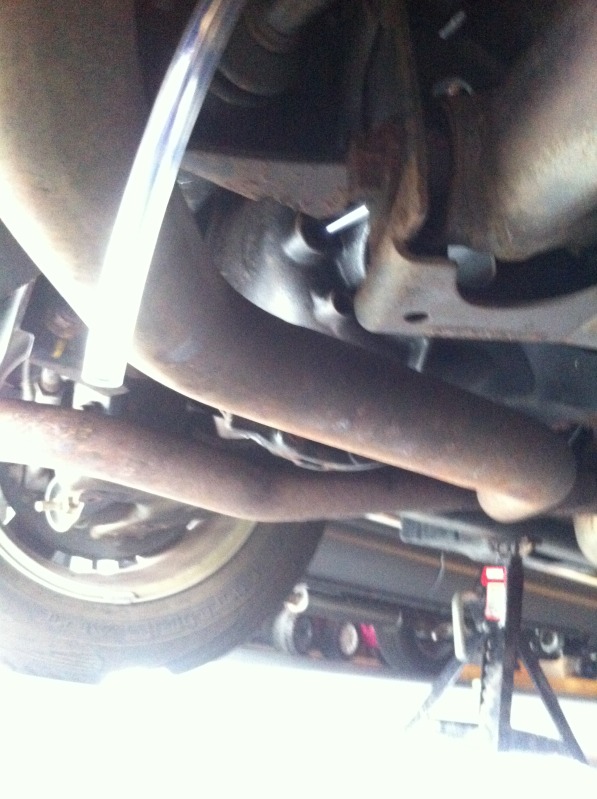
Then I fed it up, over and through a hole in the frame and zip tied it to the suspension.
I hooked the tube up to the bottle, inverted and raised the bottle in the wheel well (between exhaust and air strut) and squeezed. And squeezed. And squeezed!!! It took forever. When the first quart was half in the diff, I refilled to give more pressure when squeezing. I repeated this until I had this much left:
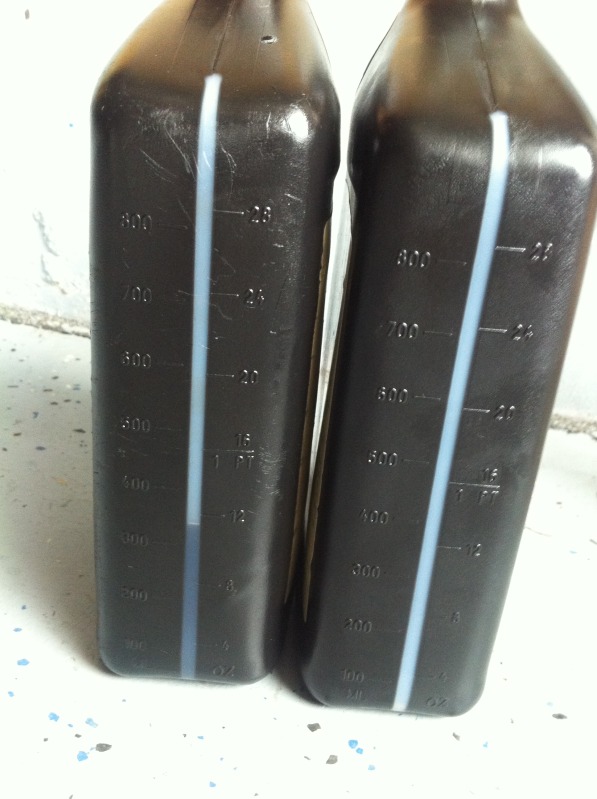
The spec is for 1.5L (1500mLs). I spilled some a few times when taking a break from squeezing. 1 quart is 946 mL, so I used about 1600mLs, figuring I spilled ~100mLs. Replace the filler plug.
You're done!
I would recommend you get the $15 fluid transfer pump from Advanced Auto Parts; it would definitely make it easier and quicker. My forearms and hands are killing me!
Torque specs for the bolts:
filler plug: 25lb/ft
drain plug: 40lb/ft
Parts: LR electronic rear diff fulid (LR019727). 8mm hex for the filler plug; standard 3/8ths drive ratchet for the drain plug.
Time: 45 minutes (squeezing the bottles took forever)
Skill Level: Easy
I've got the electronic locking diff (Wohoo!).
So I got the LR fluid for it. There's no room to put a bottle to fill up the diff, so I took the fill top from the mobil 1 bottle screws on to the quart bottles. I also had some tubing laying around that fit the top so I used this to fill the diff.
Jack up the back of the truck putting the jack-pad on the frame crossmember between the rear diff and spare tire. It's pretty tight, but worked fine. Put jack stands under the frame rails, making sure not to put them near anything important. I put mine where the two sections of frame rails are welded together, right before the bend aft.
Remove the filler plug first. This is an 8mm hex. Plug is removed in the pic below:
Position a drain pan under the drain plug and remove the drain plug with a standard 3/8ths ratchet.
THe drain plug has a magnet; inspect what's attached to make sure there aren't any large bits of metal. Mine had the standard silt-like particles. No chunks and no shavings.
I caught some of the fluid in a plastic beaker to take a look at it. Looked cleaner than the front but still dirty. It was still clear, which is a good sign (looking at it up the sides of the beaker)
Let it drain for a while to get the most fluid out. Clean off the drain plug and replace it.Now for your forearm workout! I fed the plastic tubing into the fill plug
Then I fed it up, over and through a hole in the frame and zip tied it to the suspension.
I hooked the tube up to the bottle, inverted and raised the bottle in the wheel well (between exhaust and air strut) and squeezed. And squeezed. And squeezed!!! It took forever. When the first quart was half in the diff, I refilled to give more pressure when squeezing. I repeated this until I had this much left:
The spec is for 1.5L (1500mLs). I spilled some a few times when taking a break from squeezing. 1 quart is 946 mL, so I used about 1600mLs, figuring I spilled ~100mLs. Replace the filler plug.
You're done!
I would recommend you get the $15 fluid transfer pump from Advanced Auto Parts; it would definitely make it easier and quicker. My forearms and hands are killing me!
Torque specs for the bolts:
filler plug: 25lb/ft
drain plug: 40lb/ft


Pro Wrench
Joined: Sep 2008
Posts: 1,673
Likes: 153
From: Edmonton Alberta Canada
I gather two oil filter gaskets is not better than one and none is even worse. Well seen - I did see it but sort of ignored the significance of it.
It is good that you mentioned it - much appreciated.
Those are good pictures when you can see something like that so clearly. Usually it is so dark one can not even find the oil filter let alone where to screw it back in.
It occurs to me that just because the filter one took out still has the gasket attached does not mean that there is not a second gasket there from a previous filter change.