
Head Gasket the Shade Tree Way


Three Wheeling
Joined: Jan 2013
Posts: 52
Likes: 1
From: Cleveland Ohio
Savannah,
Looking at your pictures it really looks like the problem I was having with my Gray. If you set the manifold down so the flange mates up paralell with the heads the bolt holes are misaligned. If you massage it so you can get bolts in one side, the other side has a wedge shaped gap where it meets the head and the bolts still don't line up. If I understand your explanation it seems like that is what is happening.
By machining the heads they both essentially sit about .025 closer to the block, which offsets the holes by that same amount. The intake is still at original spec so since it is sitting in a 90 degree V it stays at the same position relative to the block even though the heads have "moved" in a sense. That is what causes the misalignment.
If the manifold is machined the same amount, assuming the two flanges that meet the heads are 90 degrees to each other, the manifold will sit closer to the block and be back in alignment with the heads.

Thread Starter
|
Super Moderator
Joined: Jan 2011
Posts: 16,322
Likes: 88
From: Savannah Georgia
Will wiggle some more.
Shop did not take that much off, as I can measure the side of the head, and Rover has a spec for that as "new".
My first try installing the intake I got 11 of 12 bolts in at 51 nm. That is wrong torque it turns out.
I installed a generic helicoil in the one bolt hole that stripped.
Install try number 2 - the combination of my cleaning out holes with a tap, and the gasket being pushed against the bolts, got me to cross thread 10 of the bolts. I kept torquing down thinking the ribs in the gasket were softly collapsing. Nope, that was the bolts stripping. All failed around 40 nm.
Decided to drill out and tap for 7/16. Did that, but now the intake won't line up. Enlarged gasket holes. No go. Tried with no gasket, no go.
Before drilling out intake, which may work, I have a new gasket and inserts that will be here tomorrow after lunch. So I'll try 5/16 (using inserts in what I already have tapped), with a new gasket, since this one has been hogged out to 1/2 inch, plus holes made elongated.
That will leave intake normal, a new gasket, and the potential to go back to 7/16 (after removal of inserts).
Last edited by Savannah Buzz; Jul 24, 2013 at 05:21 PM.
Thread Starter
|
Super Moderator
Joined: Jan 2011
Posts: 16,322
Likes: 88
From: Savannah Georgia
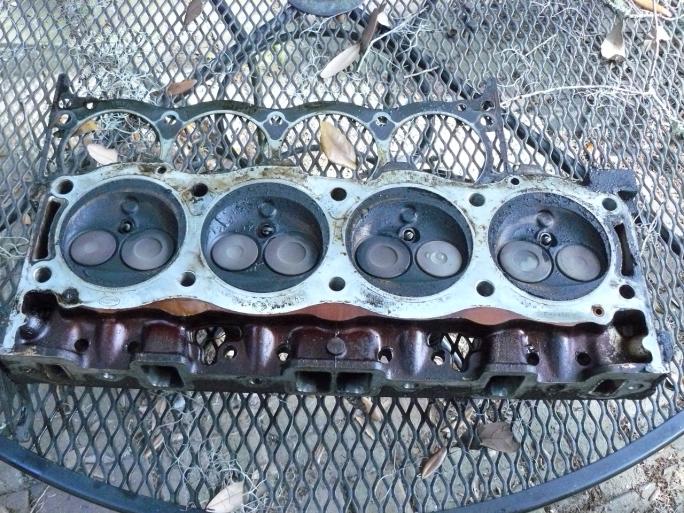
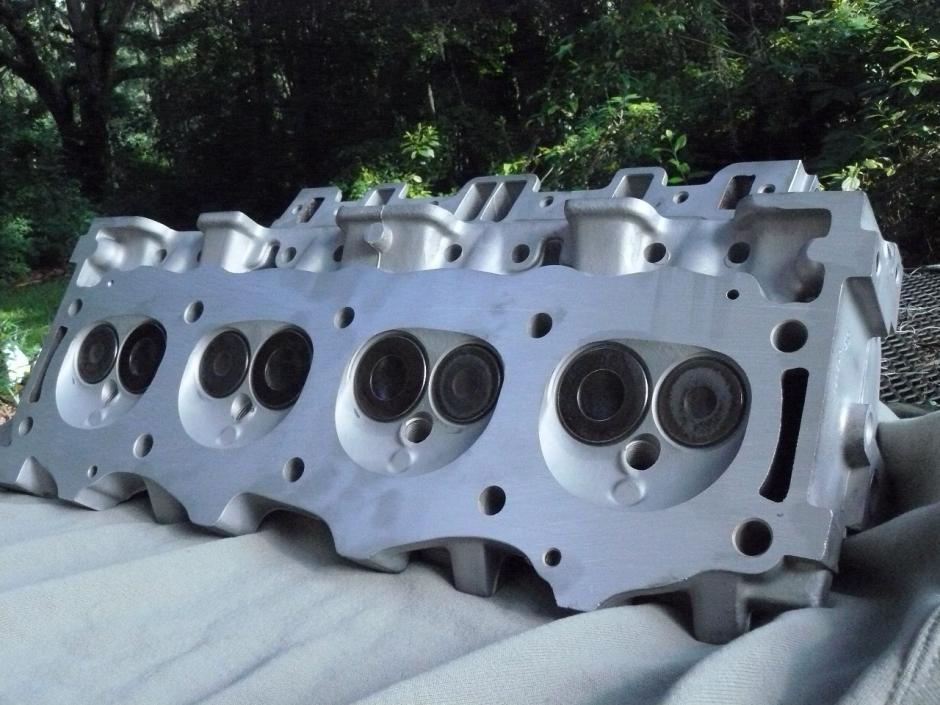
hmmm.... here is the before and after pix. I better check my pictures for more details. Look at size and shape of combustion chambers..... how much did they take off??? Look between valves and cylinder edge in the before picture - where did that go? This thing will have a higer compression ratio, and maybe interference?
Last edited by Savannah Buzz; Jul 24, 2013 at 06:05 PM.

Recovery Vehicle
Joined: Jan 2012
Posts: 1,126
Likes: 11
From: mini soda
I was wondering that too...is that a secondary concave section, or does it just look that way cause of the black deposits?
GIS shows yours look pretty normal.
GIS shows yours look pretty normal.
Last edited by pinkytoe69; Jul 24, 2013 at 06:25 PM.
Thread Starter
|
Super Moderator
Joined: Jan 2011
Posts: 16,322
Likes: 88
From: Savannah Georgia
I am not near my camera card, so will have to look at more shots. When I picked up heads I was just so happy they looked great....
This is starting to sound really bad.... If I have to pull a pair of heads off a boneyard truck, I'll still have to have them worked over. This is taking longer than anyone expected.
And the side measure shows within spec. But not many things would make the intake not line up this way??
This is starting to sound really bad.... If I have to pull a pair of heads off a boneyard truck, I'll still have to have them worked over. This is taking longer than anyone expected.
And the side measure shows within spec. But not many things would make the intake not line up this way??
Thread Starter
|
Super Moderator
Joined: Jan 2011
Posts: 16,322
Likes: 88
From: Savannah Georgia
Now that intake bolts replaced with 5/16 we are assembling engine once again. Works stopped last night when plastic bag of coil bracket and wiring harness hardware went into hiding. Have both sections of intake on, new heater hoses and stubby hose from bracket to engine. Now for alternator, PS pump, and AC compressor.
Good thing I took some pictures to refer to. You really need more pictures the older you get, mind not as sharp as it once was, and I wasn't the sharpest knide in the drawer to start with.
Good thing I took some pictures to refer to. You really need more pictures the older you get, mind not as sharp as it once was, and I wasn't the sharpest knide in the drawer to start with.

Baja
Joined: Mar 2009
Posts: 5,736
Likes: 230
From: south n.j. and ne va.
If they stayed in the spec from the manual valve Clarence is OK, if the went more then the spec then they wold have to recess the valves to compensate and add shims under valve springs
I agree they look alot different but some may just be carbon like pinky suggested, will look to see what my pics showed
I agree they look alot different but some may just be carbon like pinky suggested, will look to see what my pics showed
Thread Starter
|
Super Moderator
Joined: Jan 2011
Posts: 16,322
Likes: 88
From: Savannah Georgia
Stopping for lunch. Have everything back together. Extra nut left over for one corner of the coil bracket I am too lazy to get at. Leaving TB heater out of loop for the moment, I poured so much 20W50 on to the rocker arms and in the valley to flush down anything I missed with the vac, now the dip stick is way high with oil (no milk shake from before either). So all that is left is oil change, top up coolant and belch once it is running.
Plan is to crank first without fuel pump fuse connected to build oil pressure.
Already I have done new plugs (NGK) and replaced all the heater hoses (glad I did, they were cracked on the inside).
I'm sure there is something I forgot....
How many miles of "shakedown" test driving would you consider enough before returning vehicle to offspring? I was thinking a couple hundred, it is 58 miles one way on my commute.