
Installing Terrafirma sliders with tree bars question


Recovery Vehicle
Joined: Jan 2013
Posts: 801
Likes: 84
From: Seattle, WA
In the cold light of day, the screw that extends from the bracket that stops the bottom half of the passenger side wing from flapping about is nowhere near in the right location to screw
Into the front of the tree slider. Otherwise the other holes look good. Not sure if the panel is in the wrong place, manufacturing defect or just a relocated bracket, but either way, I have to move the bracket tomorrow so that the holes will finally all line up.
Into the front of the tree slider. Otherwise the other holes look good. Not sure if the panel is in the wrong place, manufacturing defect or just a relocated bracket, but either way, I have to move the bracket tomorrow so that the holes will finally all line up.
Recovery Vehicle
Joined: Jan 2013
Posts: 801
Likes: 84
From: Seattle, WA
Will do. It "should" be straightforward.
Removing the plastic trim piece takes around 5-10 minutes a side.
Put the slider on a jack under the sill. You'll need to open the doors again, like when you removed the plastic trim pieces.
Jack the slider up with the front and back plates on the slider wrapping the sill.
If you're fortunate, all the holes will line up, including a screw that protrudes down from the front wing. You'll need to remove the nut that is used to keep that front screw tight (and the bottom of the front wing from flapping around)
Once you have the slider in position, make sure it's sitting flat against the frame, check the doors clear the sliders and then mark the holes on both the front and back of the frame.
Lower the slider, drill out the holes so that your hardware will fit through(I used a 1/2" drill bit).
Then raise the slider again on the jack and this time you can bolt the slider in place.
In my case I have to figure out how to relocate the bracket that is used to keep the front wing tight. If I shaved off the screw to bolt on the slider, the bottom of the wing would be able to move around, so I have to address it.
I'll include pics once I get my slider all lined up.

I think you're lucky if you get half of the holes to line up. I'm not sure what Terrafirma used as a template? Maybe a wrecked disco? Maybe they just said, let's drill abstract holes. Not sure, either way they do not line up and we have it as an item note in our system to relay that info to the customer prior to purchase now.

Recovery Vehicle
Joined: Dec 2012
Posts: 942
Likes: 29
From: St. James, NY
If you have ACE, there will be an acellerometer in the way on the pass side sill. Be gentle when removing it. I used a hammer after I drilled out the rivets and had to buy a new one.
I had to drill most if not all the holes. I also had to get hardware from Lowes because there wasn't enough supplied with the sliders. I didn't use the spacers (short pieces of tubing).
I had to drill most if not all the holes. I also had to get hardware from Lowes because there wasn't enough supplied with the sliders. I didn't use the spacers (short pieces of tubing).
Recovery Vehicle
Joined: Jan 2013
Posts: 801
Likes: 84
From: Seattle, WA
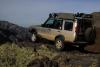
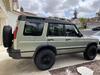
I got this finished today. Embarrassing how long this took.
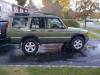
I'me happy with how it looks, but I'm never installing a set of these ever again plus I put a scratch in one while putting it on so now have to go find some touch up tomorrow before it starts rusting on me

They look pretty good. Anyone have any recommendations for a touch up pen for the sliders?

I'me happy with how it looks, but I'm never installing a set of these ever again
plus I put a scratch in one while putting it on so now have to go find some touch up tomorrow before it starts rusting on me They look pretty good. Anyone have any recommendations for a touch up pen for the sliders?
Last edited by Robert Booth; Nov 13, 2014 at 02:00 PM.
Three Wheeling
Joined: Feb 2020
Posts: 80
Likes: 45
From: Oceanside, CA
Here are the instructions from Terrafirma. I'll be installing mine tomorrow. I hope the quality of the sliders are better than the quality of their instructions.
Terrafirma Rock Slider Install Instructions - TF809
Terrafirma Rock Slider Install Instructions - TF809

Thread
Thread Starter
Forum
Replies
Last Post
christiansmith6
Retired - Private 'Wanted' Classifieds
2
Jan 7, 2014 07:46 AM
caerb
Retired - Private For Sale/Trade Classifieds
1
Jan 12, 2013 01:54 PM