
My 04 D2 rebuild adventure.


Thread Starter
|
Mudding
Joined: Feb 2014
Posts: 205
Likes: 16
From: Atlanta, GA
2nd update..
I may be taking delivery of a 06 LR3 SE fully loaded in the next week for about $8k. So, if that works out, I may be selling the freshly restored(when done) Disco II to my folks to pay off the LR3.
They could use a second car, something that can tow far more than their Element, and I want the LR3 a bit more than the Disco. But this isn't set in stone yet.

Three Wheeling
Joined: May 2014
Posts: 58
Likes: 0
From: South Pasdena
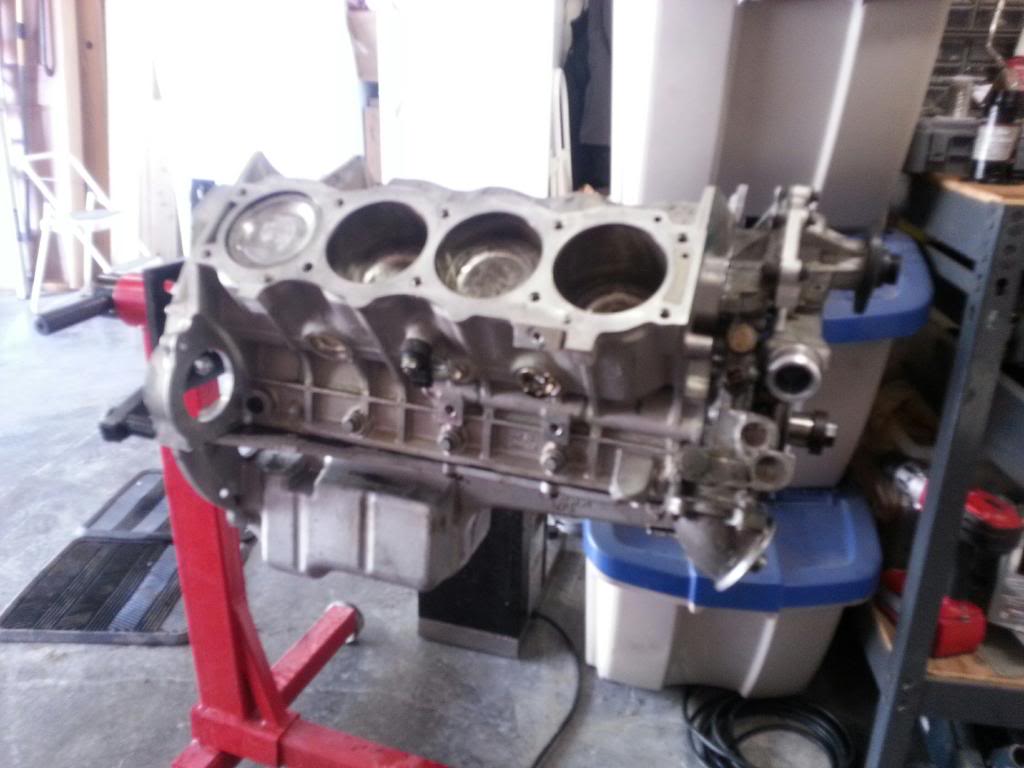
Good block on the way. 73k miles from a 04 Disco II. Professionally inspected.
Cost me $100. Should be here in a few days.
So, onto the next step. Rebuilding the bottom end when it gets here.
First thing. Crank is in perfect condition. All the other odds and ends are flawless. I plan to reuse as much as I can. Cam, lifters, push rods, crank, rods, pistons, etc. All rings, gaskets, bearings, etc will be new.
So, two things. How do I measure if I need std, or oversize bearings for the crank and rods? Any recommendations on things to consider on the bottom end?
Thread Starter
|
Mudding
Joined: Feb 2014
Posts: 205
Likes: 16
From: Atlanta, GA
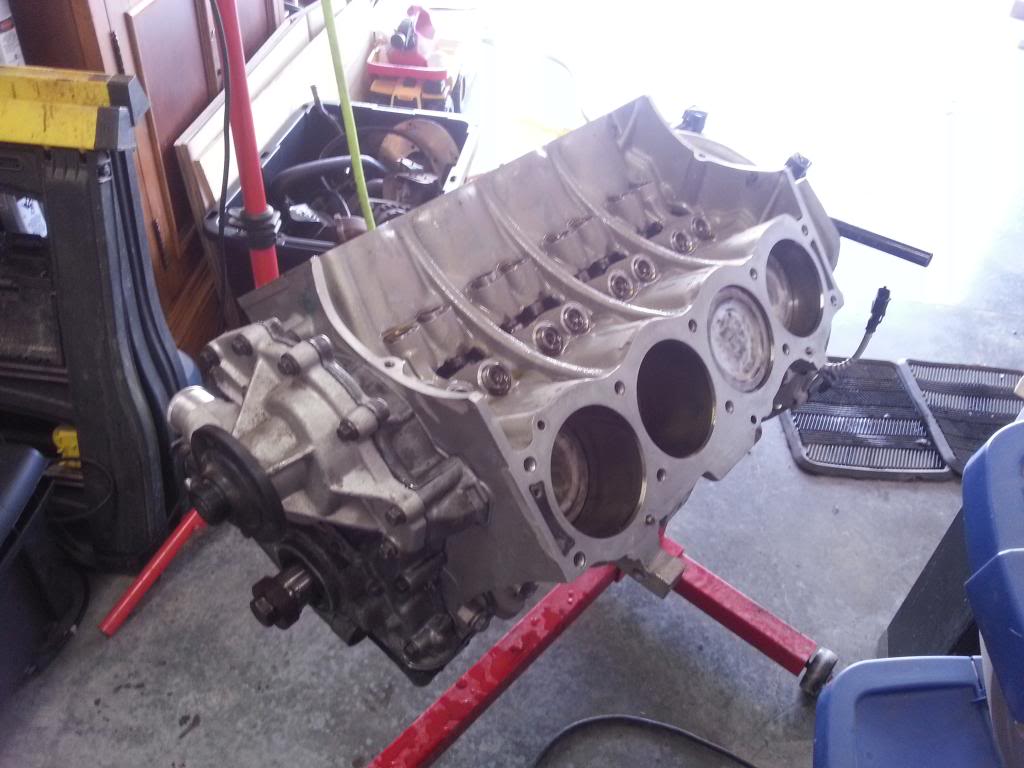
I put out a wanted ad on here. Found someone with a good block down in Seattle and we were able to just drop it on air freight and I picked it up at the airport.
Block had low miles and passed pressure tests. Glad I was able to turn around my cracked one with such a low cost.
Block had low miles and passed pressure tests. Glad I was able to turn around my cracked one with such a low cost.
Thread Starter
|
Mudding
Joined: Feb 2014
Posts: 205
Likes: 16
From: Atlanta, GA
OK. UPDATE.
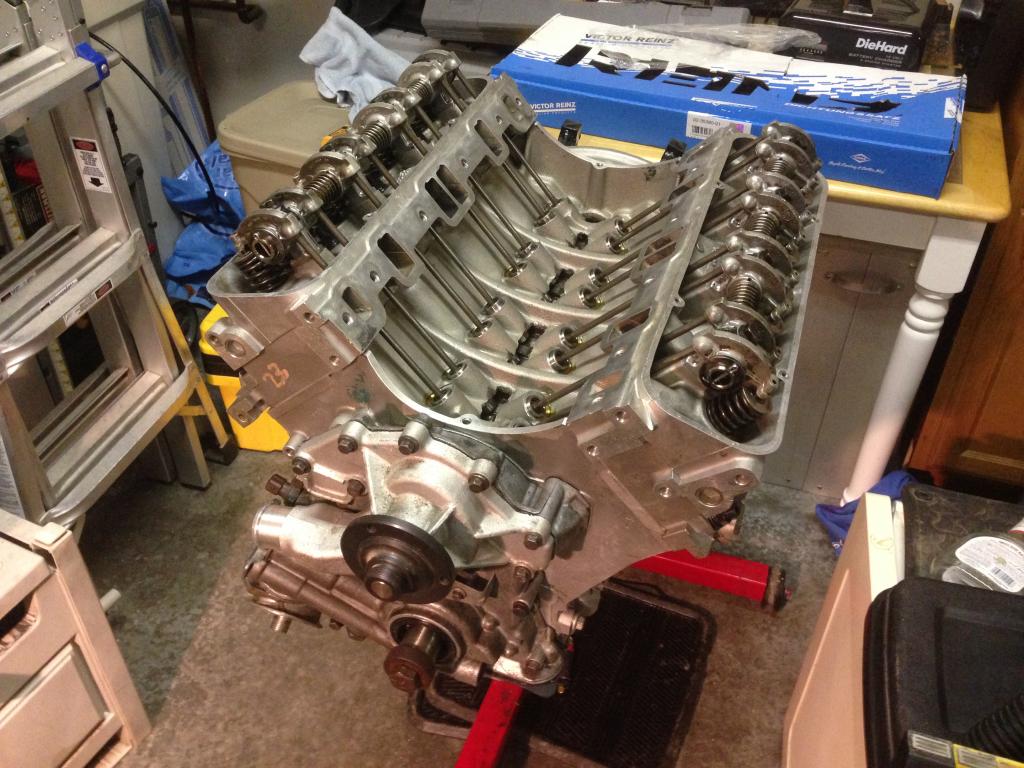
Bottom end is all back together.
New piston rings, crank and cam gears, new timing chain, all new seals, new main and conrod bearings, crank ground and polished to .010 sizes, tappets inspected and primed, etc etc. New rear core plug. Threw in a block heater while I was at it since this will be in Alaska for a while. Of course all the liners are now pinned as well. Much easier than I thought it would be.
I've also put in a new oil pump, and the water pump was already very new. Threw on a new gasket though. Cleaned up all the pistons.
Everything from the oil pan up is back together. A good dose of oil and assembly lube on everything. Wrapped it all up in a garbage bag to keep FOD out until I get the heads back.
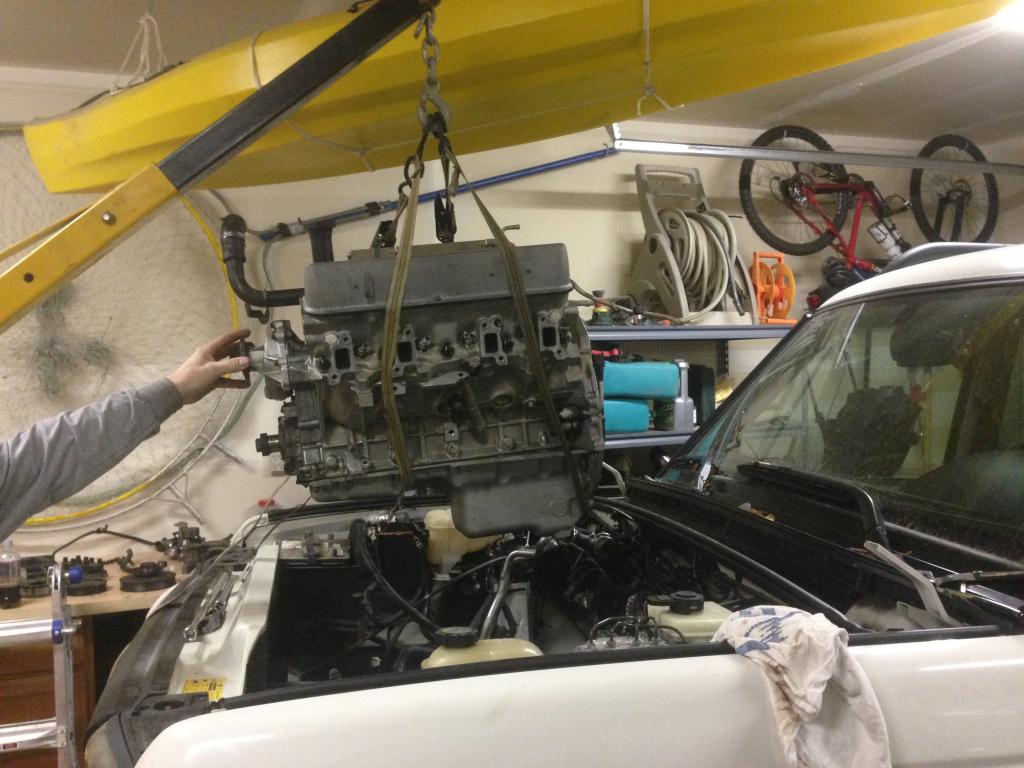
Heads were sent off to the shop to be rebuilt last week. Upon inspection, they found a circle hammered into the deck caused by the slipped liner. Must have been 1/32" deep. You could get a whole fingernail in there. So, it's being sent out to be welded, and then the head will be decked smooth. Then both will be rebuilt. I should have these back in a week or two. Then buy a new flexplate, and an ARP stud kit, then slip this back into the engine bay My nice freshly cleaned engine bay.
Then, as I am not the one who took the whole top end apart, I'll have to piece this puzzle back together. See what needs replaced as I go. I'll be putting in all new coolant hoses and a new radiator and t-stat. I figure I'll just get any cooling related possibilities solved before they ever happen with putting in all new from the start.
Bottom end is all back together.
New piston rings, crank and cam gears, new timing chain, all new seals, new main and conrod bearings, crank ground and polished to .010 sizes, tappets inspected and primed, etc etc. New rear core plug. Threw in a block heater while I was at it since this will be in Alaska for a while. Of course all the liners are now pinned as well. Much easier than I thought it would be.
I've also put in a new oil pump, and the water pump was already very new. Threw on a new gasket though. Cleaned up all the pistons.
Everything from the oil pan up is back together. A good dose of oil and assembly lube on everything. Wrapped it all up in a garbage bag to keep FOD out until I get the heads back.
Heads were sent off to the shop to be rebuilt last week. Upon inspection, they found a circle hammered into the deck caused by the slipped liner. Must have been 1/32" deep. You could get a whole fingernail in there. So, it's being sent out to be welded, and then the head will be decked smooth. Then both will be rebuilt. I should have these back in a week or two. Then buy a new flexplate, and an ARP stud kit, then slip this back into the engine bay
My nice freshly cleaned engine bay. Then, as I am not the one who took the whole top end apart, I'll have to piece this puzzle back together. See what needs replaced as I go. I'll be putting in all new coolant hoses and a new radiator and t-stat. I figure I'll just get any cooling related possibilities solved before they ever happen with putting in all new from the start.


Last edited by knightmetro; May 27, 2014 at 01:09 PM.

Thread Starter
|
Mudding
Joined: Feb 2014
Posts: 205
Likes: 16
From: Atlanta, GA
OK OK..... I know I have been super lazy updating this.
Sooo..... the engine is back in the car. I should have it buttoned up and starting it for the first time next weekend.
So here is what ya missed.
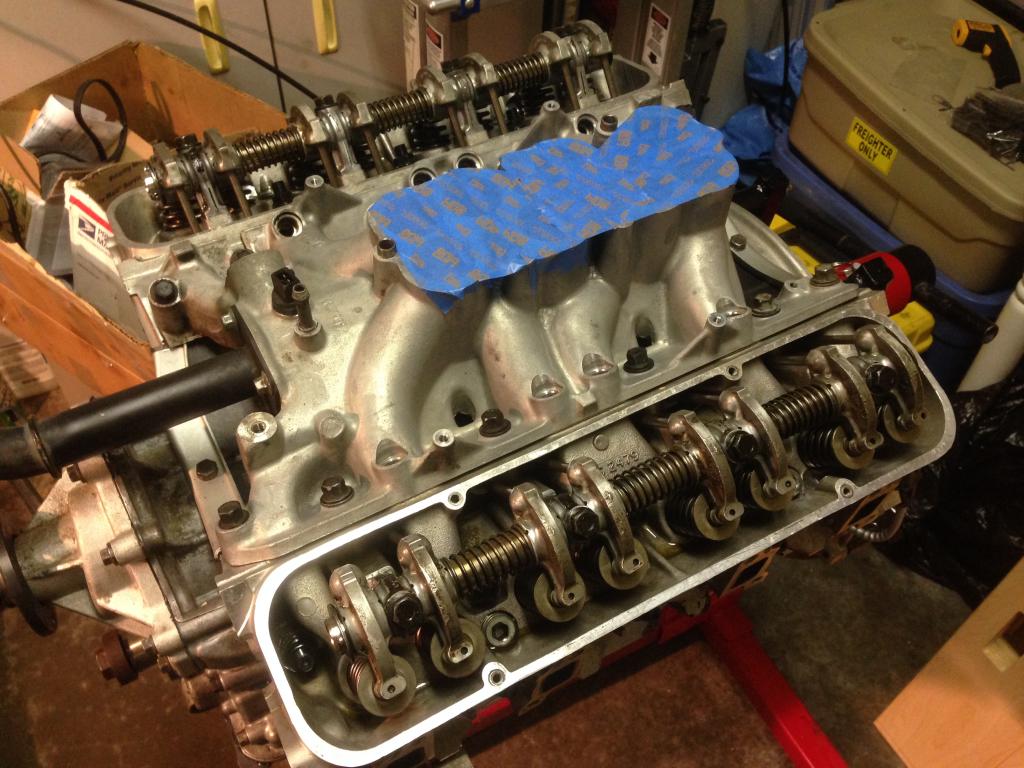
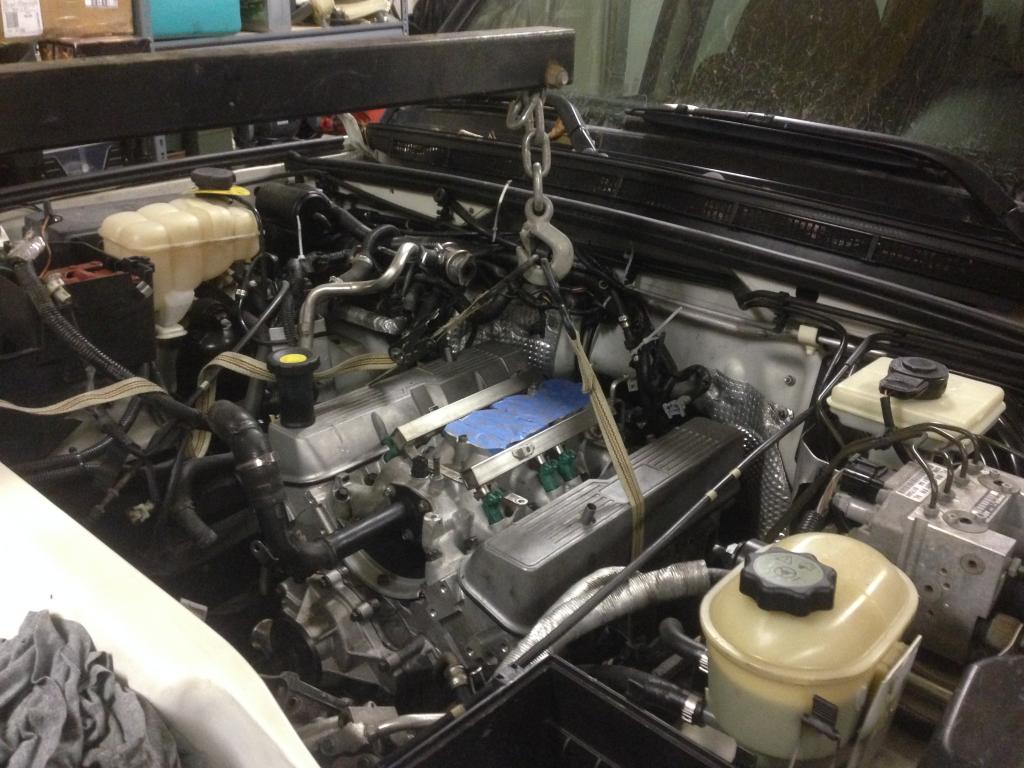
ARP head stud kit installed. Picked up the heads that went with the block I got with 77k miles and rebuilt those. Those are back on and shiny. New VR head gaskets installed and all other seals replaced. Engine dropped back in etc etc.
The rest of the parts I needed are ordered and on their way. Nissens radiator, all cooling hoses, couple bolts and rubber grommets lost during the rebuild, NGK spark plug wires, Bosch platinum plugs, transmission filter kit, Royal Purple break in oil, Dex/Merc oil for tranny, and the Britpart Gray 180 t-stat.
Here are some pics from the last few months. I really only finally started hammering this out in the last month. Getting ready for my wedding in three weeks. BUT, I have to get this done before the winter sets in hard.

Sooo..... the engine is back in the car. I should have it buttoned up and starting it for the first time next weekend.
So here is what ya missed.
ARP head stud kit installed. Picked up the heads that went with the block I got with 77k miles and rebuilt those. Those are back on and shiny. New VR head gaskets installed and all other seals replaced. Engine dropped back in etc etc.
The rest of the parts I needed are ordered and on their way. Nissens radiator, all cooling hoses, couple bolts and rubber grommets lost during the rebuild, NGK spark plug wires, Bosch platinum plugs, transmission filter kit, Royal Purple break in oil, Dex/Merc oil for tranny, and the Britpart Gray 180 t-stat.
Here are some pics from the last few months. I really only finally started hammering this out in the last month. Getting ready for my wedding in three weeks. BUT, I have to get this done before the winter sets in hard.


Last edited by knightmetro; Nov 5, 2014 at 12:13 PM.
Thread Starter
|
Mudding
Joined: Feb 2014
Posts: 205
Likes: 16
From: Atlanta, GA
What comes next...
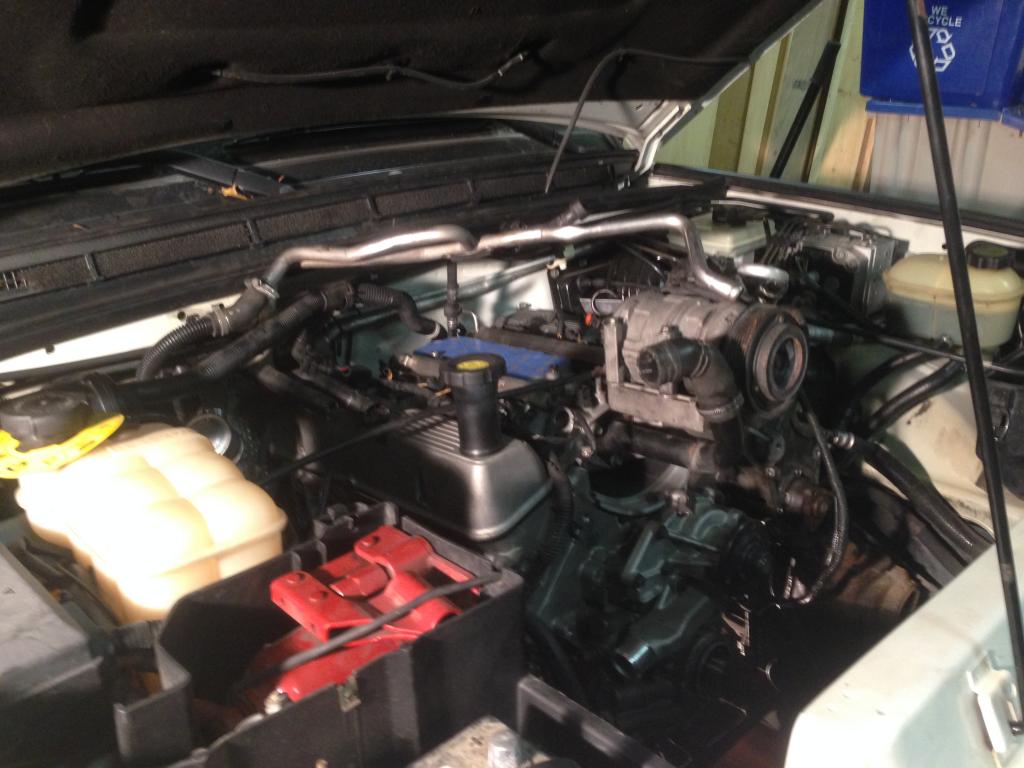
I have this going in another thread, but I'm getting rid of the SAI before I move on. Then...
1. Well I have to drain out 3/4 tank of gas that's been sitting in the car for 1-2 years.
2. Last few plugs and connectors to figure out where they go as I'm not the one who torn down the top end of the engine.
3. Install the intake, new spark plug wires, new spark plugs, new belt, new tensioner.
4. Bolt the flywheel to the torque converter.
5. Fill up the old cooling system with water.
6. Fill up the block with the RP run in oil.
7. Prime the oil system and fire her up!
After the break in I'll drop out the run in oil and filter, fill her up with some GTX dino oil, and give her a test drive. Then we will run the Moroso ceramic sealer through the cooling system to seal up any microcracks and porosity in the block. Then finally we'll let that dry, drop the entire old cooling system out and install the new radiator, t-stat, and all of the new hoses. Fill her up with some new antifreeze, and see if she can handle being a daily driver.

Pro Wrench
Joined: Nov 2011
Posts: 1,462
Likes: 32
From: Duxbury MA
The plugs on the top of the motor are pretty straightforward. The temp sensor is in the front by itself so there should be no confusion there. The tps switch uses a funky plug so you can't mess that up. On the driver's side toward the back of the motor the harness has three plugs that can be confused. The plugs are for the purge valve, the SAI vacuum solenoid and the coil. The SAI plug is grey, and the other two are black. The black plug for the purge valve has a short enough lead that you can't plug it into the coil.
Regarding your choice of oil, I would go with Rotella instead of GTX. The general consensus seems to be that it performs much better in these old-school flat tappet engines.
Regarding your choice of oil, I would go with Rotella instead of GTX. The general consensus seems to be that it performs much better in these old-school flat tappet engines.
Thread Starter
|
Mudding
Joined: Feb 2014
Posts: 205
Likes: 16
From: Atlanta, GA
I am going with Rotella 5w-40 T6 for the long run, but for the first 3,000 miles of break in, I'm going with a decent dino oil.
I'd do Rotella conv oil, but it's not rated to how cold it is this time of the year.
I'd do Rotella conv oil, but it's not rated to how cold it is this time of the year.

