
Replace Wires Without Removing IM


7th Gear
Joined: Jun 2014
Posts: 7
Likes: 0
Hey guys, First time poster who's about to dive into this project on my 2001 Discovery II. Should I be removing the battery cables before starting the job? How can I tell if my engine has secondary air? Lastly (for now), Harbor Freight offers several affordable options for long-reach pliers, both straight and bent. Would something like this set be advisable: 16" Long Reach Pliers Set
Thanks very much.
Thanks very much.

Super Moderator
Joined: Nov 2009
Posts: 5,847
Likes: 106
From: Arkansas
Hey guys, First time poster who's about to dive into this project on my 2001 Discovery II. Should I be removing the battery cables before starting the job? How can I tell if my engine has secondary air? Lastly (for now), Harbor Freight offers several affordable options for long-reach pliers, both straight and bent. Would something like this set be advisable: 16" Long Reach Pliers Set
Thanks very much.
Thanks very much.
search for ERR6621 here:
RovahFarm for all your new Land Rover Parts and Accessories

Super Moderator
Joined: Jul 2013
Posts: 5,794
Likes: 211
From: dallas texas
Hey guys, First time poster who's about to dive into this project on my 2001 Discovery II. Should I be removing the battery cables before starting the job? How can I tell if my engine has secondary air? Lastly (for now), Harbor Freight offers several affordable options for long-reach pliers, both straight and bent. Would something like this set be advisable: 16" Long Reach Pliers Set
Thanks very much.
Thanks very much.
Those bent pliers will work but just to pry not to clamp and pull.
I used my fingers, no tools, but I have long fingers. Cheap bent screwdriver is better option. Just remember to start bottom up on the wires to the coil, when putting on.
And disconnect your ground wire from battery terminal is always a good idea for any electrical work.
7th Gear
Joined: Jun 2014
Posts: 7
Likes: 0
Sai- do you have pump up next to the pass side firewall, behind reservoir, or a void?
Those bent pliers will work but just to pry not to clamp and pull.
I used my fingers, no tools, but I have long fingers. Cheap bent screwdriver is better option. Just remember to start bottom up on the wires to the coil, when putting on.
And disconnect your ground wire from battery terminal is always a good idea for any electrical work.
Thanks Jafir and Dusty for your replies. I'm going to try and post a few pictures so you can see my setup. One thing I noticed is all of my spark plugs all appear to be accessible with an long extension and possibly a swivel adaptor. I don't forsee having to do much if any pre-prep plumbing in order to get the plugs changed out.
Here's a view of the coils. I can get my hand back there (barely) and feel all four plugs but I'd be working by braille on the lower plugs for sure....

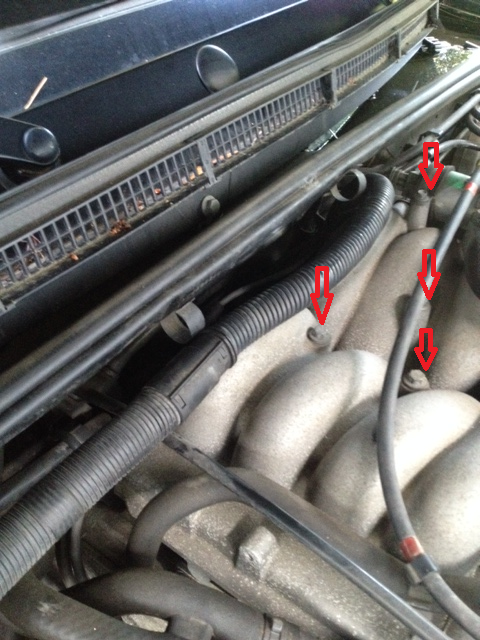
If I remove the upper manifold I assume we're talking about these bolts and some hoses??
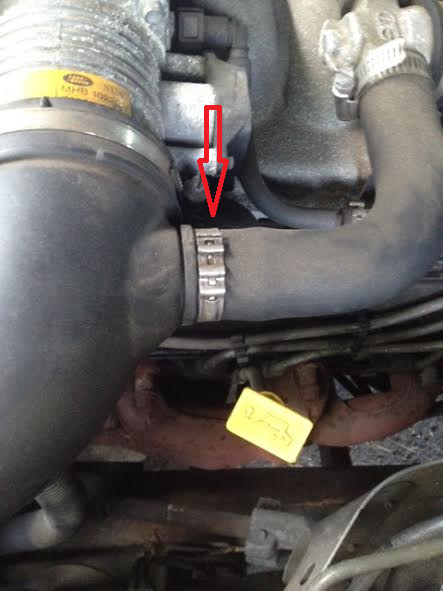
Would I need to remove this odd-looking clamp or just the traditional hose clamp to the right?
Thanks again fellas

7th Gear
Joined: Jun 2014
Posts: 7
Likes: 0
Update: Count me as another satisfied do-it-yourselfer, thanks to these posts. My truck is running GREAT for the first time in a while. I bought a 3 piece "super-long" extension set and swivel adaptor from Harbor Freight ($15) and these made quick work of the plugs. In total, the job took me three hours. I struggled mightily seating 2 or 3 of the wires in the packs, especially #2 (While accessible and visible on top, it's closer still to the firewall such that I needed to bend the rubber coil end to get it started, and this moved the innards out of alignment - ugh!). I found the bent screwdriver tip very helpful in removing the wires but worthless in installing the new ones (I found I needed to do this by hand).
Unfortunately, like another poster I ended up cracking the plastic line that runs from the coolant reservoir across the top/front of the engine. Any suggestions (parts, etc.)?
Thanks again guys!
Unfortunately, like another poster I ended up cracking the plastic line that runs from the coolant reservoir across the top/front of the engine. Any suggestions (parts, etc.)?
Thanks again guys!

I must say, during my repairs, I used this method twice, and removed the manifold once. I found that removing the manifold was easier, in my opinion, and didn't take much more time. The first time I used this method, it took about 3-4 hours. If I had removed the manifold, I could have done it in half that time.

Winching
Joined: Oct 2011
Posts: 656
Likes: 23
From: West Palm Beach, FL
I'm going to be doing my wires soon... I too have been dreading it but now Ive done so many other dreaded ( but fun) repairs Im used to it... lol maybe wheel bearing next... something fishy up front grinding sound and looser steering that seems normal.. feels draggy occasionally and grinds a little mostly when turning to right and going strait... may only be pads... will know soon enough... I have the KINGSBORNE 8mm plugs Im going to install... they look fantastic and Ive had em in the package for 2 years ... lol