Small Modification Write Ups + Index of Mods (Alex_M)
#51
 12-14-2015, 10:36 AM


No longer recommended!!! I am leaving this post up, but I no longer recommend it at least in this configuration. This would be a worthy modification if done with a filter that has a steel case. These plastic filters are not made to handle the pressure associated with modern fuel injection.
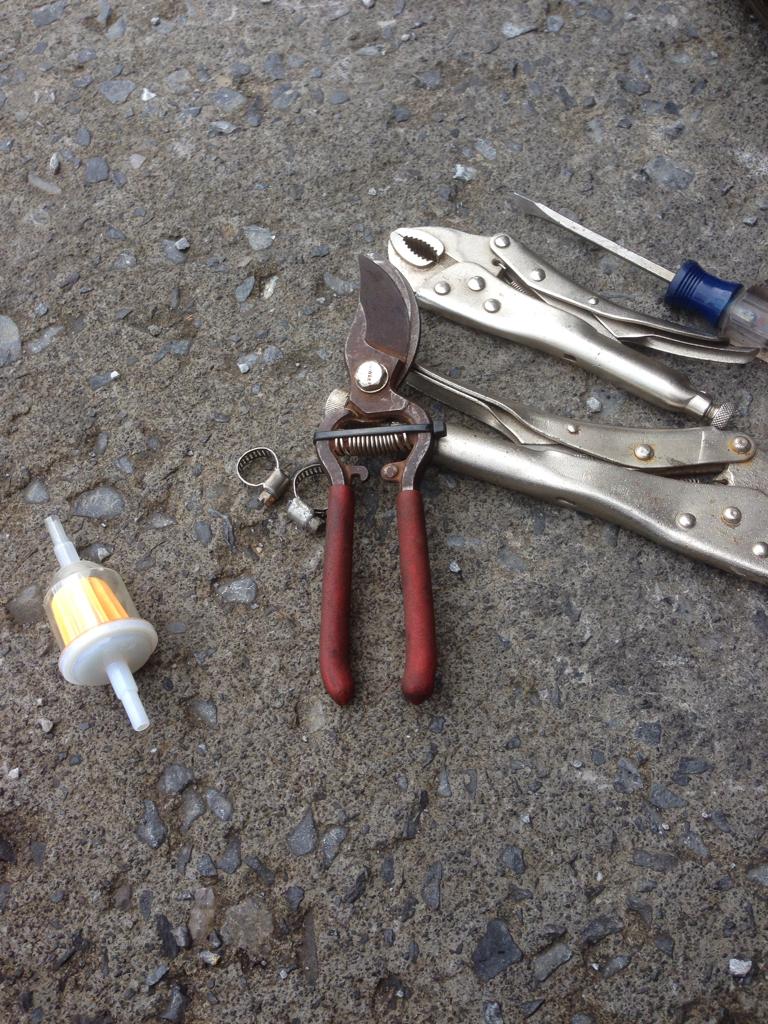
Alright guys, this one is super simple. You need a screwdriver, two pairs of vice grips, two 5/16" band clamps/hose clamps, and a Microgard 33011 fuel filter.
Edit: I ended up getting a filter that I like better because the Microgard had a slow drip. the new filter is a Prime Line 7-02323. It was about a dollar more I think, but it has enlarged ends so it shouldn't leak.
Another Edit: That Prime Line filter is working perfectly. I think the Microgard was actually pinching a little bit judging by how it looked after I pulled it and decreasing fuel rail pressure. The truck actually seems to run better with the Prime Line filter and all drips have been completely eliminated.

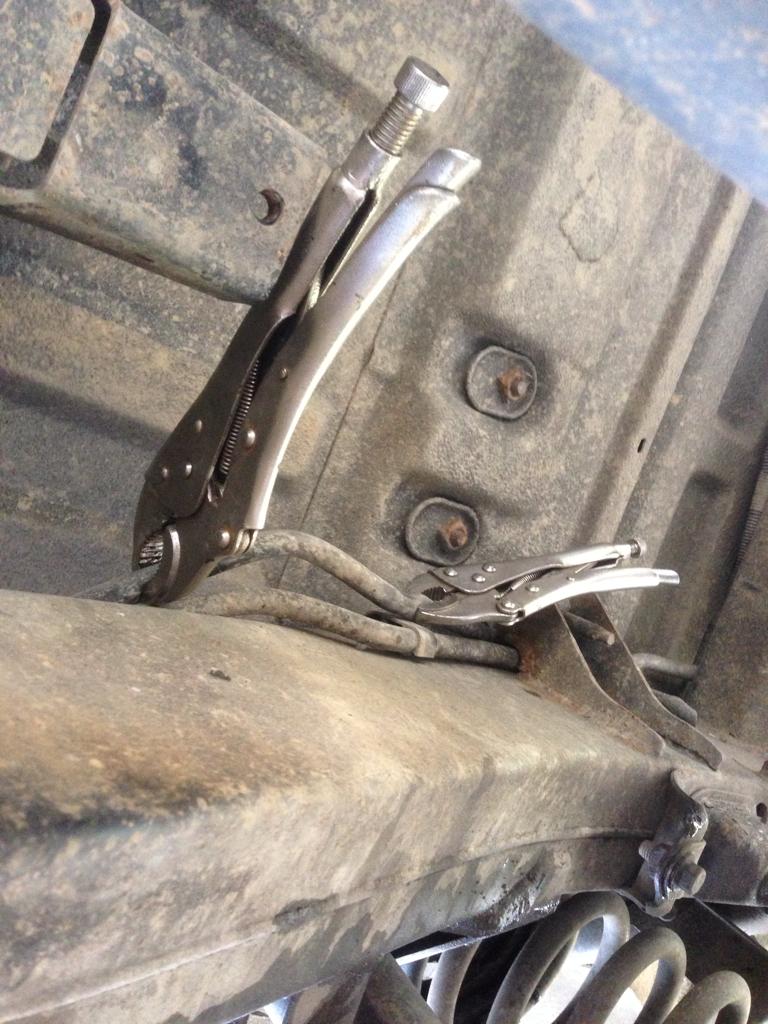
Now, crawl under your truck from the passengers side, undo the top fuel hose from the clamp holding it to the frame, and use the vice grips several inches apart. PUT THE ON TIGHT. VERY TIGHT.
Now, WHILE WEARING SAFETY GLASSES, use a pair of flower shears or wire snips to clip the fuel line in half. Seriously, wear some glasses. I didn't and I got a little gas in my eye. Luckily I had a bottle of water 5 ft away to flush my eye. Now you may still be spewing some duel. Don't worry about it, just let it finish spewing before you put the filter in. That's how I got the gas in my eye. Slide the band clamps over each end of the line, slide the fuel filter in, and clamp it down tight. Put it in in the right direction as shown if you wish to be able to see all the grime (or lack there of) that you filter out.

Now start up your truck and let it run. Watch for any drips. Mine was leaking at first so I added an extra clamp on the pump side and I was all good.
Best of luck, ask any questions if you've got any!
Alright guys, this one is super simple. You need a screwdriver, two pairs of vice grips, two 5/16" band clamps/hose clamps, and a Microgard 33011 fuel filter.
Edit: I ended up getting a filter that I like better because the Microgard had a slow drip. the new filter is a Prime Line 7-02323. It was about a dollar more I think, but it has enlarged ends so it shouldn't leak.
Another Edit: That Prime Line filter is working perfectly. I think the Microgard was actually pinching a little bit judging by how it looked after I pulled it and decreasing fuel rail pressure. The truck actually seems to run better with the Prime Line filter and all drips have been completely eliminated.
Now, crawl under your truck from the passengers side, undo the top fuel hose from the clamp holding it to the frame, and use the vice grips several inches apart. PUT THE ON TIGHT. VERY TIGHT.
Now, WHILE WEARING SAFETY GLASSES, use a pair of flower shears or wire snips to clip the fuel line in half. Seriously, wear some glasses. I didn't and I got a little gas in my eye. Luckily I had a bottle of water 5 ft away to flush my eye. Now you may still be spewing some duel. Don't worry about it, just let it finish spewing before you put the filter in. That's how I got the gas in my eye. Slide the band clamps over each end of the line, slide the fuel filter in, and clamp it down tight. Put it in in the right direction as shown if you wish to be able to see all the grime (or lack there of) that you filter out.
Now start up your truck and let it run. Watch for any drips. Mine was leaking at first so I added an extra clamp on the pump side and I was all good.
Best of luck, ask any questions if you've got any!
Last edited by Alex_M; 12-24-2021 at 12:46 PM.
#52
12-15-2015, 07:55 AM

Alright guys, this one is super simple. You need a screwdriver, two pairs of vice grips, two 5/16" band clamps/hose clamps, and a Microgard 33011 fuel filter.

Now, crawl under your truck from the passengers side, undo the top fuel hose from the clamp holding it to the frame, and use the vice grips several inches apart. PUT THE ON TIGHT. VERY TIGHT.

Now, WHILE WEARING SAFETY GLASSES, use a pair of flower shears or wire snips to clip the fuel line in half. Seriously, wear some glasses. I didn't and I got a little gas in my eye. Luckily I had a bottle of water 5 ft away to flush my eye. Now you may still be spewing some duel. Don't worry about it, just let it finish spewing before you put the filter in. That's how I got the gas in my eye. Slide the band clamps over each end of the line, slide the fuel filter in, and clamp it down tight. Put it in in the right direction as shown if you wish to be able to see all the grime (or lack there of) that you filter out.

Now start up your truck and let it run. Watch for any drips. Mine was leaking at first so I added an extra clamp on the pump side and I was all good.
Best of luck, ask any questions if you've got any!
Now, crawl under your truck from the passengers side, undo the top fuel hose from the clamp holding it to the frame, and use the vice grips several inches apart. PUT THE ON TIGHT. VERY TIGHT.
Now, WHILE WEARING SAFETY GLASSES, use a pair of flower shears or wire snips to clip the fuel line in half. Seriously, wear some glasses. I didn't and I got a little gas in my eye. Luckily I had a bottle of water 5 ft away to flush my eye. Now you may still be spewing some duel. Don't worry about it, just let it finish spewing before you put the filter in. That's how I got the gas in my eye. Slide the band clamps over each end of the line, slide the fuel filter in, and clamp it down tight. Put it in in the right direction as shown if you wish to be able to see all the grime (or lack there of) that you filter out.
Now start up your truck and let it run. Watch for any drips. Mine was leaking at first so I added an extra clamp on the pump side and I was all good.
Best of luck, ask any questions if you've got any!
#53
12-15-2015, 11:10 AM
Lucky you!
One thing I think I would do differently is actually cut off the 1/4" filter ends and squeeze those 5/16" ends into the hose. It would be tight, but if you could get it in then it definitely wouldn't leak at all. I think I'm going to try that on mine today and see what happens. Might just be out a fuel filter, but hopefully not. I'll update the write up post if I do so and it works.
Edit: the 5/16" ends didn't work, but I ended up getting a filter I like better. Editing the write up now.
Last edited by Alex_M; 12-15-2015 at 02:03 PM.
#54
12-15-2015, 03:36 PM
Whooo, pretties pictures in a write up ever! I'm going to try to start using my nice DSLR for these write ups to add a little quality and be a little nicer on the eyes.
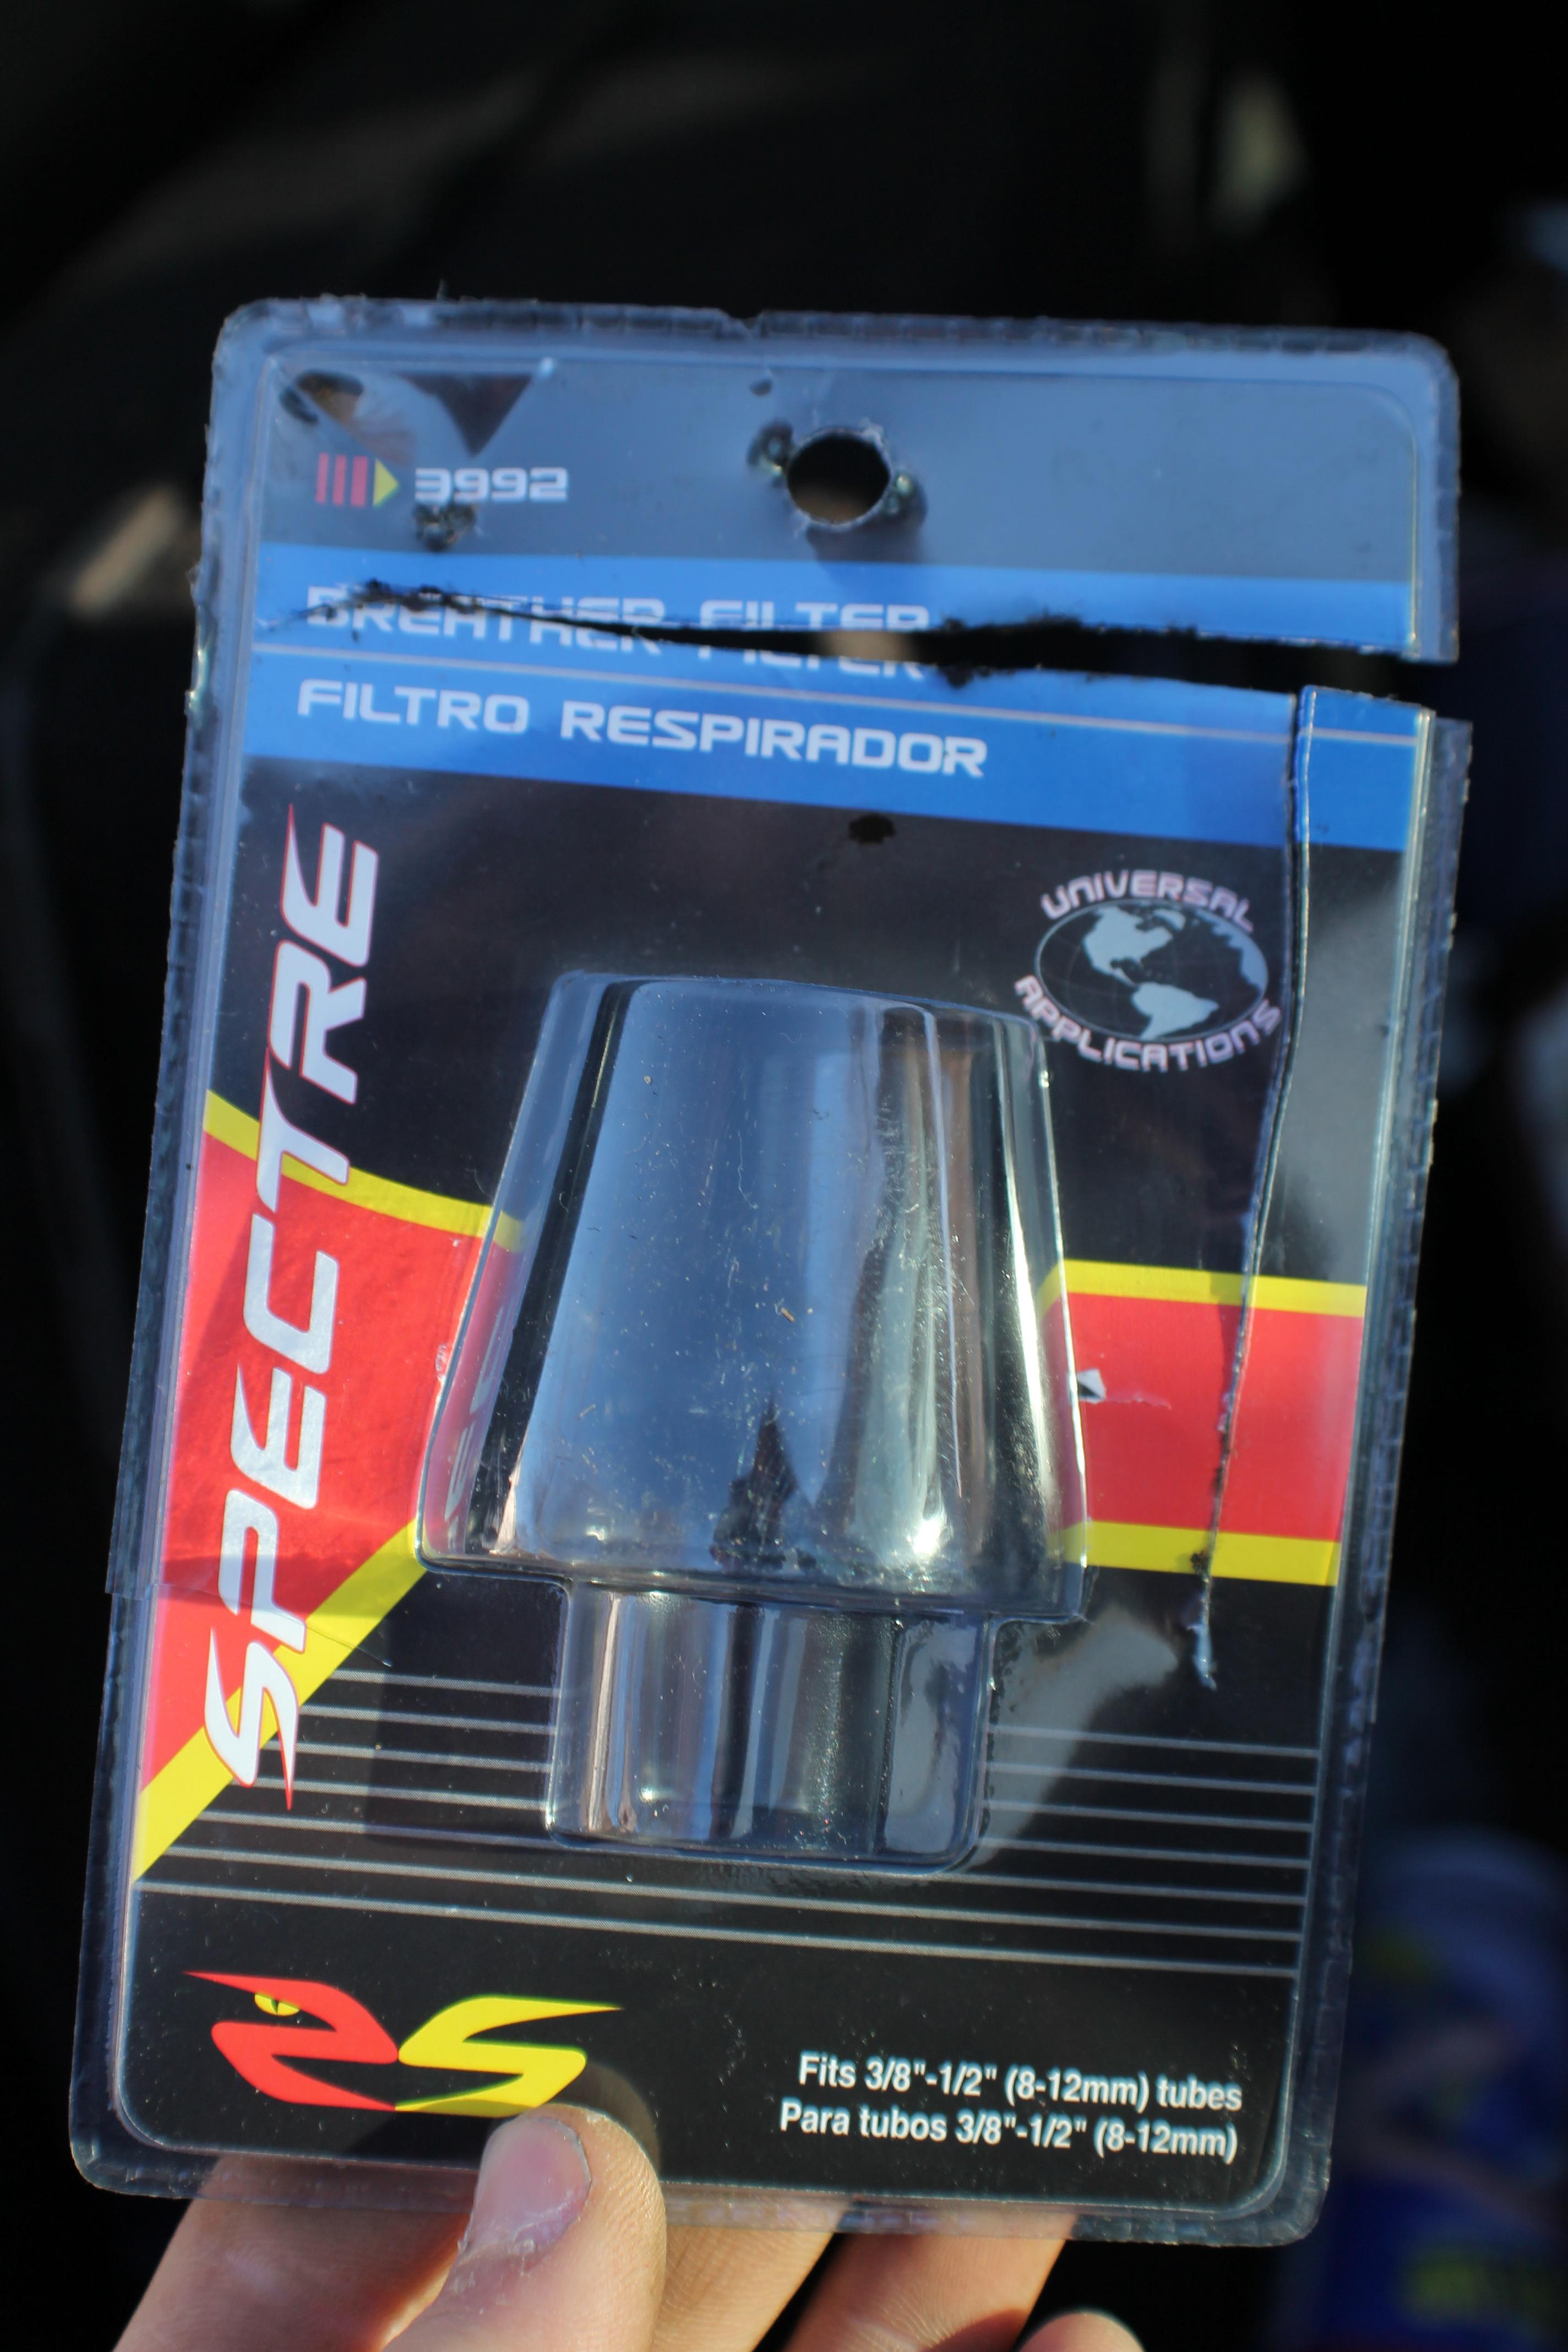
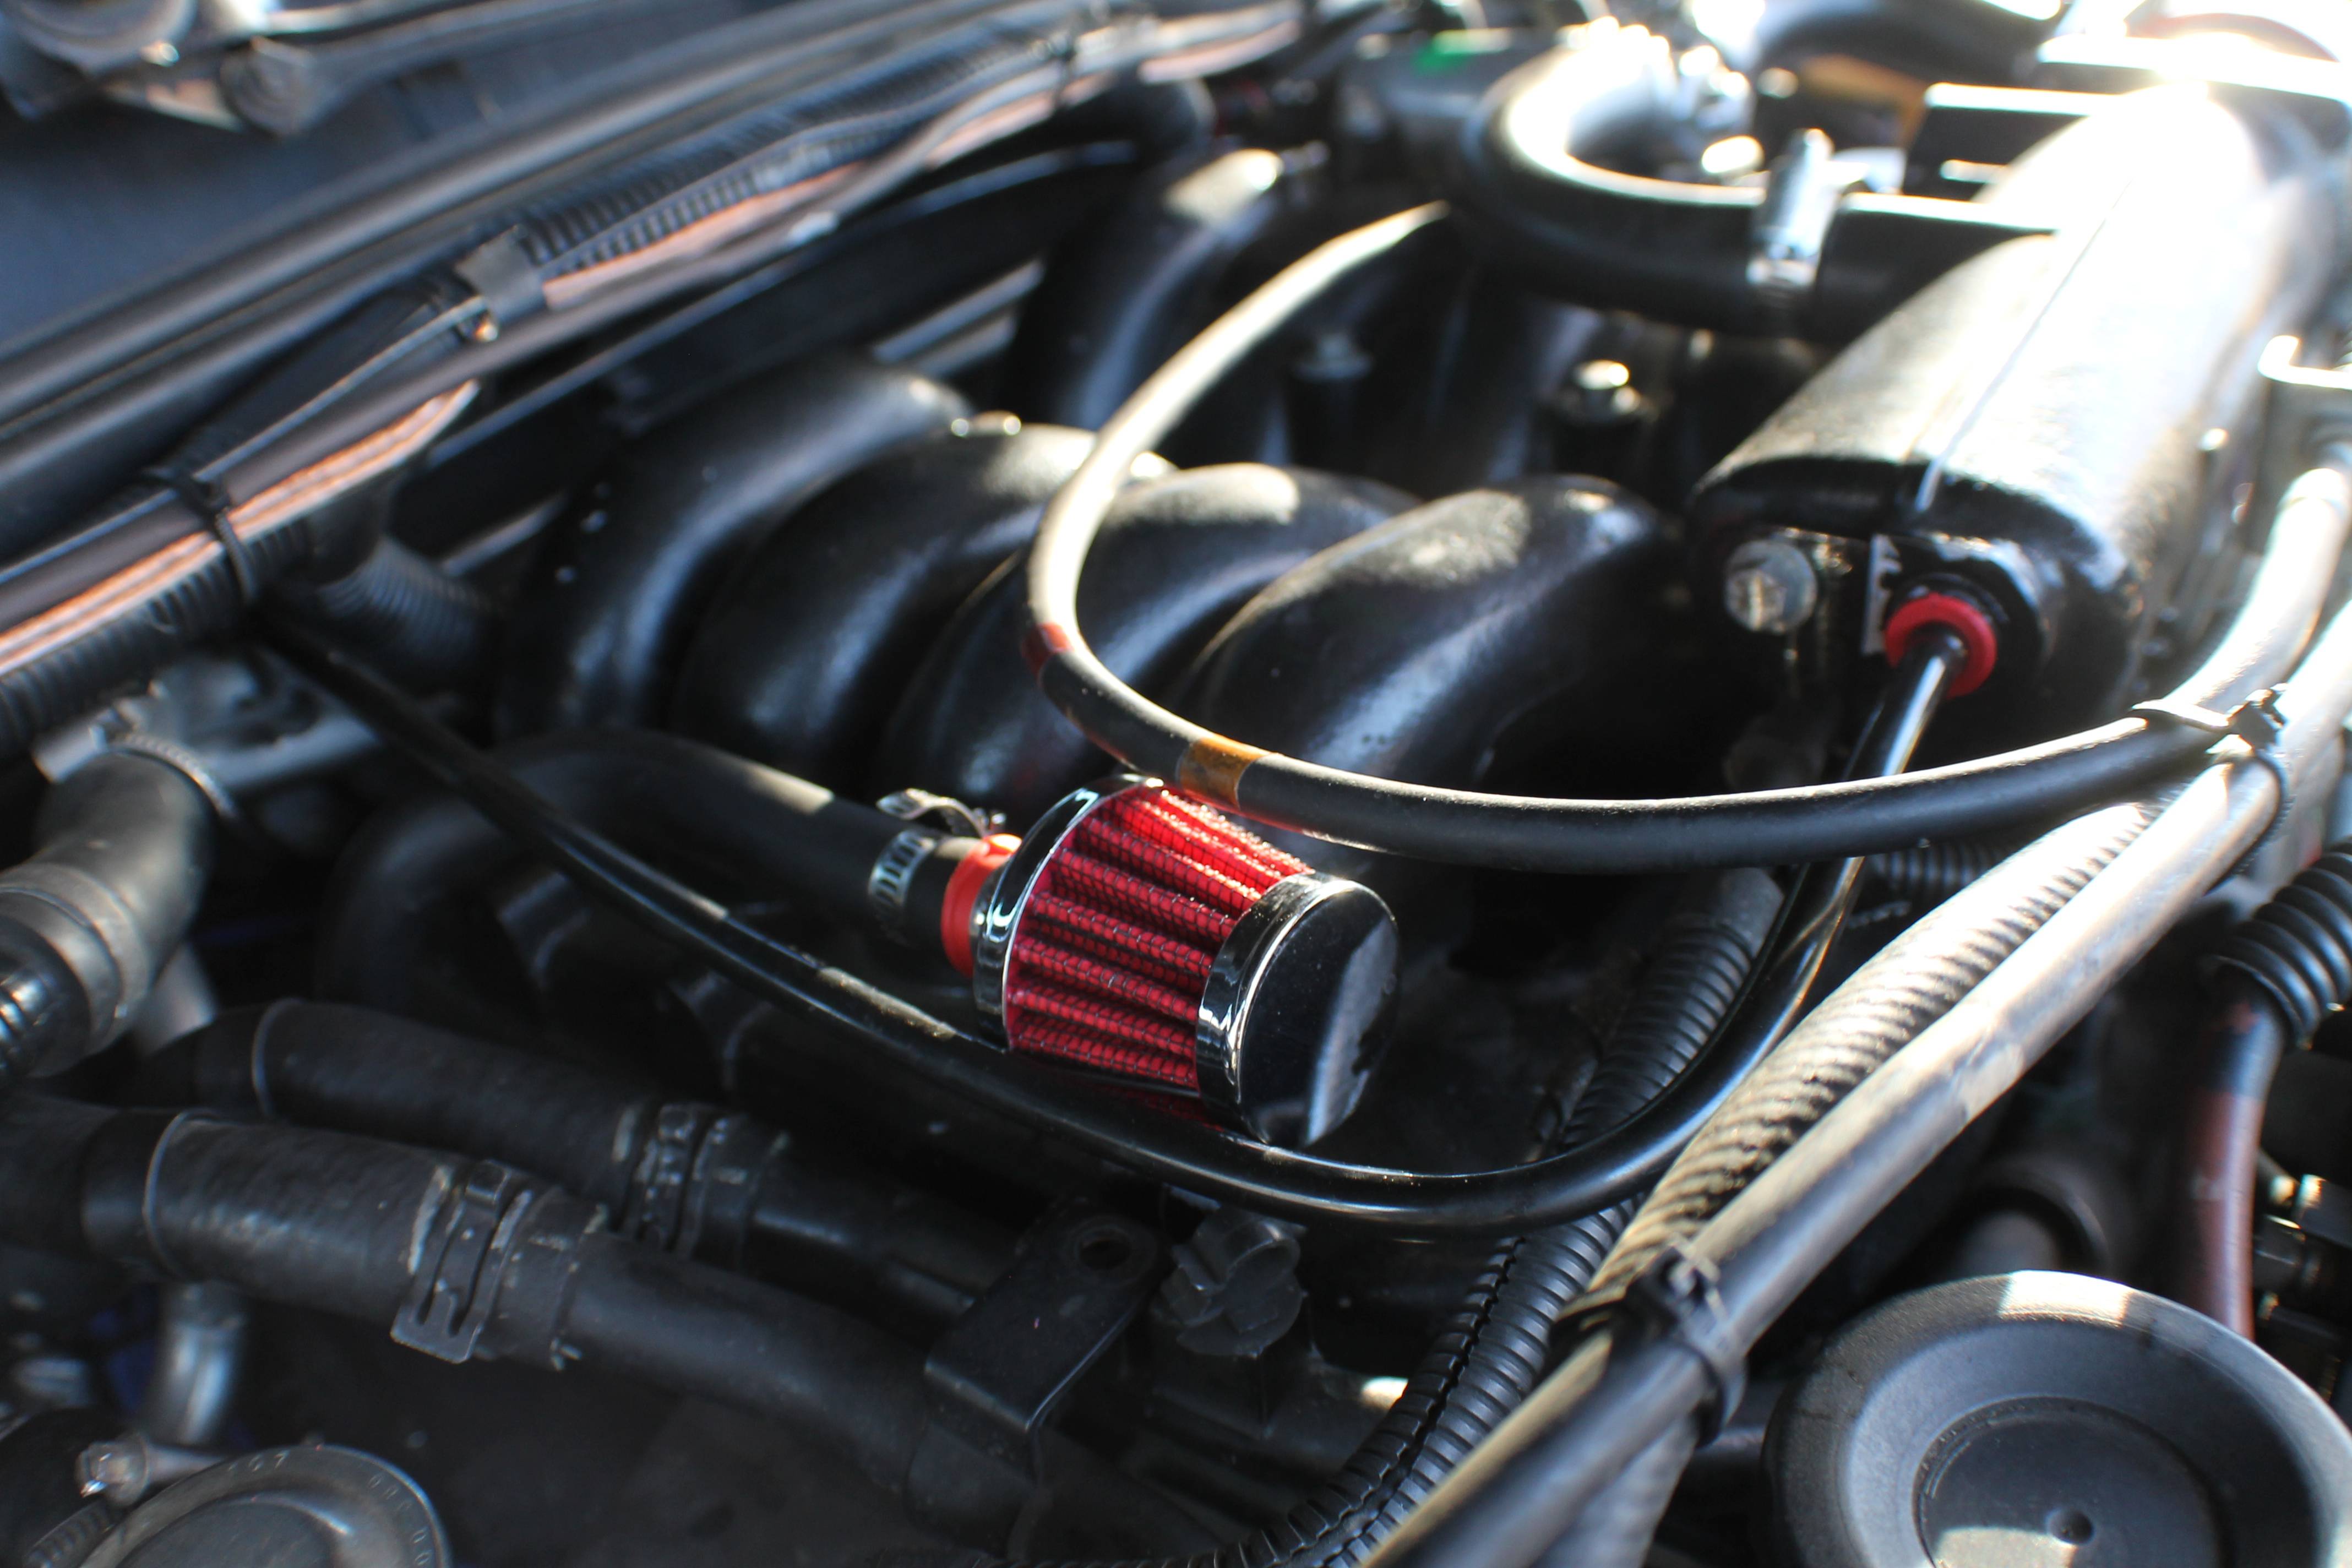
Ok, so this one is pretty simple. First, you need two Spectre 3992 Oil Breather Filters.
You'll also need a G2 ink pen or something else to use as a tube that's the same diameter and an extra band clamp. You'll want to attach it to the small filter like this.
Edit: Charlie_V said a vacutite vacuum connector, 3/8 x 3/8 works perfect in place of the G2 pen for those that would prefer the more correct route.
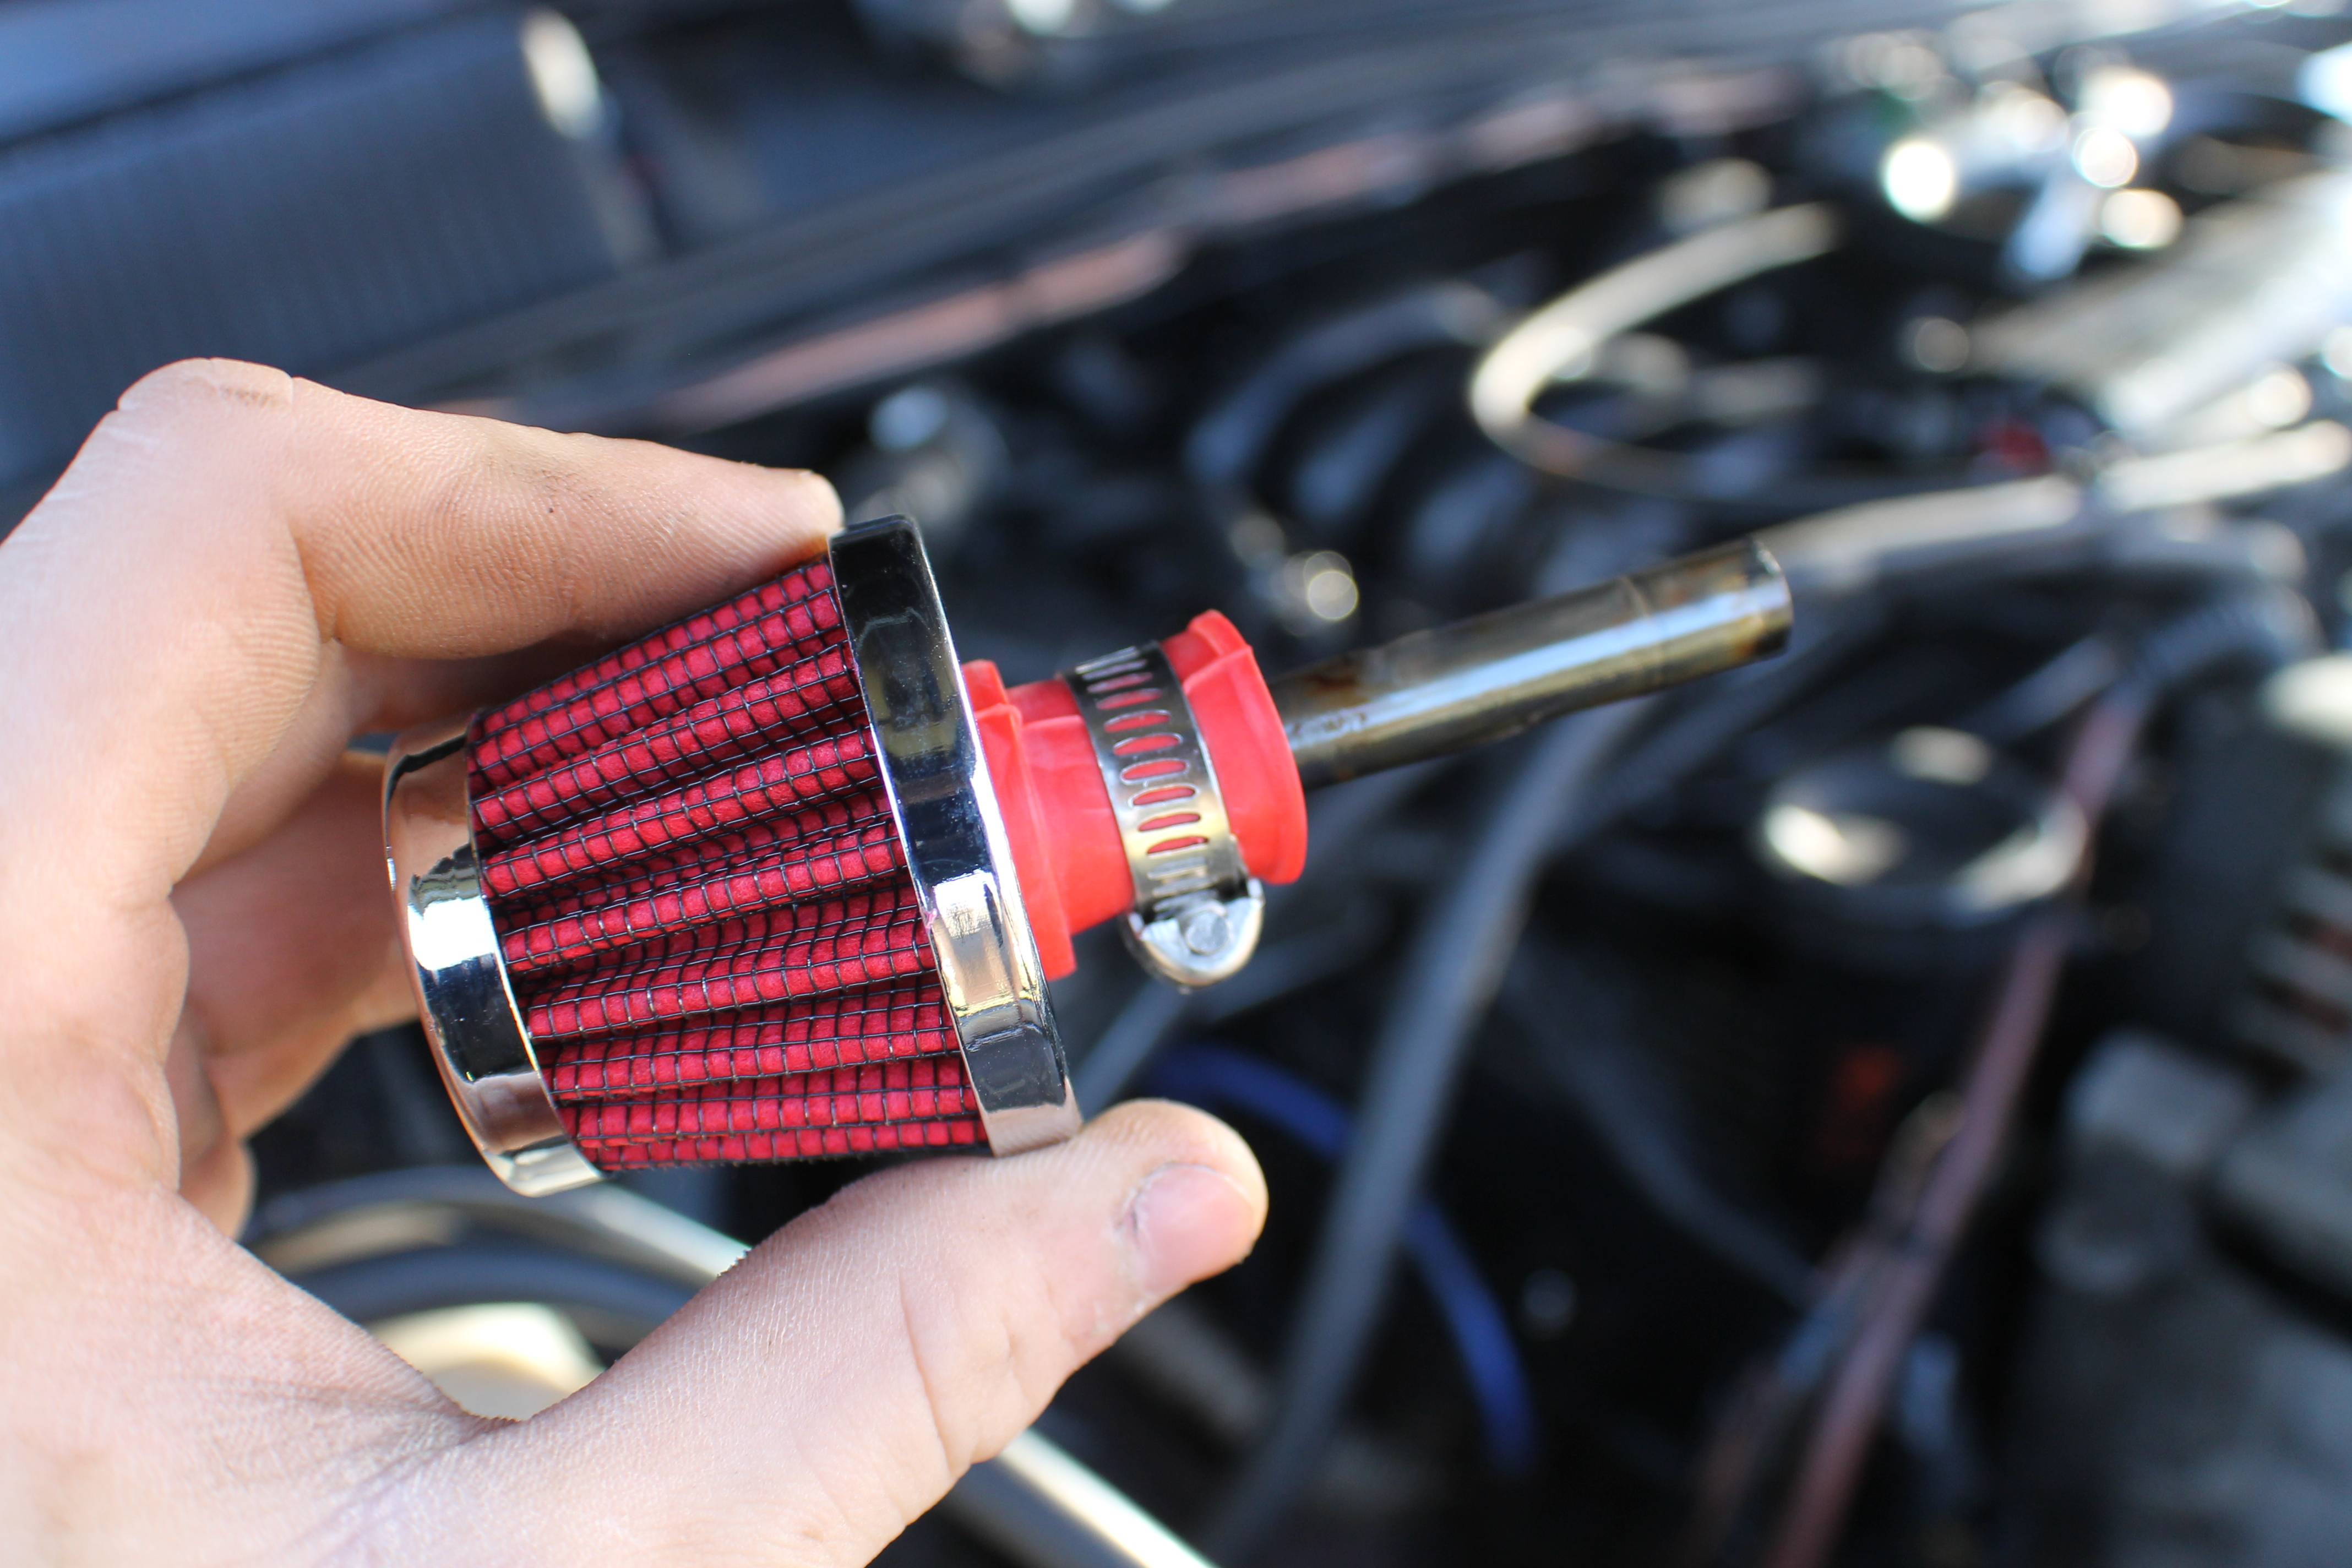
Now, cut the oil breather line in half and slide the pen into the valve cover side. Now tighten it down with that extra band clamp.
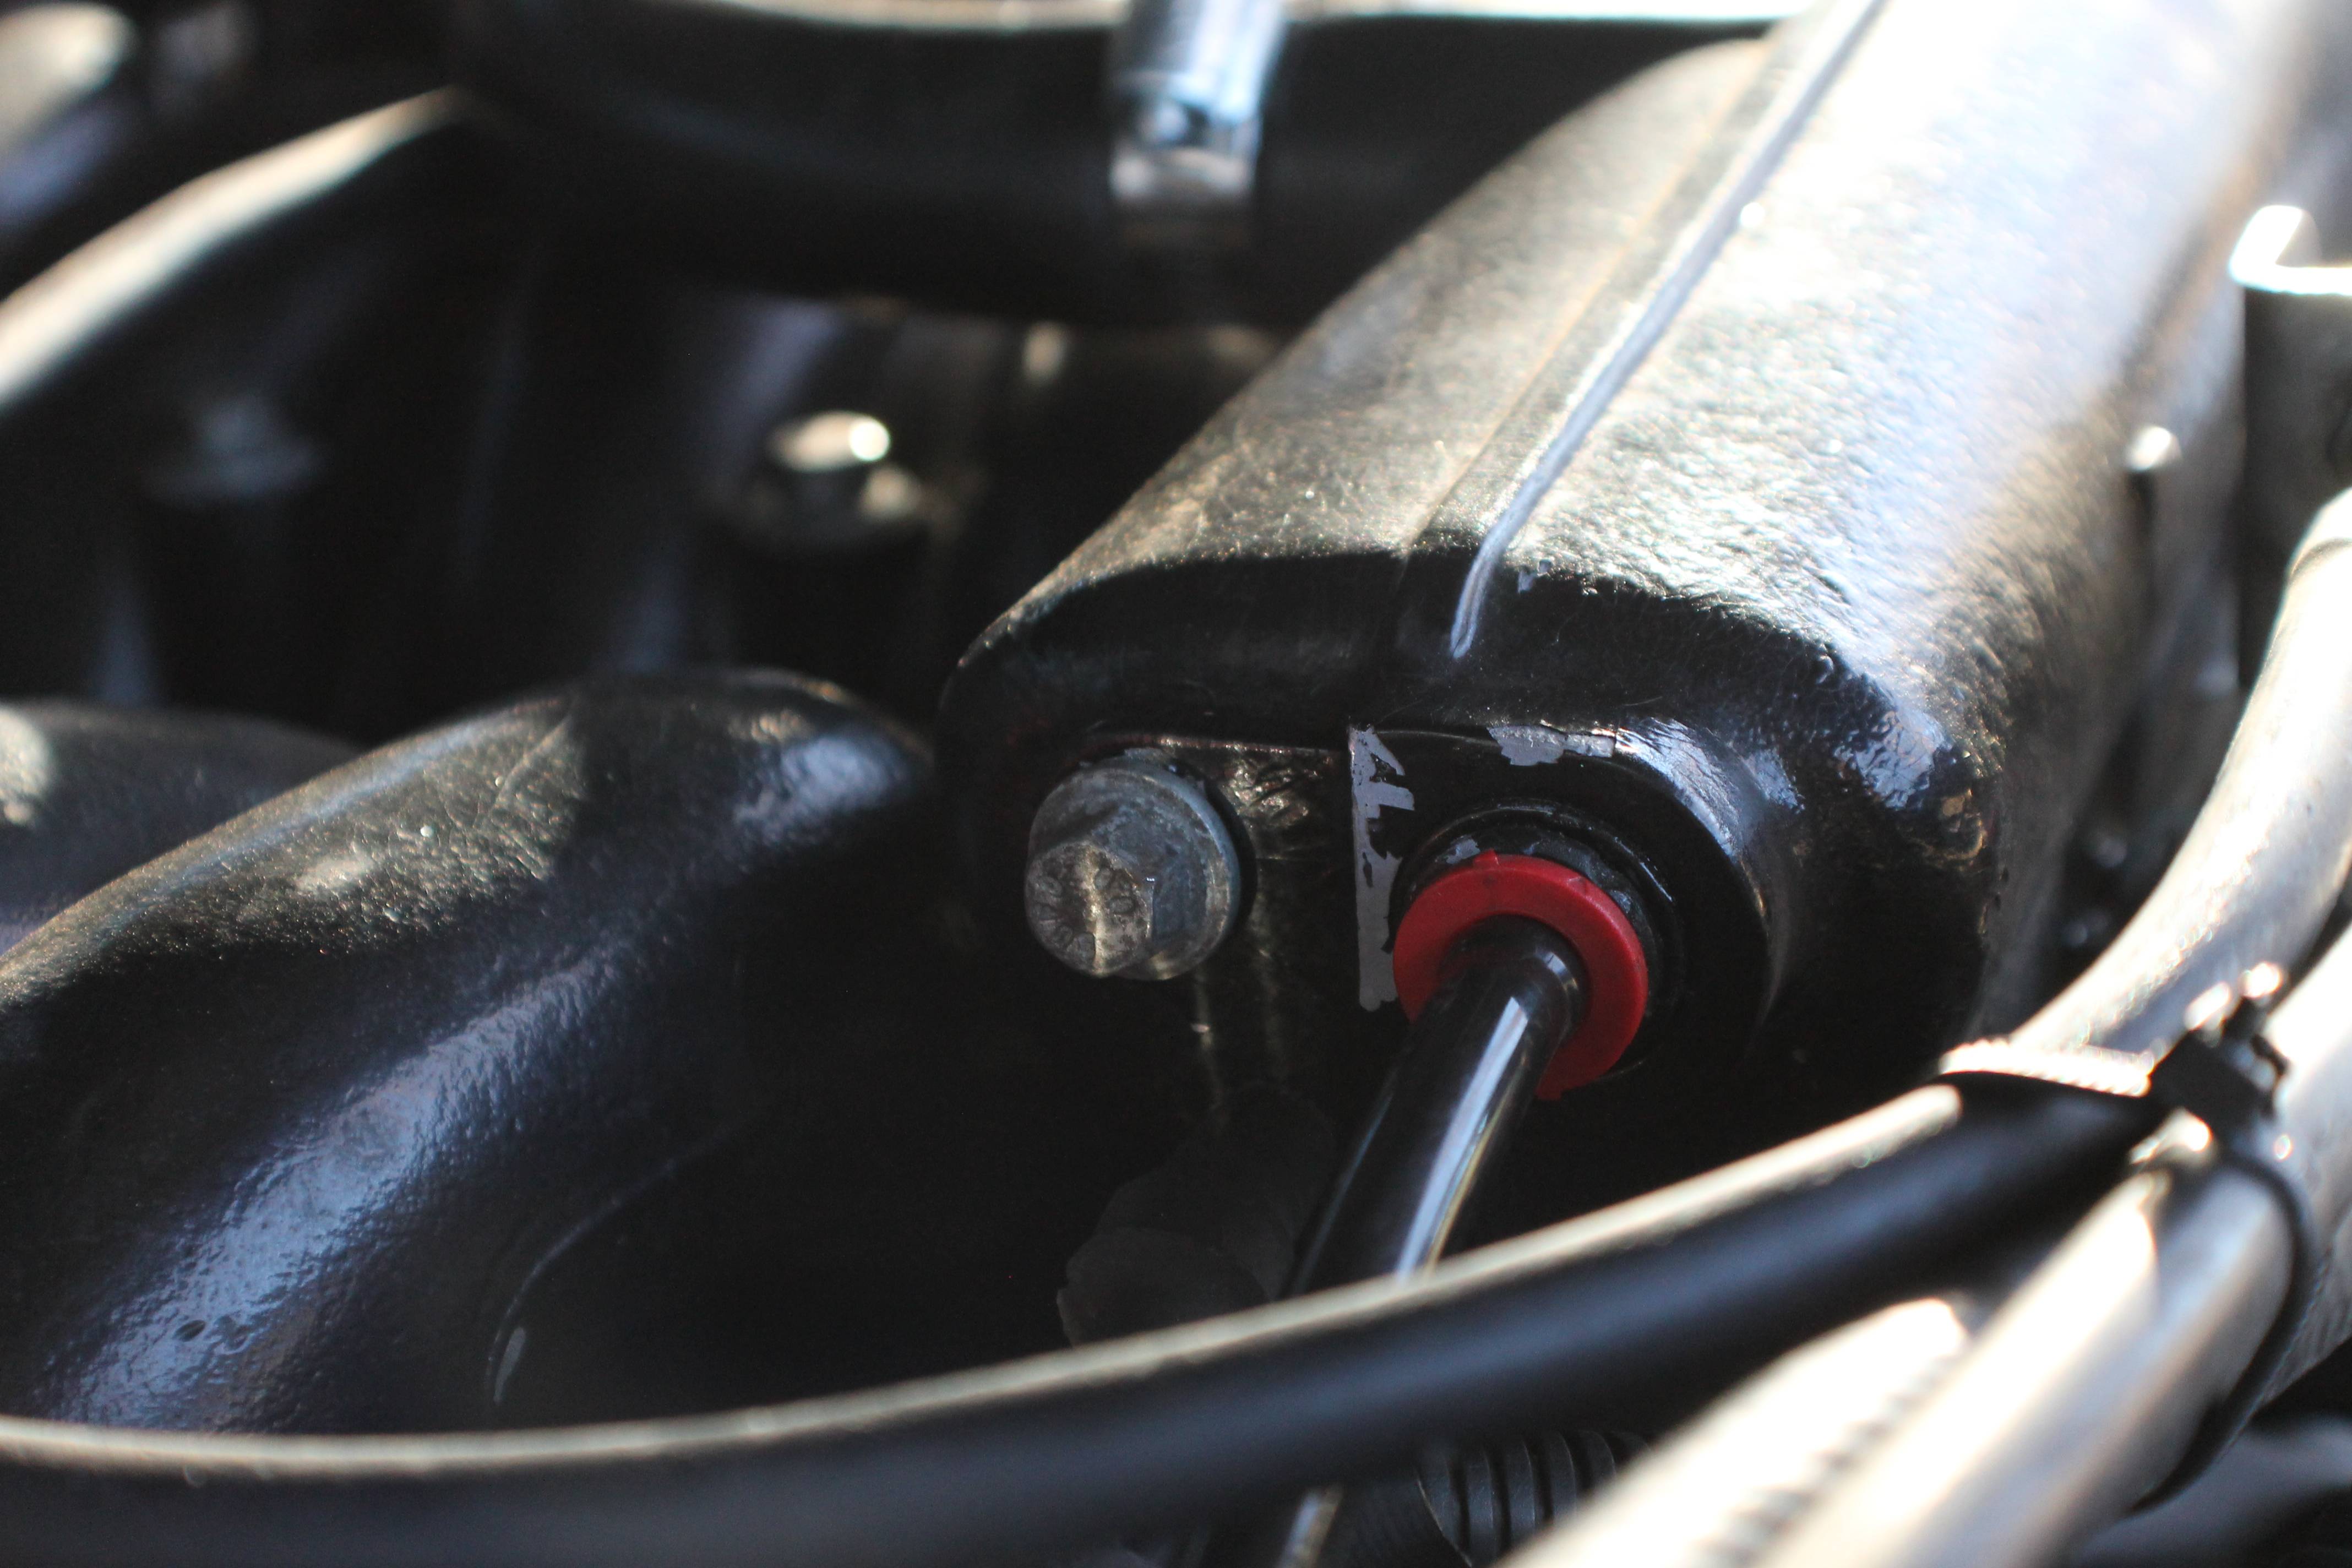
For the intake side, you'll have to block it off somehow. I accidentally broke the nipple off that the breather line attaches to, so I just threaded a plenum bolt right into the center of it. Alternatively you could get the whole thing out with threads in tact and take it to your local hardware store of choice to get a short bolt that has the same diameter and thread pattern. If you don't block this off then you'll have a MAJOR vacuum leak. The manifold bolt works fine.
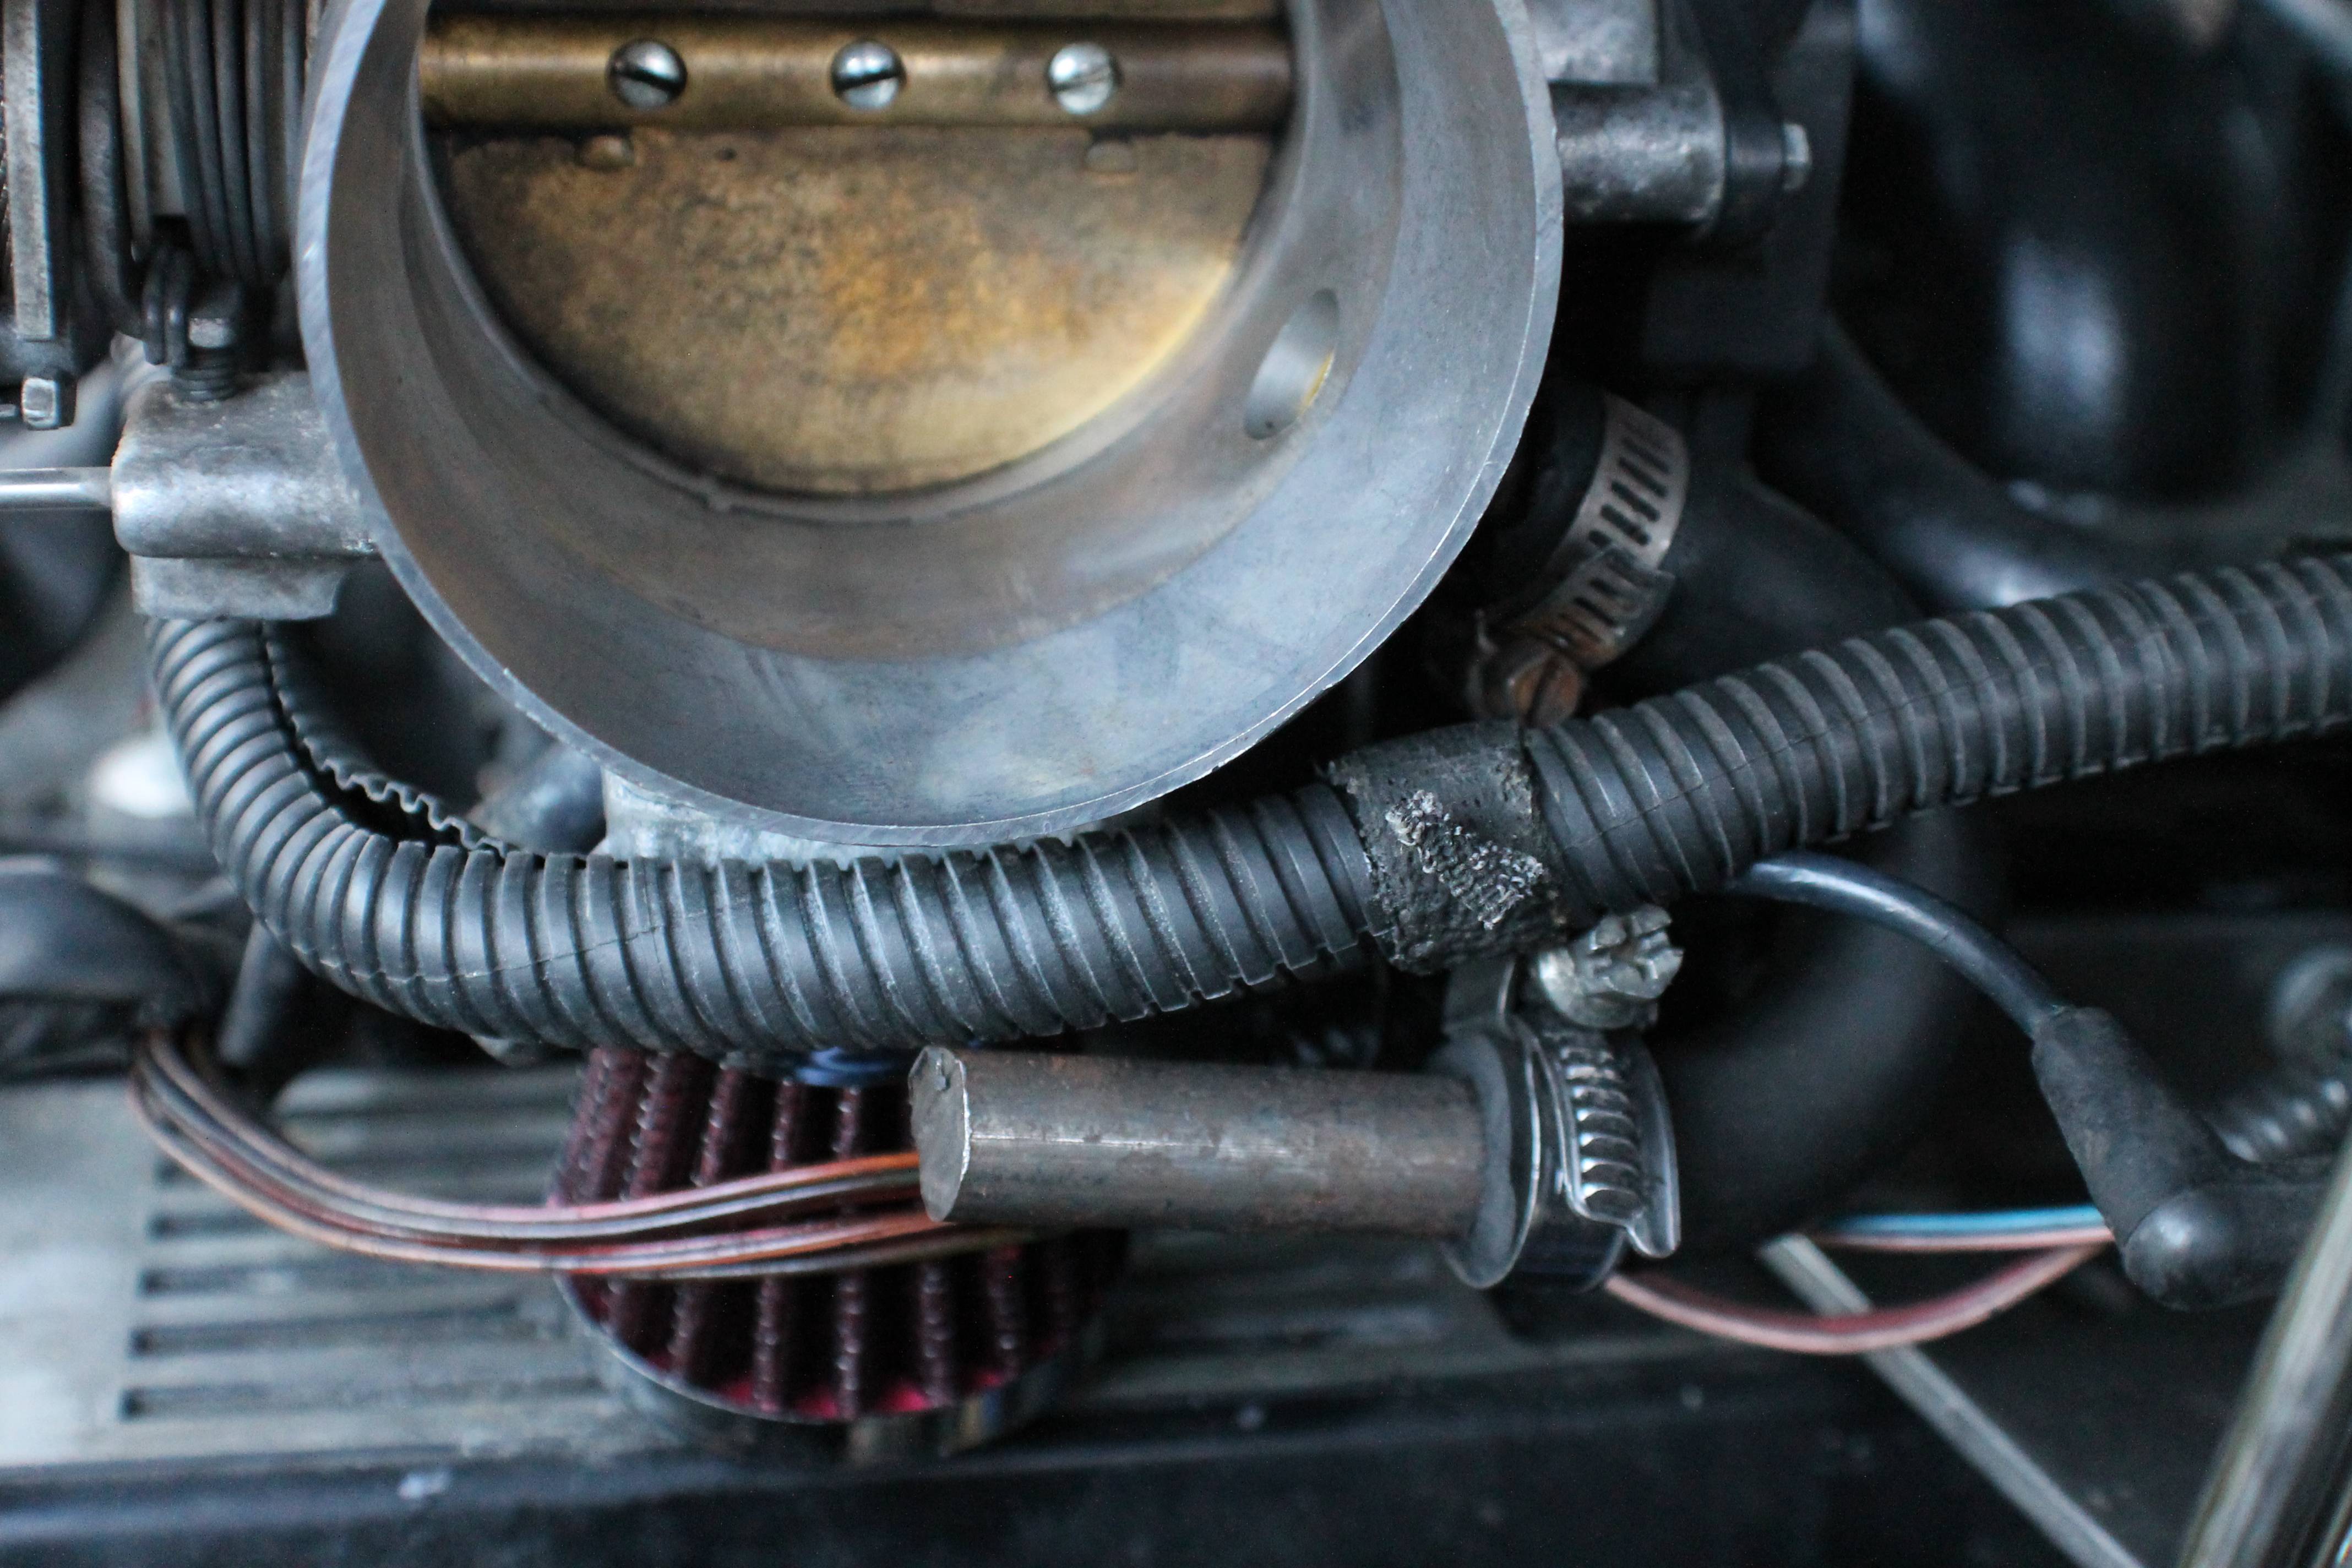
For the drivers side you'll actually have to remove the throttle body to get the filter on. In order for it to fit underneath the throttle body heater you'll need to cut part of the filter base off. About 1/3" should work perfectly. Then slide it on and re-install your throttle body. I didn't even bother clamping this side down since it's not going to go anywhere with that throttle body over it.
I forgot to get a picture, but I'll add one in a bit. You also need to block off the intake side of the old oil breather here. I just cut mine in half and stuck a piece of steel I had in it then tightened it down with the original band clamp. Again, if you don't do this then you'll have a major vacuum leak.
I recommend doing both sides and not just one. If you only do one then I believe it may also create a vacuum leak, though I'm not positive.
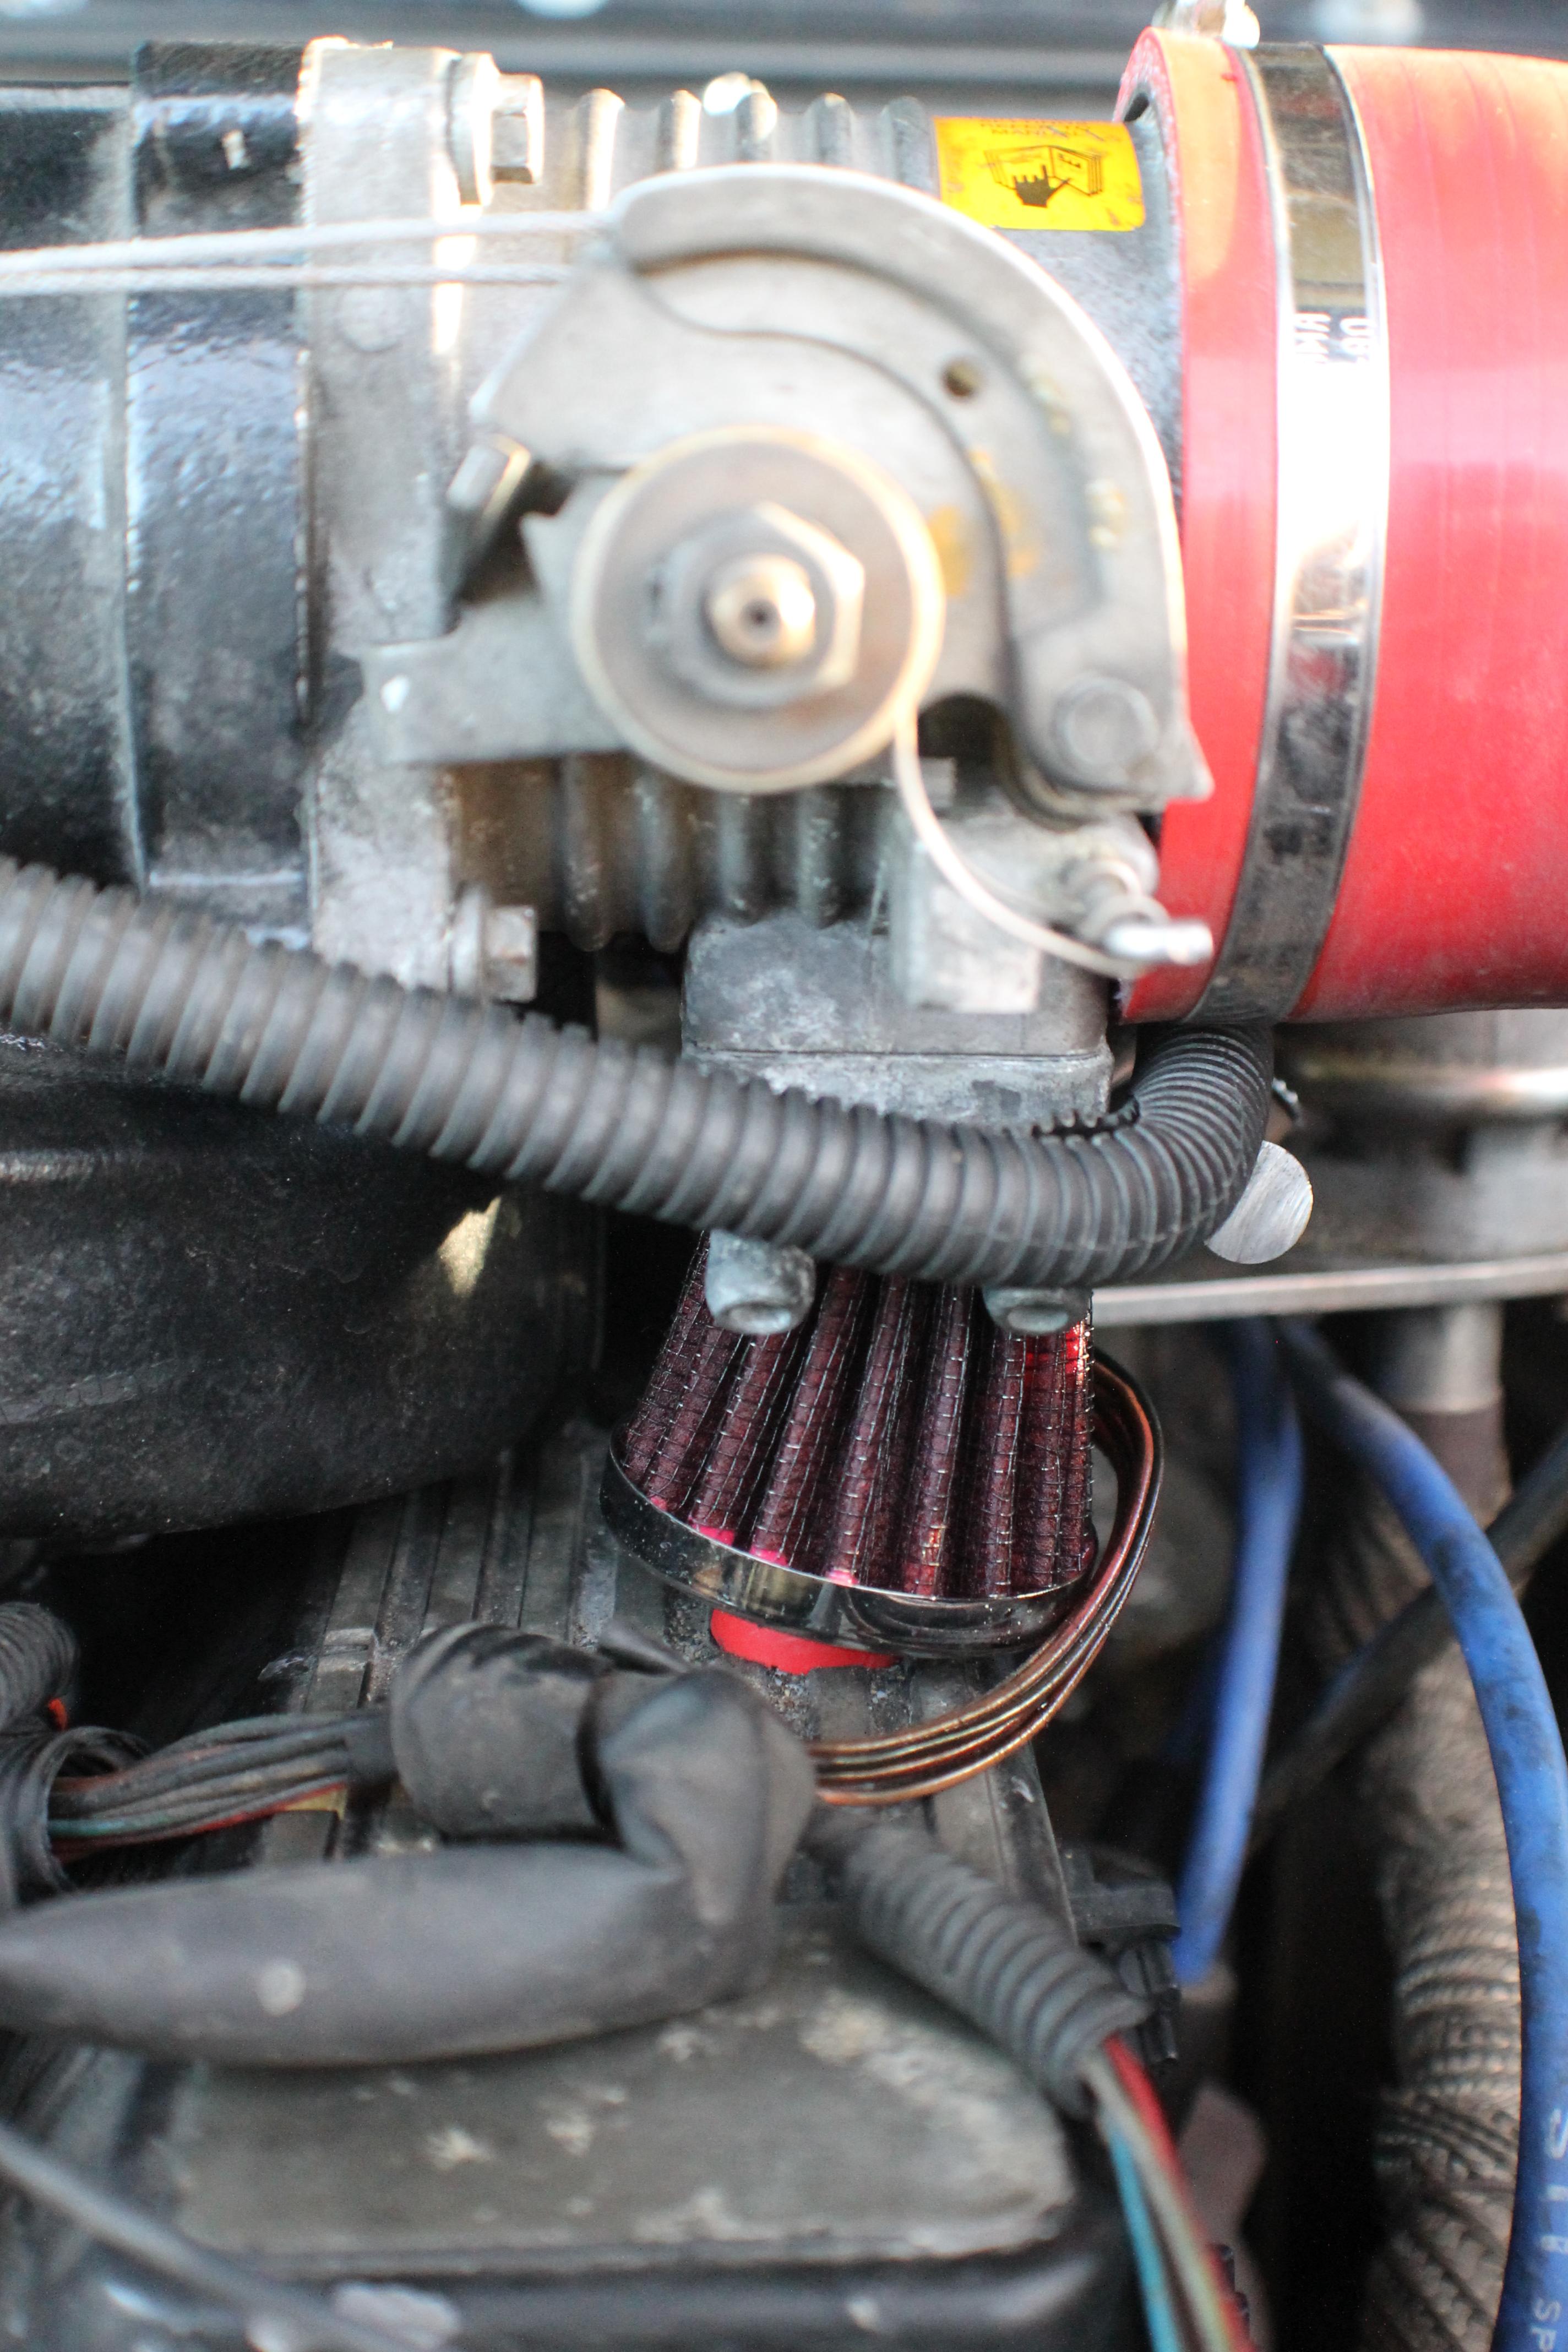
Edit: Here's the picture of what I did on the drivers side. If you wanted I'm sure you could just block the hole with a bunch of RTV, but I figured I'd just do it this way. Charile_V used a bolt instead of a piece of steel like what I used. The drivers side tube is a 1/2" or 5/8" inner diameter, so a bolt of either of those sizes should work. Thanks, Charlie!
Ok, so this one is pretty simple. First, you need two Spectre 3992 Oil Breather Filters.
You'll also need a G2 ink pen or something else to use as a tube that's the same diameter and an extra band clamp. You'll want to attach it to the small filter like this.
Edit: Charlie_V said a vacutite vacuum connector, 3/8 x 3/8 works perfect in place of the G2 pen for those that would prefer the more correct route.
Now, cut the oil breather line in half and slide the pen into the valve cover side. Now tighten it down with that extra band clamp.
For the intake side, you'll have to block it off somehow. I accidentally broke the nipple off that the breather line attaches to, so I just threaded a plenum bolt right into the center of it. Alternatively you could get the whole thing out with threads in tact and take it to your local hardware store of choice to get a short bolt that has the same diameter and thread pattern. If you don't block this off then you'll have a MAJOR vacuum leak. The manifold bolt works fine.
For the drivers side you'll actually have to remove the throttle body to get the filter on. In order for it to fit underneath the throttle body heater you'll need to cut part of the filter base off. About 1/3" should work perfectly. Then slide it on and re-install your throttle body. I didn't even bother clamping this side down since it's not going to go anywhere with that throttle body over it.
I forgot to get a picture, but I'll add one in a bit. You also need to block off the intake side of the old oil breather here. I just cut mine in half and stuck a piece of steel I had in it then tightened it down with the original band clamp. Again, if you don't do this then you'll have a major vacuum leak.
I recommend doing both sides and not just one. If you only do one then I believe it may also create a vacuum leak, though I'm not positive.
Edit: Here's the picture of what I did on the drivers side. If you wanted I'm sure you could just block the hole with a bunch of RTV, but I figured I'd just do it this way. Charile_V used a bolt instead of a piece of steel like what I used. The drivers side tube is a 1/2" or 5/8" inner diameter, so a bolt of either of those sizes should work. Thanks, Charlie!
Last edited by Alex_M; 12-15-2015 at 06:32 PM.
#55
12-15-2015, 03:57 PM
Thanks for posting that. I'm on it.
I always a cause a vac leak when I take off the upper intake, but I have an extra passenger side hose so I may go all My Favorite Martian on the driver side.
And by the way, stellar photography. The details are great but dang, the low sunlight on a painted intake with a red filter?! Wow!
I always a cause a vac leak when I take off the upper intake, but I have an extra passenger side hose so I may go all My Favorite Martian on the driver side.
And by the way, stellar photography. The details are great but dang, the low sunlight on a painted intake with a red filter?! Wow!
Last edited by Charlie_V; 12-15-2015 at 04:07 PM.
#56
12-15-2015, 04:54 PM
No problem, Charlie! Every time I remove the intake I just slather everything with another coat of RTV and it seems to stay pretty happy, knock on wood. I also added the picture of what I did on the drivers side.
Thanks! I like to take pictures some and figured it would make these write ups a little easier on the eyes. It also helped that it just happened to be in the middle of the golden hour when I took the pictures and that one focused just perfectly on the filter. A true feat for Canon's auto focus.
Thanks! I like to take pictures some and figured it would make these write ups a little easier on the eyes. It also helped that it just happened to be in the middle of the golden hour when I took the pictures and that one focused just perfectly on the filter. A true feat for Canon's auto focus.
#57
12-15-2015, 04:56 PM
No problem, Charlie! Every time I remove the intake I just slather everything with another coat of RTV and it seems to stay pretty happy, knock on wood. I also added the picture of what I did on the drivers side.
Thanks! I like to take pictures some and figured it would make these write ups a little easier on the eyes. It also helped that it just happened to be in the middle of the golden hour when I took the pictures and that one focused just perfectly on the filter. A true feat for Canon's auto focus.
Thanks! I like to take pictures some and figured it would make these write ups a little easier on the eyes. It also helped that it just happened to be in the middle of the golden hour when I took the pictures and that one focused just perfectly on the filter. A true feat for Canon's auto focus.
#59
12-15-2015, 05:56 PM
On the breather setup... the hose on the passenger side is 3/8 inner diameter but it is wider on the driver side. I just used an extra clamp, but a plastic fitting from 3/8 to 5/16 or even 1/2 would be better that a 3/8 to 3/8 on the driver side. Or a G2 pen. Haha. Either.
Also on closing the openings to the throttle body, I used the extra pieces of hose from what I cut with a bolt shoved into the end of each and a clamp around that. I have a metal barb (from Lowes I think) so I couldn't thread into it without risking damage.
I have some extra TB hoses so I just put the breather filter on the end of mine (instead of taking the TB off) and nestled it next to the intake hose.
Last edited by Charlie_V; 12-15-2015 at 05:59 PM.
#60
12-15-2015, 06:24 PM
Bummer. I didn't even know mine (O'Reilly) had it, but the lady helping me didn't know what she was looking for and I saw that one in the back and pointed it out to her.
Yea, I think the drivers side is 1/2" because I used a piece of 5/8" steel to plug it and it stretched a decent amount. I didn't even worry about attaching it through the other half of the hose on the drivers side, but it definitely would be easy to do it that way for those with an extra hose.
Yea, I think the drivers side is 1/2" because I used a piece of 5/8" steel to plug it and it stretched a decent amount. I didn't even worry about attaching it through the other half of the hose on the drivers side, but it definitely would be easy to do it that way for those with an extra hose.