When you click on links to various merchants on this site and make a purchase, this can result in this site earning a commission. Affiliate programs and affiliations include, but are not limited to, the eBay Partner Network.
I'm expecting my Colorado Fairing this week. To remove the front cross piece, do you just need to undo the two hex bolts on the back?
It's not easily removable. I ended up using a dremel to cut 2 slots in it for the fairing bracket. There are 4 brackets, the 2 on the outside are outside of the cross piece, the center ones can be mounted without cutting, but it's awkward.
It's not easily removable. I ended up using a dremel to cut 2 slots in it for the fairing bracket. There are 4 brackets, the 2 on the outside are outside of the cross piece, the center ones can be mounted without cutting, but it's awkward.
Sorry for the delayed response.
You are not taking the center section off, it is removed quite easily where the curved section meets the straight side pieces. loosen the first cross piece and push it back, this will expose a hex screw on each side remove them and the whole thing slides out. This way you can drill all the holes on the work bench.
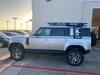
Thanks. That works. I've attached a couple of photos. You need a Torx T30 security bit and an 8mm socket.
Here is how I mounted the fairing after removing the rack’s front center section.
Start with the outer brackets, attach them to the fairing and then clamp them to the center section. Offer it up to the rack to align everything. Remove it again and mark holes to drill for the outer brackets.
Remove the outer brackets from the fairing and bolt them to the center section with M8 hex bolts and Nylock nuts. Bend down the leading edge of the outer brackets slightly to ensure a good fit of the ends of the fairing to the roof.
Now the center brackets. I decided not to cut anything so bent up the trailing end of the center brackets by 90 degrees to fit against the center section’s air dam. Note, this cracks the paint on the bracket so I had to respray them and also did the mounting bolts that came with fairing at the same time.
Mount everything to the fairing and drill holes in the center section air dam and bolt on the center brackets (M8 hex bolts, Nylock nuts). You need to bend the trailing end of the center bracket or it will touch the roof.
Replace the center section in the rack with the fairing attached and bolt it in place. Replace the rack’s front cross rail.
Last edited by denhams; Dec 22, 2022 at 04:47 PM.
Reason: Include installation.
Thanks. That works. I've attached a couple of photos. You need a Torx T30 security bit and an 8mm socket.
Here is how I mounted the fairing after removing the rack�s front center section.
Start with the outer brackets, attach them to the fairing and then clamp them to the center section. Offer it up to the rack to align everything. Remove it again and mark holes to drill for the outer brackets.
Remove the outer brackets from the fairing and bolt them to the center section with M8 hex bolts and Nylock nuts. Bend down the leading edge of the outer brackets slightly to ensure a good fit of the ends of the fairing to the roof.
Now the center brackets. I decided not to cut anything so bent up the trailing end of the center brackets by 90 degrees to fit against the center section�s air dam. Note, this cracks the paint on the bracket so I had to respray them and also did the mounting bolts that came with fairing at the same time.
Mount everything to the fairing and drill holes in the center section air dam and bolt on the center brackets (M8 hex bolts, Nylock nuts). You need to bend the trailing end of the center bracket or it will touch the roof.
Replace the center section in the rack with the fairing attached and bolt it in place. Replace the rack�s front cross rail.
Thanks this very helpful. I however, cannot slide the first crossbar back to get to the hex nut to remove the front piece. The hex nut itself blocks the travel of the bar through the slots. Any suggestions?
Hmm, I guess if you can't get to it, then you could take the rack off. It's pretty quick - 6 bolts each side (6mm hex drive). Remove the small plastic covers to get to the rear ones. You'll need someone else to help lift it off. That will enable you to measure and drill off the car. After that, you can fit the fairing with the rack back on the car.
BTW, I've driven many miles on- and off-road. Nothing has come lose or moved. The fairing noticeably reduces wind noise.