
Headgasket quality questions


Super Moderator
Joined: Jan 2011
Posts: 16,322
Likes: 88
From: Savannah Georgia
1. Fuel pump runs to bring up pressure. If engine is not running after a few seconds it shuts off.
2. see Discovery I V8 Engine Top End Parts Available from RoversNorth.com, may help with odd hose. There is a valve cover to plenum connection to remove crankcase vapor.
3. Will see if I can find the recent post of vac diagram. Here are the photos from the sultan of the swampy sandbar, Cosmic88
2. see Discovery I V8 Engine Top End Parts Available from RoversNorth.com, may help with odd hose. There is a valve cover to plenum connection to remove crankcase vapor.
3. Will see if I can find the recent post of vac diagram. Here are the photos from the sultan of the swampy sandbar, Cosmic88
Last edited by Savannah Buzz; Oct 31, 2011 at 09:57 PM.

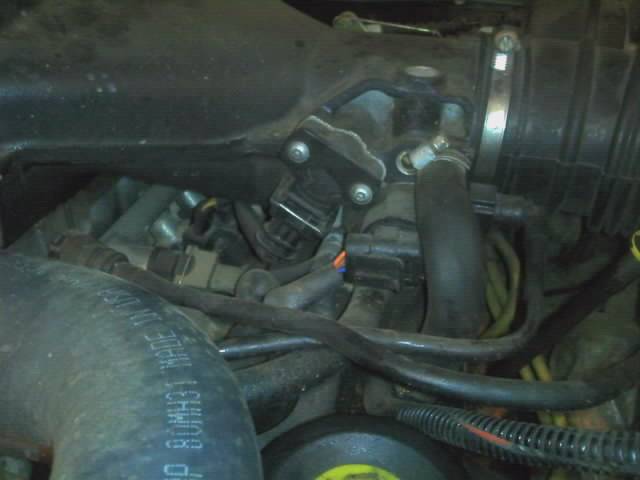
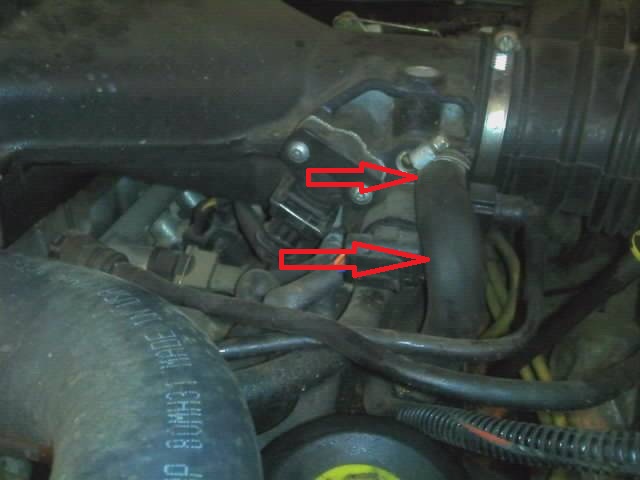
ok I have found a picture of where i think EER4763 goes and pointed red arrows at it .....is this the c/c breather hose?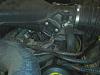
 thing is in do not seem to have the t piece shown here http://www.roversnorth.com/store/c-611-top-end.aspx
 thing is in do not seem to have the t piece shown here http://www.roversnorth.com/store/c-611-top-end.aspx
Last edited by Timebus; Nov 1, 2011 at 04:07 AM.
Super Moderator
Joined: Jan 2011
Posts: 16,322
Likes: 88
From: Savannah Georgia
Hose with arrows appears to be a non-stock version of #68 (bigger than mine) in Rovers North drawing, and it is the driver's side breather hose. On the passenger side, the other one is toward the rear of the valve cover, and usually has a 90 degree elbow, fits over the oil seperator , which can be squirt cleaned with carb cleaner.
See attached drawing, which is from D2 shop manual. D1 shop drawing shows a 3.9 engine, with a small Y and two hoses on the driver's side. Mine just has the one hose. There is a hard plastic slim one near there that is part of the evap cannister system.
See attached drawing, which is from D2 shop manual. D1 shop drawing shows a 3.9 engine, with a small Y and two hoses on the driver's side. Mine just has the one hose. There is a hard plastic slim one near there that is part of the evap cannister system.

Pro Wrench
Joined: Sep 2011
Posts: 1,526
Likes: 18
From: Oregon
A HG job is a lot of work already. Getting into timing, rockers, cam, pumps, etc is a lot more work. You got to pick somewhere to stop unless you have a few weeks, lots of room, required tools, money, and the endurance.
Camshaft AND tappets wear together. They should be replaced together.
AFAIK pushrods can be kept unless they show signs of wear like pitting.
Rockers and rocker-shaft wear together and should be replaced together.
The consequence of replacing one of two worn parts is premature wear and failure.
Asking Henry's where they get their heads machined is a good idea, otherwise any auto machine shop should be able to do it.
Also, about removing the camshaft: I'm not sure if it can be removed without removing the engine. Removing engine is a PITA. Either way front cover must be removed though (might as well replace timing chain then), and to remove the front cover I had to remove the sump. To remove the sump I had to remove the oil pickup, which is a pain. Really it's all a pain though. How much pain can you take?
Yes how much Pain indeed.... hmmm well I do have a great set up at the moment have been blessed into a great place to stay with awesome garage and I do drive a Land Rover so for this cross country trip I TRAVEL with most every tool I would need ....was pulling a trailer after all / and where im staying also have LOTS of tools....I have seriously been concidering the timing chain as Im sure it may never have been done and im at 138,000 ....so we'll see how things are going ....
So far the insides of my girl are filthy hard to see how oil was getting around....sludge and grot....I am amazed at how things have looked....
few little detials in my way at the moment ....maybe someone could help ...
1) can not seem to get the drivers side exhaust manifold out....any tips appreciated...I tried for a while seemed like steering would have to move ??
!!
2) having trouble with the two rear lower/ outer bolts on the heads can't seem to get tool in there ..gonna check napa for different socket tomorrow ...or different breaker bar....everything seems just off a little...very little space dont know how i'll ever be able to torq these properly at this angle on refit.......maybe pulling the hood off tomorrow just to get it out of my bleeping way and then hang myself from the ceiling all Laura Croft style ...ha!!
heres some pics of my OCD HEAD GASKET ADVENTURE SO FAR
So far the insides of my girl are filthy hard to see how oil was getting around....sludge and grot....I am amazed at how things have looked....
few little detials in my way at the moment ....maybe someone could help ...
1) can not seem to get the drivers side exhaust manifold out....any tips appreciated...I tried for a while seemed like steering would have to move ??
!!
2) having trouble with the two rear lower/ outer bolts on the heads can't seem to get tool in there ..gonna check napa for different socket tomorrow ...or different breaker bar....everything seems just off a little...very little space dont know how i'll ever be able to torq these properly at this angle on refit.......maybe pulling the hood off tomorrow just to get it out of my bleeping way and then hang myself from the ceiling all Laura Croft style
...ha!! heres some pics of my OCD HEAD GASKET ADVENTURE SO FAR
Last edited by Timebus; Nov 4, 2011 at 06:14 AM.
feeling ok about it so far had very little trouble except for the d side manifold and those two head bolts .....most my time is spent organizing and labeling taking pictures and video so that I remember how everything goes......lol....oh Im learning SO MUCH 
Last edited by Timebus; Nov 4, 2011 at 06:07 AM.


Rock Crawling
Joined: Oct 2011
Posts: 326
Likes: 0
From: Whitefsh, MT
Can't help you with the tough bolts but I appreciate you sharing your experience with us as I will be following in your footsteps here shortly.
How does the fuel rail disconnect from the chassis?
Hat's off to you Timebus...the toughest 'roadside repair' I've done is change out a fuel pump in my bronco by the side of the road. Real fun with Semi's blasting by you at 70+ mph like 10 feet from your head!
How does the fuel rail disconnect from the chassis?
Hat's off to you Timebus...the toughest 'roadside repair' I've done is change out a fuel pump in my bronco by the side of the road. Real fun with Semi's blasting by you at 70+ mph like 10 feet from your head!
Calebbo - yes indeed its from Hft ...picked it up in Illinois to replace exhaust....cause I forgot mine at home...its super comfy...for me...definately worth the $29 dollars... great for gazing up under the rover and listing all the stuff you still need to do and comfy as you brown out thinking of it all
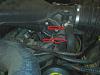
HH65FLYER...... MY FUEL RAIL..disconnected at rear...hoses coming from the passenger side....two of them wrapped in silver heat stuff....one requires 14mm combo wrench (x2)
just a at the fuel pump.... second one had a squeeze fitting on a hose at regulator...however I could not remove from this point due to sight ...tool position problems and found it much easier to remove regulator ....from fuel rail ...there were two bolts one above one under....once you remove the harness from that side, the coil packs, and the plenum you will see them very easily then i used a pry tool to pop the reg out of the fuel rail...careful .... pic for you here the silver wrapped hoses in the bottom left corner are the hoses ... Luckily Im doing better than roadside...much better actually....funny story though after my gas tank recall work earlier this year...I had to rig up my pump on the side of the road less than 40 miles from the dealer !!! Just another reason I do my own work as much as possible ..I am constantly dumbfounded by the incomp. of people who do this for a living....NOT TO insult anyone I just NEVER get the good work done....either because im female or because they are thinking about beer?? Really cant figure out WHY but I ALWAYS have to take my car back in usually within hours ....wtf?
SAVANNAH- besides the top there it really kind of does seem ok but wow the dirt caked next to it....and wow the muck inside this sweetie....it really has seemed that my bolts in general have all been kinda loose...I have rarely need a breaker at all....and im quite petite ....until the head bolts ....so the thoughts of loose bolts causing the codes earlier on may be accurate
ok I hurt all over but gotta get to work ....ouch...after the heads are off Ill get some time to rest....I am writing up a complete procedure for my adventure..complete with pictures..so if anyone wants the info along with pictures just let me know
HH65FLYER...... MY FUEL RAIL..disconnected at rear...hoses coming from the passenger side....two of them wrapped in silver heat stuff....one requires 14mm combo wrench (x2)
just a at the fuel pump.... second one had a squeeze fitting on a hose at regulator...however I could not remove from this point due to sight ...tool position problems and found it much easier to remove regulator ....from fuel rail ...there were two bolts one above one under....once you remove the harness from that side, the coil packs, and the plenum you will see them very easily then i used a pry tool to pop the reg out of the fuel rail...careful .... pic for you here the silver wrapped hoses in the bottom left corner are the hoses ...
Luckily Im doing better than roadside...much better actually....funny story though after my gas tank recall work earlier this year...I had to rig up my pump on the side of the road less than 40 miles from the dealer !!! Just another reason I do my own work as much as possible ..I am constantly dumbfounded by the incomp. of people who do this for a living....NOT TO insult anyone I just NEVER get the good work done....either because im female or because they are thinking about beer?? Really cant figure out WHY but I ALWAYS have to take my car back in usually within hours ....wtf?SAVANNAH- besides the top there it really kind of does seem ok but wow the dirt caked next to it....and wow the muck inside this sweetie....it really has seemed that my bolts in general have all been kinda loose...I have rarely need a breaker at all....and im quite petite ....until the head bolts ....so the thoughts of loose bolts causing the codes earlier on may be accurate
ok I hurt all over but gotta get to work ....ouch...after the heads are off Ill get some time to rest....I am writing up a complete procedure for my adventure..complete with pictures..so if anyone wants the info along with pictures just let me know