So what did you do to your Disco today?
#3441
 02-02-2015, 10:43 AM


Thanks for reply.
It was the spickot shaft bush with a nice tight fit allowing my gearbox running with the engine.
I took it on a nice 2 km downhill, kept it in gear with clutch depressed and engine switched off, allowing the gearbox to turn against the dead (Static) engine. this practice worn the bush out a bit and after the 4 th run got a smooth shift. All fixed and old faithfull is back on the road again.
Post those pics requested asap.

#3442
02-02-2015, 08:37 PM
If you are desperate you start to do all sorts of things
The promised sway bar "Brackets"
I used 10 mm Carbonated Flat bar (Spring steel)
Very slow and cold as possible welding.
Can not see clearly but the clearance from propshaft to sway bar is the same as axle to stop rubber.
The promised sway bar "Brackets"
I used 10 mm Carbonated Flat bar (Spring steel)
Very slow and cold as possible welding.
Can not see clearly but the clearance from propshaft to sway bar is the same as axle to stop rubber.

#3444
02-02-2015, 11:03 PM

Pro Wrench
Wow that's freaking brilliant. I disconnected mine on my old Discovery. That's a really simple way to solve that height issue. It drops the sway bar attachments down on a lifted truck. Allowing a lift w out the stress on the factory mounts.
Last edited by Shiftonthefly1; 02-02-2015 at 11:05 PM.
The following users liked this post:
Hercu (02-04-2015)
#3445
02-04-2015, 11:06 AM
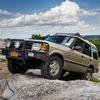
My Truck is my daily driver, holiday work horse and toy.
I first removed the sway bar but on 120 km/h on a highway without sway bar the handling was not nice and on offroad conditions the crunching sound of the propshaft running against the sway was not nice thus the fitting of the lowering brackets came to mind and I am quite happy with the result.
With the 2" lift and the sway bars on the original factory brackets the clearance from sway bar to heavy duty Universals on front propshaft was about >50 mm in normal position.
The moment you get an axle drop on offroad conditions the propshaft was actually dropping onto the sway bar.
Hope the explanation helps and please feel free to ask more
#3446
02-17-2015, 11:45 AM

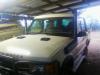
Today (well, yesterday) I replaced the rear door quarter window on my Discovery that had been broken by a thief before I bought it. There was some satisfaction in finding the broken end of his knife still wedged in the rubber - but otherwise the task was fiddly and time consuming. (And I was ripped off on the replacement by my local Pick'n'Pull who ended up charging me $40 for the window, but that's another story.)
It's good to have the duct tape off the truck now, and ends the daily hunt for tiny pieces of broken glass around the cabin.
It's good to have the duct tape off the truck now, and ends the daily hunt for tiny pieces of broken glass around the cabin.
#3447
02-17-2015, 12:42 PM
Today (well, yesterday) I replaced the rear door quarter window on my Discovery that had been broken by a thief before I bought it. There was some satisfaction in finding the broken end of his knife still wedged in the rubber - but otherwise the task was fiddly and time consuming. (And I was ripped off on the replacement by my local Pick'n'Pull who ended up charging me $40 for the window, but that's another story.)
It's good to have the duct tape off the truck now, and ends the daily hunt for tiny pieces of broken glass around the cabin.
It's good to have the duct tape off the truck now, and ends the daily hunt for tiny pieces of broken glass around the cabin.
I need to replace all the window seals on my '95 so this is something I'll need to learn how to do, preferably making it a one-man job.
#3448
02-17-2015, 01:30 PM
There was no real difficulty. The manual tells you to take out the whole door window taped to the frame, I found I could slide the frame/runners off over the door window easily enough, and back in place with a little fiddling. I didn't disconnect any wires, in fact I need to use the window switch to shift the window up and down a couple times. Hope that helps
#3449
02-17-2015, 06:02 PM
It was very easy, I'd had the junk vehicle I removed the spare glass from (self service yard) to practise on to see how it all went together. I didn't use a new seal, it was easy to put the seal on the glass then feed it into the frame.
There was no real difficulty. The manual tells you to take out the whole door window taped to the frame, I found I could slide the frame/runners off over the door window easily enough, and back in place with a little fiddling. I didn't disconnect any wires, in fact I need to use the window switch to shift the window up and down a couple times. Hope that helps
There was no real difficulty. The manual tells you to take out the whole door window taped to the frame, I found I could slide the frame/runners off over the door window easily enough, and back in place with a little fiddling. I didn't disconnect any wires, in fact I need to use the window switch to shift the window up and down a couple times. Hope that helps
#3450
02-18-2015, 07:58 AM