
Leaking brake fluid.


Thread Starter
|
Winching
Joined: Dec 2009
Posts: 517
Likes: 62
From: Oceanside CA
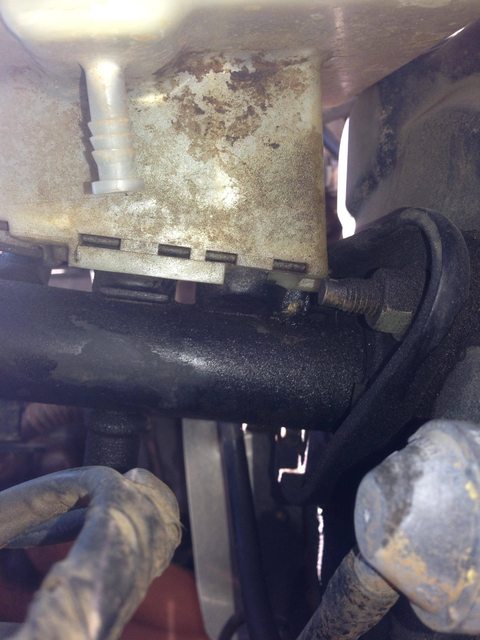
I am leaking brake fluid in between the reservoir and the master cylinder.
I was wondering if this was a common thing and if anyone has any tips, suggestions, or ideas on what could be the trouble.
I would like as much info as possible before i start taking it apart.
I was wondering if this was a common thing and if anyone has any tips, suggestions, or ideas on what could be the trouble.
I would like as much info as possible before i start taking it apart.
Thread Starter
|
Winching
Joined: Dec 2009
Posts: 517
Likes: 62
From: Oceanside CA
All right i have done some looking around and perhaps this will do the trick? Brake Master Cylinder Reservoir Kit (Genuine Part # SJJ100362) - Land Rover kits from Atlantic British

Administrator
Joined: Apr 2006
Posts: 25,707
Likes: 108
From: Denver, Colorado
Rebuild or replace the master cylinder, but do it soon before any fluid leaks into the booster, then you will have even bigger problems.
Don't forget to do a full 2 quart DOT 4 brake flush when done.
Don't forget to do a full 2 quart DOT 4 brake flush when done.
Thread Starter
|
Winching
Joined: Dec 2009
Posts: 517
Likes: 62
From: Oceanside CA
Is this kit sufficient for rebuilding it?
Brake Master Cylinder Reservoir Kit (Genuine Part # SJJ100362) - Land Rover kits from Atlantic British
Brake Master Cylinder Reservoir Kit (Genuine Part # SJJ100362) - Land Rover kits from Atlantic British

Camel Trophy
Joined: Dec 2009
Posts: 3,885
Likes: 955
From: Charlotte
Jason, yes, that kit should be all you need. I rebuilt the master cylinder on my '99 DII about six weeks ago. Oddly I could find nothing useful about doing the repair in RAVE or in the forums, so here goes.
My copy of RAVE does have a good cross-section illustration of the MC on page 70-11 (864). You could probably buy the kit for much less money from Will Tillery. AB's price is up at least $10 since mid-November.
Although it looks like a pretty straightforward job I ended up thinking it would have been money well spent to buy a complete new master cylinder instead of rebuilding. Little frustrations added substantially to the time required.
It looks tempting to swap the reservoir in place and just replace the two seals on the underside of the tank, but to do the job correctly the master cylinder needs to be removed.
Remember that brake fluid eats paint and should not be mixed with other waste fluids, so try to use plenty of paper towels and capture the old brake fluid for proper disposal. My local county takes brake fluid as part of its hazardous waste program.
First, disconnect the two brake lines from the MC, then remove the two nuts that secure the master cylinder to the brake servo and remove the MC.
Once the MC is out of the truck, use pliers to pull out the two-pronged metal retaining pin. You'll then be able to separate the reservoir from the body of the MC and you'll find the two rubber doughnuts that are responsible for the leak. Pay attention to where the other O-rings are installed for reassembly. This is where you need to be most careful to capture the old brake fluid.
The next step is to remove the yellowish-green plastic "cup" from the back side of the MC mounting plate. This was more difficult for me. I ended up using a small chisel to cut off the two plastic tabs that extend through the mounting plate. Once the cup is removed be sure to notice that the third and larger rubber doughnut is fitted inside the cup.
Reassembly is the reverse of these steps. A couple of short 2x4 scraps and a hammer made installation of the cup easier, and it takes some force to seat the reservoir correctly and install the retaining pin. Reinstalling the assembly is easy.
Next step is to complete a careful bleeding of the brake system, but that's detailed in other posts in this forum.
Good luck.


Thread
Thread Starter
Forum
Replies
Last Post
leddifer
General Range Rover Discussion - Archived
17
Mar 23, 2016 01:56 PM