

DIY Frontrunner style roof rack

Thread Starter
|
Mudding
Joined: Jul 2013
Posts: 126
Likes: 15
From: MN -> UT
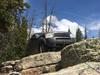
It's certainly not a new idea, but I hadn't seen it on a LR so I thought I'd share what I built. I made a frontrunner style rack out of a Harbor Freight ATV ramp. I call it frontrunner style because it's flat with no sides, certainly not as good looking as the real thing. For tools I used a sawz-all, angle grinder with a flap disc, misc hand tools and the neighbor's welder. I started with this ramp: https://www.harborfreight.com/1500-l...amp-60334.html which I had an additional 20% off coupon for. I was able to score some free 1" square steel tubing at work for cross bars, I used about 13'. The last ingredient is hardware. I used fender washers, carriage bolts and acorn nuts to secure it to the roof. Oh, I almost forgot, I bought 1.5" square and 1"x2" plugs off Amazon to fill the ends of the rack and the crossbars.
After unboxing the ramp, I drilled the pop rivets out of the hinges and tailgate tabs to remove them and bolted the 3 ramp sections together. This gave me roughly a 44"x 65" platform which I painted flat black.
My brother made a rack like this but used a Yakima system which attached to roof rails on his Sequoia. While it worked perfectly well I was looking for as low profile as possible. I had hoped to use the cross bars directly on the roof tacks, but that left about 3/16" clearance between the bar and the roof glass. I opted to cut a 3" piece of tubing with a 45 degree angle on one end and welded it to the ends of my cross bar to raise it up off the glass. After test fitting the rack with a front and rear cross bar, I found the middle bar spacer had to be 1/8" shorter. I also cut this with a sawz-all, not because it's the right tool, but because it's what I had! I contemplated just using JB Weld to attach the spacers to the cross bars, but ultimately I went to the neighbor's and used his welder. This was the only "fabrication" I had to do.
After my bars were welded and painted it was just a matter of layout and drilling holes. I opted to have it sit as far back as I could and clear the tailgate when up. After looking into ladders, this may be too far back. I found the Hi-Lift from a previous vehicle laid perfectly across the back of the rack, so I drilled holes for more carriage bolts to hold it down. I can install a shovel with the tip under the Hi-Lift and strap the handle to the rack, as well as strap an axe to the other side. I was contemplating some more permanent mouth solutions for these, but like the idea of not more hardware sticking up when the accessories are off.
As a side note, I had to chuckle at myself for even mounting the Hi-Lift on the rack. Since I still have factory bumpers and no sliders, I can't even use it on my rig. It's just funny how they've become a "must have" when you venture off road. They've got to be top 5 must have items if we were to take a poll, even though they're dangerous as all get out and I doubt most people know how to use them. I see them on all kinds of mall crawler JK's here in UT!
Last, it was pretty noisy on the highway and even had a little vibration if the wind was right, so I stole the fairing off my daughters car! Well, actually I traded her a new style yakima fairing for the old one that was attached to MY roof rack on HER car. That made a night and day difference in road noise.
It was a pretty fun project and I'm mostly happy with the results. It doesn't look too homemade so that was a big plus for me.

Thread Starter
|
Mudding
Joined: Jul 2013
Posts: 126
Likes: 15
From: MN -> UT


Mudding
Joined: Mar 2012
Posts: 106
Likes: 27
From: NYC
It's certainly not a new idea, but I hadn't seen it on a LR so I thought I'd share what I built. I made a frontrunner style rack out of a Harbor Freight ATV ramp. I call it frontrunner style because it's flat with no sides, certainly not as good looking as the real thing. For tools I used a sawz-all, angle grinder with a flap disc, misc hand tools and the neighbor's welder. I started with this ramp: https://www.harborfreight.com/1500-l...amp-60334.html which I had an additional 20% off coupon for. I was able to score some free 1" square steel tubing at work for cross bars, I used about 13'. The last ingredient is hardware. I used fender washers, carriage bolts and acorn nuts to secure it to the roof. Oh, I almost forgot, I bought 1.5" square and 1"x2" plugs off Amazon to fill the ends of the rack and the crossbars.
After unboxing the ramp, I drilled the pop rivets out of the hinges and tailgate tabs to remove them and bolted the 3 ramp sections together. This gave me roughly a 44"x 65" platform which I painted flat black.
My brother made a rack like this but used a Yakima system which attached to roof rails on his Sequoia. While it worked perfectly well I was looking for as low profile as possible. I had hoped to use the cross bars directly on the roof tacks, but that left about 3/16" clearance between the bar and the roof glass. I opted to cut a 3" piece of tubing with a 45 degree angle on one end and welded it to the ends of my cross bar to raise it up off the glass. After test fitting the rack with a front and rear cross bar, I found the middle bar spacer had to be 1/8" shorter. I also cut this with a sawz-all, not because it's the right tool, but because it's what I had! I contemplated just using JB Weld to attach the spacers to the cross bars, but ultimately I went to the neighbor's and used his welder. This was the only "fabrication" I had to do.
After my bars were welded and painted it was just a matter of layout and drilling holes. I opted to have it sit as far back as I could and clear the tailgate when up. After looking into ladders, this may be too far back. I found the Hi-Lift from a previous vehicle laid perfectly across the back of the rack, so I drilled holes for more carriage bolts to hold it down. I can install a shovel with the tip under the Hi-Lift and strap the handle to the rack, as well as strap an axe to the other side. I was contemplating some more permanent mouth solutions for these, but like the idea of not more hardware sticking up when the accessories are off.
As a side note, I had to chuckle at myself for even mounting the Hi-Lift on the rack. Since I still have factory bumpers and no sliders, I can't even use it on my rig. It's just funny how they've become a "must have" when you venture off road. They've got to be top 5 must have items if we were to take a poll, even though they're dangerous as all get out and I doubt most people know how to use them. I see them on all kinds of mall crawler JK's here in UT!
Last, it was pretty noisy on the highway and even had a little vibration if the wind was right, so I stole the fairing off my daughters car! Well, actually I traded her a new style yakima fairing for the old one that was attached to MY roof rack on HER car. That made a night and day difference in road noise.
It was a pretty fun project and I'm mostly happy with the results. It doesn't look too homemade so that was a big plus for me.
After unboxing the ramp, I drilled the pop rivets out of the hinges and tailgate tabs to remove them and bolted the 3 ramp sections together. This gave me roughly a 44"x 65" platform which I painted flat black.
My brother made a rack like this but used a Yakima system which attached to roof rails on his Sequoia. While it worked perfectly well I was looking for as low profile as possible. I had hoped to use the cross bars directly on the roof tacks, but that left about 3/16" clearance between the bar and the roof glass. I opted to cut a 3" piece of tubing with a 45 degree angle on one end and welded it to the ends of my cross bar to raise it up off the glass. After test fitting the rack with a front and rear cross bar, I found the middle bar spacer had to be 1/8" shorter. I also cut this with a sawz-all, not because it's the right tool, but because it's what I had! I contemplated just using JB Weld to attach the spacers to the cross bars, but ultimately I went to the neighbor's and used his welder. This was the only "fabrication" I had to do.
After my bars were welded and painted it was just a matter of layout and drilling holes. I opted to have it sit as far back as I could and clear the tailgate when up. After looking into ladders, this may be too far back. I found the Hi-Lift from a previous vehicle laid perfectly across the back of the rack, so I drilled holes for more carriage bolts to hold it down. I can install a shovel with the tip under the Hi-Lift and strap the handle to the rack, as well as strap an axe to the other side. I was contemplating some more permanent mouth solutions for these, but like the idea of not more hardware sticking up when the accessories are off.
As a side note, I had to chuckle at myself for even mounting the Hi-Lift on the rack. Since I still have factory bumpers and no sliders, I can't even use it on my rig. It's just funny how they've become a "must have" when you venture off road. They've got to be top 5 must have items if we were to take a poll, even though they're dangerous as all get out and I doubt most people know how to use them. I see them on all kinds of mall crawler JK's here in UT!
Last, it was pretty noisy on the highway and even had a little vibration if the wind was right, so I stole the fairing off my daughters car! Well, actually I traded her a new style yakima fairing for the old one that was attached to MY roof rack on HER car. That made a night and day difference in road noise.
It was a pretty fun project and I'm mostly happy with the results. It doesn't look too homemade so that was a big plus for me.
I know this is an old thread, but that's a great innovative way to add to the LR4. I'm curious though, it seems very close to the sunroof. Does the sunrise still have full functionality?
Thread Starter
|
Mudding
Joined: Jul 2013
Posts: 126
Likes: 15
From: MN -> UT
Yes, it clears the rack. If you put a fairing on it it may affect the function, depending on how it�s mounted. I never use it, but a couple of weekends ago I opened it to take a picture while on a trail run and it wouldn�t close. The sunroof hit the middle mounting bolt for the fairing and had gone into the �anti entrapment� mode. It took awhile to figure it out since I didn�t know it did that, thank goodness for the owners manual. Once the offending bolt was removed it was able to cycle through the entire travel and reset the system. I highly recommend the fairing, it was very noisy before I mounted that. I think I just need to cut down that bolt and it�ll clear just fine, but I haven�t tried it because I never use the sunroof.

2nd Gear
Joined: May 2021
Posts: 2
Likes: 0
Nice! Love the DIY build. How did you go about bolting the cross bars down to the factory roof rails? I�m looking to do a similar DIY build on my LR3 using aluminum extrusions. The roof rack feet are the last component I need to figure out.
Thanks!
Thanks!
Thread Starter
|
Mudding
Joined: Jul 2013
Posts: 126
Likes: 15
From: MN -> UT
I used steel plate cut down to fit in the factory track. I drilled holes drilled in the center and carriage bolts run up trough the plates and bars. The factory track get pinched between the plates and the bars. It takes a little trial and error to get it right, but my bars bolt down nice and tight.
2nd Gear
Joined: May 2021
Posts: 2
Likes: 0
I used steel plate cut down to fit in the factory track. I drilled holes drilled in the center and carriage bolts run up trough the plates and bars. The factory track get pinched between the plates and the bars. It takes a little trial and error to get it right, but my bars bolt down nice and tight.

Thread
Thread Starter
Forum
Replies
Last Post