When you click on links to various merchants on this site and make a purchase, this can result in this site earning a commission. Affiliate programs and affiliations include, but are not limited to, the eBay Partner Network.
Make sure your front differential rebreather is of the newer design. It’s a LR4 part. Swap is a 2-3 minute job and all you need, besides the new top, is a pair of scissors. The older has a tendency to gunk up which increases the pressure inside the diff.
The first thing I did after purchase was to order a GAP IID Tool. The issues below showed up.
Issues when purchased:
� Suspension Fault C1A20-64 (2E)
� TCCM Fault P0902-00 (2F)
� Front Left Height Sensor Fault C1A03-1C
Getting the water out
The LR3 was pressure washed before I bought it and water was in both the passenger and driver footwells. Through watching LR Time and Waffle Square YouTube as well as this forum it was apparent that pressure washing led to either (or both) A-pillar water leaks or sunroof leaks into the cabin. I checked and cleaned the sunroof drains and found the driver side rubber boot had slipped inside the cabin and was draining into the driver side floor. I removed the front and mid-row seats and mid-row carpet. I was then able to remove the door jam plastic and driver side floor plastic trim. I then found and re-inserted the drain L-shaped plug on the driver side. I removed the plastic trim from the passenger side and was able to lift the front carpet enough to get to the Central Junction Box (CJB). This is what Land Rover owners call the fuse panel. I lifted the passenger footwell carpet and folded it toward the center console. This allowed me to access the CJB and unbolt the 10mm nuts that hold it in place. I removed the CJB, cleaned it and let is completely dry out. I cleaned all the pins with contact cleaner. This also allowed me access to all the water in the passenger footwell. I used a shop-vac to get as much of the standing water out as possible. Then I put a dehumidifier in the truck and let it run for a few days to completely dry out the interior. While this did not fix any issues, it pointed to some of the standard water entry issues pointed out in the LR Time. So, I purchased the A-pillar service kit from Atlantic British (linked below) and installed it.
There was tons of dirt and small sticks under the A-pillars that I cleaned out just to get to the holes that needed to be taped up. I replaced all the clips and re-installed the A-pillars. The kit is a must for every LR3.
Height Sensor
I started this trouble shooting by inspecting the height sensor on the left front. When I compared it to the one on the passenger front, it was apparent that the sensor had flipped backwards. I assume this happened when the truck dropped to the bump stops. I flipped the sensor back to the correct orientation and the error went away.
Suspension
I did a few minutes of searching on YouTube and found multiple videos on how to remove the air compressor for the suspension. This is one of the times you will need lots of patience. I removed the pump but had to cut the air lines from the back of the unit. Then I pulled the desiccant can off the unit. As this was a Florida car from an area of high humidity, I assumed it was clogged. The desiccant was not only clogged up but completely rusted shut on both ends. I went online and purchased a new complete desiccant kit from eBay for $60. I installed it on the compressor and used a bench vise to hold the compressor to repair the airline connectors. This was a great kit to get the unit back to functioning. I installed it back in the LR3 and the suspension faults went away. I then followed the calibration routine with the GAP tool and the suspension was back in business.
Then I moved on to the Transfer Case Control Module (TCCM) faults. I removed the world’s heaviest battery and put it on a trickle charger. The key to removing the battery is to disconnect the negative cable and then the positive cable. The red positive cable has a rubber grommet that holds it in place on the engine side of the battery tray. If you pull that rubber grommet up the battery cable moves out of the way enough to get your hand under the battery while lifting the battery with the battery handle. Then I lifted the front end of the battery and folded the handle out of the way to lift the battery out of the tray. This allows access to the TCCM cover that is removed via the press clips on each side. I removed the cover and slid both cable rubber grommets back toward the firewall. This allowed me access to the three connectors. I removed the TCCM which is harder than you might guess due to the plastic clips holding it to the firewall. Once removed, I used contact cleaner on the contacts. After waiting ten minutes I re-installed the TCCM but nothing changed. I sent an email to GAP and they suggested that I check all of the pins for a short to ground. So, I disconnected the TCCM and jacked up the LR3. I tested all the pins on the Transfer case connectors for a short to ground. There weren’t any shorts so I sent a follow up question to GAP asking about replacing the TCCM with a used unit. They provided the following guidance:
If you get one from another D3, it will only need calibrating.
-Menu->Calibration--Transfer Case, proceed with both items, engine running. They are done with the transmission in Neutral
So, I went on eBay and found a used TCCM from a salvage company that allowed returns. This cost about $120. I installed the TCCM and the battery then followed the calibration routine and the fault codes went away. I still have the incorrect VIN but the transfer case is working perfectly now. This was the first time I was able to drive the LR3 around the block with no red dash lights.
Cleaning
Since I had the seats and carpet out, I used a brush kit on my drill to clean the carpets and the seats. This worked awesomely! I highly recommend this kit to clean carpets and seats.
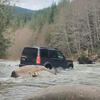
I was watching this video and wondering what that sound is coming from the Front Left tire? On the Bonatti Grey D3, it can be heard when the driver is in the cave, and going up the first steep obstacle. It seems like something is broken and limiting the forward progress of the vehicle? But it still runs and drives pretty much normally when the terrain response system isn't trying to apply a lot of torque. Any advice on this would be very much appreciated!
Picked up a couple of slim solar panels a few weeks ago, one for me one for a mate. Heading out tomorrow camping so got out and made up some brackets to mount it to my rhino rack, panel is 144cm x 66cm so uses about half of the width of the rack.
Also fitted a victron smart regulator under the bonnet next to the aux battery and ran cable under the A pillar trim into the engine bay.
Solar was a great upgrade for mine. I pretty much just run a fridge and charge stuff. In winter I have a diesel heater. The solar is more than enough to keep things topped off all day even in poor light. I also found that the aux battery is holding a much greater charge. The solar charger seems to have done a great job of reconditioning the battery. The only thing I want to add is another set of panel connectors in parallel to the roof one so I can have a portable panel with a long cable as I prefer to park in the shade on hot days. My controller is a Victron 75/15/ I had a 100/50 but it was just physically too large to cram in the engine bay box.
Solar was a great upgrade for mine. I pretty much just run a fridge and charge stuff. In winter I have a diesel heater. The solar is more than enough to keep things topped off all day even in poor light. I also found that the aux battery is holding a much greater charge. The solar charger seems to have done a great job of reconditioning the battery. The only thing I want to add is another set of panel connectors in parallel to the roof one so I can have a portable panel with a long cable as I prefer to park in the shade on hot days. My controller is a Victron 75/15/ I had a 100/50 but it was just physically too large to cram in the engine bay box.
75/15 is what i used, just the right size to fit in the space.I usually use a 125w folding blanket and looking at it yesterday i also thought off putting a Y connector to plug the blanket in when i'm parked in the shade plus i really needed another 10cm of cable to route the plug a bit higher to clear my sunroof.
I put an anderson plug on the panel to make this easy and also if i need to remove it for any reason.
Over the last two months I replaced the front upper and lower control arms, rear upper control arms, and rear brake lines with the LR brake line repair kit. This was all a result of new tires and 1.5� lift. Definitely a bigger job than I anticipated.
I installed a new battery sprayed a bit of contact cleaner on the terminals cleaned and a squirt on some of the harness connections.
Started right up but now when I put it in reverse both front left and right mirrors auto power so they are both angled down. As soon as I put it in drive they go back to where they were. WTF?
If you don't like it, in your settings menu is something along the lines of reverse mirror dip that can ideally be turned off or on.
I say "ideally" because I have turned Lazy Entry off several times and yet it continues to do lazy entry. Just to make life interesting, if I decide to turn the key before the seats and steering wheel have travleld to their driving postion they will stay in that spot and not continue to the driving postion. It's not a huge issue but it is annoying.


 la-2512152189032&abcId=9407521&merchantid=101701220&g ad_source=1&gclid=CjwKCAiA5Ka9BhB5EiwA1ZVtvGPX8iEG 7-uwreSzqucdYFs9FtEHq7kA6BSsoIOQ9honbZEKdk2ZcBoCtCoQ AvD_BwE