When you click on links to various merchants on this site and make a purchase, this can result in this site earning a commission. Affiliate programs and affiliations include, but are not limited to, the eBay Partner Network.
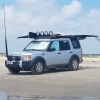
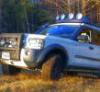
Sorry, just the hood blackout is new. It cuts glare from the roof lights. The dip is velvety black and works great. I just wish I could get the tape lines cleaner.
For fine line breaks with plasti-dip I used automotive pin stripe and the key is to pull while the dip is still wet.
HVAC fan motor started acting up 3 months ago. I bought a replacement back then, but kept putting it off as I was busy and the old only made noises "occasionally" (as in every time I started the car). Last night it started making a loud growling noise that was too loud to ignore even with the radio nearly all the way to max volume.
So today.....I installed a new HVAC fan motor that has been sitting on my self in the garage since spring. I figure that is 3 moths longer before I have to replace it again.
Now it is time to enjoy an adult beverage and think about something other than the Rover.... like tearing into the dash in my 2003 mini cooper to connect the fog and aux driving lights wire harnesses, .... but that can always wait until it is cooler as well....... I think.
did the rear passenger sway bar link this morning. that was sneakily a bigger pain in the *** than expected, mostly because the top nut has little clearance so I had to sit there going about 1/4 turn at a time with a ratchet
did the rear passenger sway bar link this morning. that was sneakily a bigger pain in the *** than expected, mostly because the top nut has little clearance so I had to sit there going about 1/4 turn at a time with a ratchet
Yup lots of room when you have the hub assembly out lol. Otherwise that would have been a pain in the butt
I removed my rear sway 50K miles ago and dont miss it. I can feel that its a little more tipsy with the spare on the roof, but nobody else notices. Removing it also improved rear articulation to the point I had to do some more trimming in the rear wheel well.
Not all today, but finalized everything this week finally. The new to me LR is just about ready to be a daily driver. (AAA membership renewed).
My goal is to make it as reliable as possible for some long road trips and see if I can take this thing well into the 200k mile range. Replacement of working parts costs far less than down time and getting stuck and having someone else do the work. Most of the parts were fine, but as I�m at 100k, it was time to replace.
Brake pads/rotors/sensors (including e brake drum pads), wheel speed sensors, front & rear upper and lower control arms, sway bar links, stabilizers, inner and outer tie rods, upstream O2 sensors, PVC valve, rear brake lines/from mid to rear of vehicle, fog lights, both tensioners & accessory belts, alternator, water pump, thermostat, spark plugs, filter, Fluids drained or extracted � Brake, front & rear axle, transfer case & oil, tranny fluid, antifreeze flush, Transmission pan replaced and upgraded with new one.
Parts were obtained from LuckyLLC, Atlantic British and Rock Auto. The only part that didn�t match was one rear e brake pad as the mechanical bits for spreading the pads was reversed. I was very happy with how much everything was exacting.
I will say for the most part the vehicle wasn�t too bad to work on. Previously owned an expedition with the 5.4 and anything mechanical under the hood (spark plugs) was an absolute nightmare. However, the control arms and having to cut them out to remove was an absolute PITA. But, the winner hands down goes to the tranny pan. Having done all this on jack stands, I had to unbolt the exhaust and remove to get the pan to slide out. Then saw that stupid tube for what felt like an hour. After that the transmission wasn�t accepting of my main pump for getting the fluid back in, so I used one of my cheap $2 hand pump that moves about as much fluid as you would get from a soap dispenser. After sitting under a hot running vehicle with exhaust less than a foot from my face for about an hour slowly pumping in fluid, I may just hire it out even though I upgraded the pan. What I wouldn�t do for a fill tube and a dip stick.
But it�s done. Last tasks is to get the power steering fluid replaced and test the AC lines and alignment. I did get lucky in that the previous owner had done the breather completed for the front diff. Also the T line for bleeding the antifreeze is completely gone. I looked everywhere and realized that its just a solid hose with no connections.