When you click on links to various merchants on this site and make a purchase, this can result in this site earning a commission. Affiliate programs and affiliations include, but are not limited to, the eBay Partner Network.
I removed the rear OME763 HD springs for the MD Terrafirma TF023V +2” springs. I’m also adding the shorter galvanized Disco 1 rear spring plate to give me another +.5" and add the Gwyn Lewis 4x4 Disco 1 rear spring retainers. The retainers are needed when installing the shorter D1 spring plate. It got dark and I ran out of beer so I’ll finish up the install this weekend.
Disco 2 vs. Disco 1 rear spring plates
Disco 2 vs. Disco 1 rear spring plates hight difference by .5"
The diameters and threads are the same for old and new bolts
Galvanized rear Disco 1 spring retainer and spring plate fits a Disco 2
Sizing up everything before installing
I also upgraded my wife's X5 grill to bling it out. lol
Last edited by JUKE179r; Apr 17, 2020 at 12:52 PM.
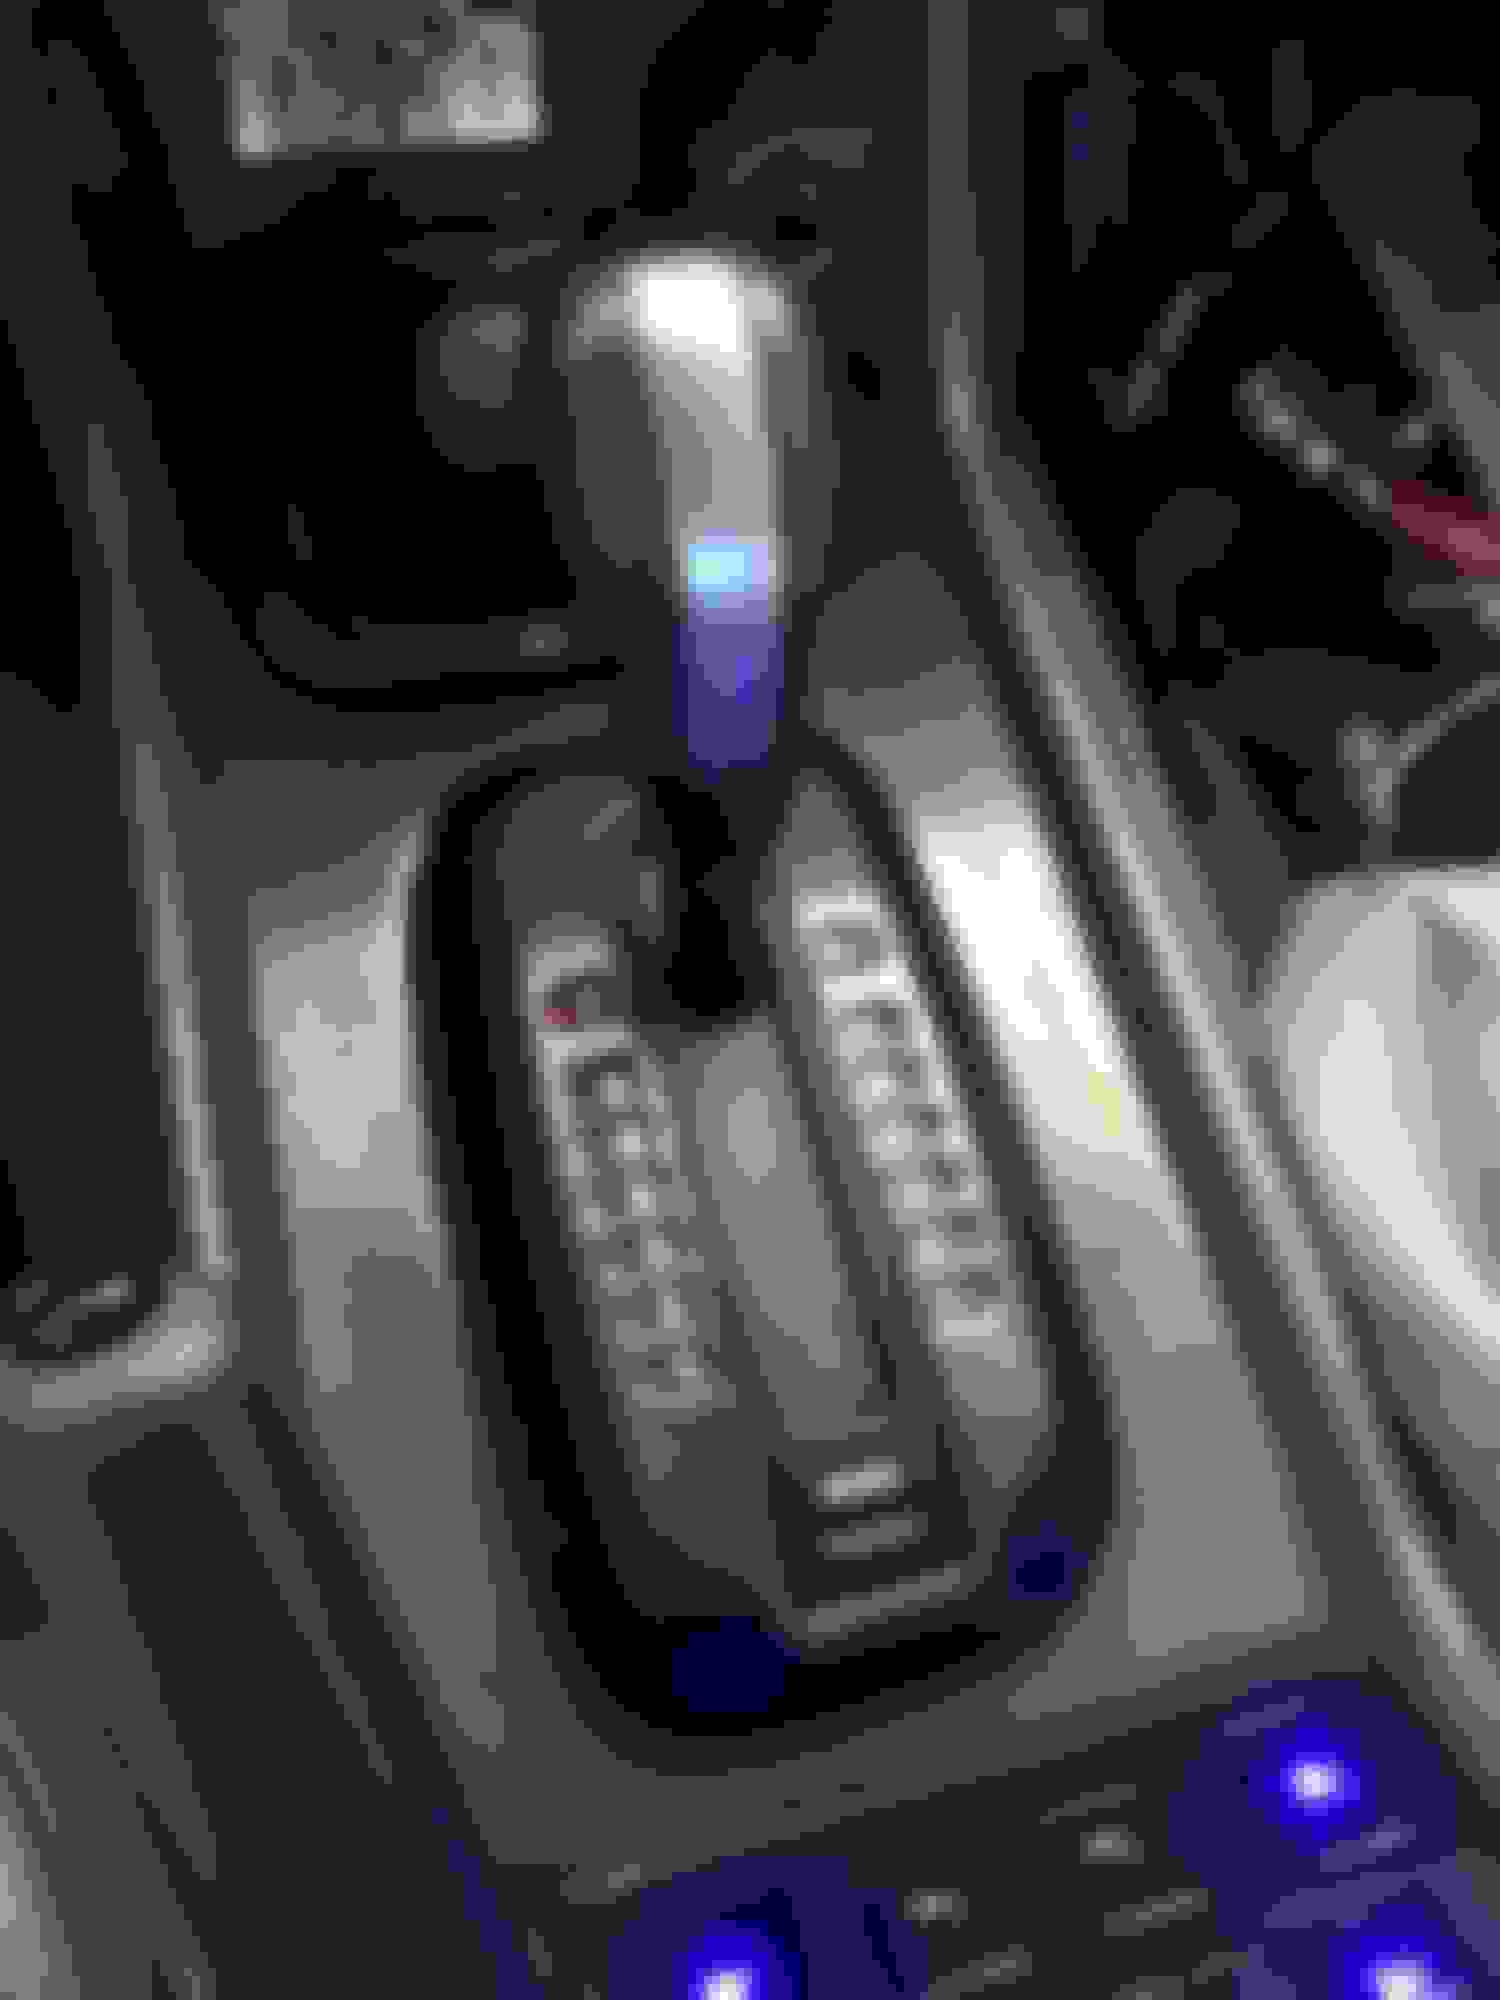
I received messages asking about installing an LR3 (or a Discovery 3 for our overseas brethren) auto gear shift **** with pics of the Disco 2 vs. Disco 3/LR3 *****.
You have to file down and curve off the Disco 3 handle tip from 7.02mm down to 4.04mm like on the Disco 2 handle tip.
Here is the YouTube video on how to do this for a bit of bling bling...
Still waiting on the refurbished fuel injectors and upper manifold gasket so I took the upper manifold off. Replaced the brake vacuum connector with a Saab part number 55557389 connector. It has the same dimensions and was bout $15 cheaper than a Land Rover part. I punched it out from inside the manifold with a 3/8� drive long extension and a 3/8� to 1/4� adapter at the tip.
Last edited by JUKE179r; Apr 23, 2020 at 01:43 PM.
I finally custom built my 10mm Taylor 409 HT leads that were originally for a Mustang, connected them to my new coil packs and added zip tie spacers as a cheap mod.
I tore the #5 cylinder coil pack rubber boot trying to install it so will be ordered next.
Cheers @Fastercat ! We'll see if my military crimping and heat shrinking skills are still on point once I install it all. Time will only tell once I fire up the V8. I'll have a fire extinguisher close by just in case. lol
I'm still waiting on my Fel-Pro VS50789R valve cover gaskets so today I took removed the viscous fan to inspect the all the pulleys and the serp belt. The belt still looks good but I found both the 80mm and 70mm pulley bearing are both wobbly even though I replaced them 3 years ago! I also found my AC compressor clutch bearing is wobbly and the oil pump pulley has some play at the 12 & 6 o'clock position but it is fine when I shook it at the 3 & 9 o'clock position.
Luckily I have a cheat sheet with US part numbers for the V8 pulleys and bearings (*** DON"T GET URO PARTS!***): - Tensioner assy: Gates #38245 / Dayco #89287 - 90mm tensioner pulley only: LR #131070 / Gates #36102 steel / Dayco #89054 polyvee (Bearing #6203-2RS) - 70mm idler pulley (near tensioner): LR #PQR500060 steel or Dayco #89052 steel (Bearing #6203-2RS) - 80mm idler pulley (between AC compressor and steering pump): LR #PQR101150 / Gates #36275 (Bearing #6304-2RS) - AC Compressor Clutch Bearing NACHI #30BG05S2G-2DS or Santech #MT2027
Finally after several months of having the CARRS4x4 door handle pin from @abran , I installed it today. The instructions from his website was extremely easy to follow to disassemble the door panel and install the door pin.
Honestly it would have taken me about 20 minutes to totally install the door pin but I ran into small problems from my end...
1) Have gorilla hands so it was hard from me to fit my hands inside the hole in the door to unhook the plastic piece from the connecting rod. I was able to get a pointy end of a scribe in there and unhook the connecting rod from the door handle assembly.
2) I didn't have a pin punch but only a tapered punch. I sprayed the area of the handle with penetration oil and punched the roll pin outward. Then I resprayed that same area again with penetration oil again and knocked out the roll pin the opposite way. The door handle pin easily popped out after doing this.
3) Installing the handle was super easy. The hardest part was finding out my driver's door card had only 4 of 10 door card clips to secure it to the door. My military attention to detail was pinging and wanted perfection so I ordered 30 of the door card clips in case I find more missing on my Disco.
Needless to say the driver's door opens, closes And locks perfectly. Cheers @abran !!!
I also took some Mother's aluminum polish and a green scrub pad to clean and shine up my intake manifold. I should have taken a before pic but I really didn't think I would have any good results. Now I think it looks better than before.
Older before pic...
after...
Last edited by JUKE179r; Jun 13, 2020 at 06:45 AM.
Yeah, the door pin job is not terrible...and makes quite a difference. Mine was quite sticky before it finally broke. Always had to pull the handle about four times before it would open. Replaced pin...opened perfectly afterwards.
I finally received and installed the Fel-Pro gaskets to the rocker covers. Very easy to do except when I saw how filthy the covers where on the inside. I thought it would have looked cleaner as I religiously change the oil every 5K miles with Rotella T-6 synth diesel oil. Luckily I found the 2 missing metal bushings that fell out from the old gasket.
Ended up disassembling the covers and cleaned them out with a half of bottle of LA's Totally Awesome cleaner that I bought for $3 a bottle from the Dollar Store online. They ship overseas!
I let the Awesome cleaner sit in the covers for 15-20 minutes to loosen up the grime and sludge. They cleaned up very well with a stiff plastic bristle brush.
Last edited by JUKE179r; Jun 23, 2020 at 05:23 PM.
That engine was very clean inside. I've seen some that just look like they've been in a 5 alarm fire inside the valve covers with thick dark black tar like deposits on everything.