What did you do with your DII today?


#532
 04-11-2013, 09:43 AM

#534
04-11-2013, 12:53 PM

Yes, I bought a hole saw bit from Lowe's and cut it. Had a shop do the rest. I took a piece of 3/16" hose... Slit it and made a a trim piece to protect/ finish the rough edge. Finally painted the raw tip black.
Last edited by Zonk872; 04-11-2013 at 12:57 PM.
#535
04-11-2013, 01:07 PM

Awesome tip...thanks. Mine look horrible and currently between houses so no garage or place to paint mine so this sounds like a good option I will be trying out tonight. That is the main eyesore on mine
#536
04-11-2013, 01:20 PM
Be patient with it. It takes a few coats for the color to set in. Shake it good too. I apply it to the door handles, rear bumper caps, rear license plate trim (top piece).
#537
04-11-2013, 08:10 PM

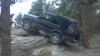
Rock Crawling
Just finished buying the last of (I hope!) the parts for this round of repairs. Engine has been pretty much taken down to the short block. Getting ready to have it all put back together.
The block and rotating assembly are in awesome shape, as are the heads.
I will have:
New HGs
180* thermo
New radiator
New fan clutch
New timing set
New front cover (oopsie with the old one)
New water pump
New front oil seal
New serpentine belt
STI 8mm wires
Bosch Platinum plugs
Green 50/50
New expansion tank cap
New TB heater plate & gasket
As well as all the necessary gaskets and maybe a few things I'm forgetting. It's going to be like a whole new engine!
Up next is rebuild rear drive shaft, replace cargo door actuator, and some wiring. Oh, and the new snorkel and cable for some homemade limb risers are in the garage.
#538
04-11-2013, 08:13 PM

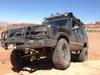
Mudding
Join Date: Feb 2012
Location: Park City, Utah
Posts: 183
Likes: 0
Received 0 Likes
on
0 Posts
Finished my head gaskets today.
She runs great. No ticks or smoke.
Total cost $560
Atlantic British Gasket kit and TTY bolts - $240
Rotella T5 15W-40, Peak antifreeze, Champion RC12 copper plugs, Mobil 1 M1-301 oil filter - $90
Machine shop resurface - $80
Silla radiator from Genesis - $130
Front crank seal - $20
Already had a new thermostat, hoses, water pump and cap. Already had STI 8mm wires.
I used my own torque sequence as I didnt trust the spec 15 ft/lbs-90�-90�
I used 25-50-75-80. I did this because of the amount of material that was taken off the heads and horror stories about stripping threads with the spec sequence.
I'm glad I did as all the bolts started to yield at 75 ft/lbs. The final 80 ft/lbs was just right. As I was watching the angles as I torqued, I feel at least 6 bolts could havee broke or stripped the block if I had followed the spec torque sequence. I'm not saying you should do this. I'm just saying this is what I did and it worked for my motor. Do whatever you want.
Cheers!
Last edited by 909wheeler; 04-11-2013 at 08:18 PM.
 anyway no fun this weekend
#540
04-13-2013, 01:40 AM
Three Wheeling
